This script is for the Spring'11 classes at Community Colege of Philadelphia. Class scripts are in existance since Summer II 2009. To see previous scripts, click here.For Lew Neumann. The Yanomami Indians
The Spring 2011 term for Community College of Philadelphia (CCP) started the week of Jan 17, 2011 (Jan 18 was the first day). This web site deals with the two classes Marc Rauer is teaching: The Saturday 9-12AM OA106-18 and the Wed/Fri 6-8:30 PM CIS103-36. If you want to contact Marc Rauer, you should do so through his Email at 777rauer@voicenet.com, mrauer@ccp.edu or use the form below which is directed toward 777rauer@voicenet.com. Also, from a previous class, pictures were taken at WERC and you should be seeing these around this text.
As indicated in class and on this site, students have to enroll on the snap2007 web site. On this, students get availability to tutorials, but even more importantly, your Word test will be there for you to take outside of class. To pass this course, you must take the Word exam and therefore have to enrolled in the web site. Use the buttom right of this for a tutorial on enrolling:
There are requirements to take this class as you can read in your syllabus. One is to take the tests. The first test is online using the snap2007.emcp.com web site. When you buy the book you will get an envelop about snap2007 which includes a booklet. On the inset of the booklet will be a code made up of 8 letters. This is your activation code. You need to also know your enrollment code and this is :
For OA106-018: it is lessons-aluminium Note:You must include the hyphon (dash)
For CIS103-036: it is fume-tycoon Note:You must include the hyphon (dash)
To enroll, start with snap2007.emcp.com and click new student
Fill in the information. But, consider the following: use a password that others do not know but you are familiar with. Use an Email address that you frequent regularly. You should know by now both the activation and enrollment codes
If you get this message, you have been enrolled. A confirmation will be emailed to the email address you indicated
If you try to get on and get what's above, you are using the wrong browser. Switch to Microsoft Internet Explorer 6 or 7 or 8. With 8, you may have to make some adjustments as indicated below.
If you are on Internet Explorer 8 and are told at any stage that you are not compatible, you can run IE8 as IE7 thrugh the following measures. Click the page button on the right. One option should be compatibility view settings. When you click that a dialog box shoud appear on the right (as opposed to this picture, the context menu for page will disappear) and you should click the bottom check box
While not at the moment, your account should provide a series of tutorials and you can see an example of this above from last term's class.
To the right is a tab designated as exams. Again, this is for last term's test but this is what you would be navigating through to take the test.
Click the button above to hide this tutorial
I promised both classes (and two people I had coffee with in the Valley Forge Barnes and Noble, that I would put the following two tutorials on this web site for the Spring '11 classes.
For the Barnes and Noblese - and any students dealing with resumes -
. This comes out of a true case several years ago involving one of the people at Barnes and Noble. In addition, not indicated here on this resume, but apt to remind the classes and everyone using Microsoft Word, is that there are hard and soft ways to affect people's eyes on your documents. But, all of this must be done in moderation. Something continually done, like bullets, bolding, numbering, bordering, etc lose effectiveness when done excessively.
The origins of this exercise are kind of cute (although aggravatig at the time) but the emphasis is how to condense a letter.
Your instructor at one time dabbled in real estate. He did meet a lot of interesting tenants. Probably one of the most interesting couples is the subject of this letter. The husband, through his job, was well connected with real estate lawyers in my county and it was apparent that this letter would be read by several willing to do a for for this couple. So, who the letter written to: in essence some unknown lawyer. It was important to direct the lawyer's eyes to what I would do if this was taken to court
We start with the text involved in an answer to letter asking for an explanaion of charges leveled against an escrow account. Click here to see this document
Since this was not a friendly letter, I felt that I could pull out all the stops in condnsing this to two pages. But, there is one inclusion that would take up quite a bit of space and that is a digital picture of Tricia's art on the walls. YOu can see this picture (and save it where you need it to do this problem) by clicking here.
So, what was the final result. Click her to see this. Notice that we have takn slightly more than 2 pages of text, aded a icture and created a document that sits within 2 pages comfortably. I think you would also agree that the document looks better and accomplishes what I need, directing eyes to what I'm emphasizing - that any appearance in court would be expensize to this couple and any lawyer stupid enough to try anythiong would have their head handed to them.
You can click here to see a microsoft word document that describes how to change before to after. Or, if you want, there is a link to an htm document that attempts to do the same thing by clicking here.
This course has changed over the years and in previous years I concentrated on using Word to create a resume. It's still an important issue. To do a professional one, you could use tables. Below is the material we used in class for the previous versions of word. We will modifiy the procedure for altering the resumes for this version. But first:
Laura B is a real person. She tried to do her own resume given that she had a job interview the next day and would present the resume at the perspective job site. Click here to see this resume created by Laura
Now, what's wrong with this resume. Let's list the problems:
Header is not centered
Not real bullets
difficult to read
Too far down as far a time history
Now before we look at the question of change, let's discuss setting up a history of jobs. Everyone has been to grade school and to high school. It's probable that most people have been baby sitters. Think how many people have been cub scouts, brownies , girl and boy scouts. Certain things should not be added to a resume. Educaton is important and colleege must be indicted, but if you are seeking an administrative job, should you add that you went to cosmology school. Maybe but probably not. You tailor yur resume to whom you will talking to, but probably they are not interested in grade or high school.
As you get older, another factor comes into play. Maybe you have been working in the labor force for thirty years. Does your experience thirty years ago apply today. Probably not. Probably you were dealing with 30 year old tchnology which canno be found anywhere today and is irrelevant to any work you would do at present. THe people you worked wth 30 years ago probaly are not even with that firm, may have retired or relocated.
Your instructor would be a perfect example. He begain programming as a college student in 1968. He could set up 10 pages worth of previous jobs and experience. However, he limits himself to the last 15 years and this is the time of Windows accendancy. Even in this he does not include every langage and skill he used as many of these have become obselete. from your instructor's point of view, it is important to look current and deal with those types of issues than look like a technological dinosaur.
Most people would agree that this second one is better than the first. Why?
Header that's centered
Education that is meaningful to the reader
Consistent layout of jobs
And, the way that this is set, the reader's eyes are trained in what to look for. You will remember that I emphasize that you are the controller of the reader and this is an example for as soon as the reader can figure out the first job contents, the eyes now can easily handle the rest of the jobs
Until I change this to a Word'07 oriented tutorial, I will allow you to see a document that indicates how these changes were made. Remember that this is in the previous versions of Word. I hope to have this changed to the '07 version shortly. So, click here for the documentation on how to change these
Note:Enrollment code for CIS103-036 is fume-tycoon
For 5/6/2011 we have the test. Here are the files that we will be during the test.
I was checking the results of your test. 88 was the high and the next one after that was 87 which will be set as a hundred (100%). The 88 becomes a 101 and you can calculate your result by talking your correct answers and diving by 87 and multiplying by 100. An 82 corresponds to a 94, a 76 corresponds to a 97, a 70 corresponds to an 80 when rounded.
As we gear up for the excel final, I have activated several excel tutorials on the snap site. Please remember, though, we are taking a test created by me in class. We still have not decided when as I believe we can take it either on Wed, May 4th or Fri, May 6th. Below this is a link to see prior excel tests which would not be a bad idea to visit as we get closer to the final.
Previous Excel tests, previous Word tests (although yours will be on line), and previous powerpoint projects
This version, The Benchmark series, has been specially designed for this class at CCP. The suthors are Rutkowsky and Rutkowsky who I believe are sisters who teach at a college in Oregon. The publisher is paradign/emcp.
We are interested in the books for 2 reasons: as a reference and as a entry to the publisher's web site designated as snap2007 and accessible at snap2007.emcp.com
The intension of this course is to use the snap2007 site for your Word test, a computerized test you will do outside of class. To be able to do this test, you will have to be able to access and use the sanp2007 site. This can be done in 2 ways:
Purchase of the books in their wrapper (new) should provide you with a pamphlet that contains a code to be able to register on this site. Next week we will attampt to use a student's pamphlet and code to register them on the site in class so that you can see this.
You can purchase a code from the publisher without purchasing the book. I am told that with a credit card the code can be emailed to you. The telephone number for the publisher is 1-800-535-6865.
In addition, we must discuss the problem of obtaining the software used in this course, either office 2007 or office 2010 although officially we are dealing with office 2007.
Here are options I can find if you do not have this software already.
You may (and you don't have to) use my supplier for acquiring Office 2010. THe preofessional version which includes outlook and Access and the applications we will be studying costs $95 and can be applied to your computers twice. If you want to go this way, contact Juishi Dian at Apex computer at 610-695-0695. I want you to understand that Juishi is my supplier of computer equipment but I am not involved in any way, especially monetarily, with any transaction that you have with him.
Another possibility is accessibility through the department but you would have to visit C3-1 in the commerce and industry building on main campus to effect acquisition of this software. If going through this route, call Sylvia Gaines-Henderson, the secretary of the department, at 215-496-6134.
You can also bring down a trial version from Microsoft's web site but it does get a little more complicated. A code is Emailed to you and then you can download using to code to activate the software. I believe this is a 30 trial which may be enough time per this class. Below, are pictures of what to do although I had to stop when we got to the the actual request of a pass code. Microsofts web site can be accessed by clicking here or accessing www.microsoft.com. Once there click the office tab, select office trials and then select try it now (or you can buy it) to get you to the point where Microsoft asks for a Email address. Below are screen saves of this.
Lecture for Feb 11th, 2011
Here's what's planned.
We will take one student and myself (and maybe one more) and register each onto the snap2007 web site. I will use 'joe student' as an Username and 'abc123' (if allowed) as a password. You are allowed to use this user name and ID until you get one yourself. Understand that you can't take the test using this user id.
In doing this you will see the tutorials already being established for your snap2007 login account. These will automatically come up when you register and use the enrollment code 'fume-tycoon'.
Above, before the CIS103 button, we have an example of formmail. We all will use this today so that I can create an Email list. You are required to do this as I am using your Email to mark attendance today
This formmail is a convenient way to contact me even if you do not have an Email program available at the machine you are using. It does not work for attached files and your instructor will show an example of sending an Email with an attachment. Your word test will not need this but the excel and technology tests, not to mention the powerpoint takehome, will require you to do this and sometime in the future in this course you will be given a tutorial for you to do and more info on this.
We want to discuss the various options of office just for your info. We touched on this on Wednesday but we want to make sure you are fully aware of what an office suite entails
We want to discuss file operations in XP and other operating systems. In the past, this course allowed the instructor to spend time dealing with this and interacting with you. We don't have the time today. I will very quickly (and without your input) show several features about files and folders. One thing, though, a filename is made up of a name and extension and you will see examples of this.
Extensions have changed between Office 2003 and Office 2007. We want to let you in on this and discuss the question of compatibility between all the various versions of the office suite
We want to open Microsoft word and look at it when no document is inside the word buffer. What changes are there between the Office 2003 version of Word and Office 2007 (and 2010). If you are dealing with 2003, there will be a learning curve necessary to get up to speed on this new version of word and the only way to do this is to practice using Word 2007. If you have started your word career with word 2007, you already have gone through this learning curve
If we have time, I intend to add an icon to the quick access toolbar allowing for the use of autotext which is not supported automatically by this version of word. In doing so, we will see a new aspect of word designated alternately as building blocks or quick parts and you will see some of the power that has been added to this system
Lecture for Friday, Feb 18, 2011
Let's open Microsoft word. We are dealing with the 2007 version in class while many of you are dealing with the 2010 version outside of class. We will attempt to mention both but keep in mind that the schoolswitches to Office 2010 next term, Fall'11. Below is an annotated view of what we should see as we open up the program
Let's discuss several of these things that we see. The page is dominated by the word processing buffer where we put the data. Data in this case is words making up a document. This is verified by the title above designated as document1. You should understand that MS office allows for a launch of an application for Word and few other applications. Any file opened that meets that application are attached to it automatically while the launch is active. In previous versions, (like the one in 1994) it was possible to have 2 separate launches going simultaneously but not possible today. Word, for instance, deals with doc documents similar to what your operating system does with executable file. This is called multiple document interface and your operating system responds by indicating the document at the bottom in its status bar.
We want to look at several things today. If I did not do this last Friday, let's look at the individual tabs of the ribbon. And, speaking of the ribbon, it changes depending on the number of pixels on your screen so it is possible that your instructor's lap top will look different than what you are seeing on your machine in class and what you will b e wseeeing at home. Understand that everything is available to you. The question is how much is visible and in what way as you look at the ribbon. In Word 2007, there are always 7 tabs with an eighth possible though options available to you. But, the ribbon adds tabs pertaining to context in terms of what you are doing with microsoft word on a real time basis
In Word 2010, there is an added tab and this replaces the microsoft vista/office symbol that we are seeing on the screens at school. We will deal with this symbol shortly.
Notice next to the symbol is a type of tool bar and this is the quick assist tool bar. 3 icons are defaulted here automatically. One is undo and Microsoft has a great undo feature as you will see at some time while working in Word. Notice that i have said only in Word. Do not extend these sentiments to other Office applications. Access, for instance, has no undo when changing tables or databases. Excel has a guaranteed one undo although sometimes you can luck out and get a little more. Word, however, is pretty good and there is a corresponding redo feature that allows you to recover what you have undone.
Today, if we didn't do it, I will show you how to add icons to this quick access toolbar. You can add any operation that exists on the ribbon at the moment. You can also add operations that didn't make the cut - those dropped that existed on the 2003 version of word.
A note about the title. Notice that our document as we came up is designated as document1. This is the default for new documents. Additional new documents during a launch get the designation of documentx where x is succeeding integers. You should not save any document under the document designation as you run a risk of destroying this document by a subsequent save.
Those familiar with previous versions of Word will notice when they first use this version that something called the ruler is missing. That's ashame as the ruler has many features. We will deal with these features as we study Word but there is an indicator top right to turn this on and off. Notice in turning this on two rulers show up, horizontal and vertical.
Let's turn our attention to the bottom. Similar to your operating system, Word has its own status bar. This has been significantly upgraded with this version. To the right is zoom control. Moving zoom left shrinks the document and you can see multiple page. Moving zoom to the right magnifies the document and is very useful for crowded documents - and these are the type of documents your instructor tends to deal with. While I would keep it off, you can turn the percentage and the control off and we will show you how as we discuss this status bar.
Notice on the left of the status bar is several figures pertaining to where you are in the document. This has been altered since the 2003 version but you can with technique indicate much more than is shown at the moment. To the left of the zoom control is a group of icons which indicate 'views' of the document. At the moment you are in print layout and let's leave it at that until a further discussion later this term. Finally, you probably can see a pen writing on paper to the left on this status bar. This is a version of the spell checker giving you an opportunity to correct spelling in a different way.
The secret to all of this can be shown by right clicking the status bar and you will see what's on the right of the picture above. There are a set of groups (separated by separator lines) and each group has one or more entiries. Either data or on/off isindicated to the right and check marks indicate what can be seen on the status bar for the most part.
Let's try a few of these. Click line number and you will see on the left that line number is now added to the status bar. Click it off and this disappears. Word count would act the same.
Now, let's try a few more of these so that you can becomec familiar with what we have here. Click track changes. Notice that an indicator shows up on the status bar. That indicator should still show off. Keep in mind that there is a difference beteen activating an option and seeing the status of the option. The check marks pertain to use on the status bar. Once displayed on the status bar, clicking the icon may change the status.
Some of these indicators respond to what you are doing with your computer. Again, right click the status bar and then click caps lock. Don.t see anything yet? look at your keyboard and isolate the caps lock key. Do you know what this does. When activated it forces your keyboard into upper case mode. Letters by default are capitalized. Use of shift gives you small letters. Now, let's depress the caps lock key. Now, your status bar indicates that you are in caps lock. Hit it again and the caps lock indicator disapears. Some of the options such as selection mode pertain to advanced usage of mouse clicks but your instructor does not use this and is not an advocate of this type of mouse selection.
By the way, notice that you can select not to show the zoom control or zoom percentage but again, if it's me, I would keep it around.
Now, this is getting somewhat ahead of ourselves but this is the place to show this. If you do not have knowledge of the spell checker and how it normally works, please ignore the following indicated here and in class. But, for those already familiar with the spell checker, I will show you a new option that can be used through the statis bar. I am going to type my last name which the spell checker will consider as an error. Next, instead of and, I will type axdm and then some junk. This is what I am going to type in the word processing buffer: Rauer axd ffffffggggg.
Many of you know that Word indicates what it considers as misspellings by jaggeed red lines and each of these 'words' I typed are so indicated. Right click rauer and you will notice a context menu that includes possible corrections to this word. Similarly notice that this is true for all three words. This type of spell checker correction is at variance for what most of you would consider the spell checker (if you've had previous experience in Word). Ny the use of the spell checking icon on the status bar, you can cycle around your document showing the context menu possibility. Click that icn as I will be doing in class to see these possibilities. The picture on the right shows one of these operations in action. By the way, similar to the normal word checker, clicking on a possibility will change your document.
Let's deal with the file and options portion of Word. On the left is what we see when we click the file tab of Word 2010. To the right is what we see when we click the office/vista symbol in the 2007 version. There are a lot more options in the 2010 version and this is where the major changes between the versions has occurred. For this class, we must concentrate on the right. Notice a set of options on the left of the 2007 version, a list on the right part of the 2007 version and several butttons below including options and ending word. Let's start with ending word. WOrd considers a change to a document while in the word processing buffer to have occurred if a key (other than ctrl, alt,shift by themselves) has been hit. It is possible by undoing or retyping that you have hit several keys and the document has not been chenged. This is to your mind, not Word's. As soon as the first key was hit, Word considered the documet changed. When you exit word through this button, or the close designation that is the last indicator on the list to the left, or the x of the controls immediately top right, word will determine which of your docments have changed per its theory. You will get the option to cancel this closing and return to what you were doing in Word, save the particilar document or not to save it as Word closes. Unsaved document are exactly that - they are not saved to media and they are not considered to have been interrupted giving you the ability to recover them somewhat.
How about the list. On your machine this is blank. Remember, the school machines delete everything considered as potentially virus enabling when brought up in power. On my machines at home and on your machines at home this is not occurring and what you would see in this section is what is called a pick list. This is nothing more than a list of the last few ms word documents that you have lloked at using this version of Word. By clicking the name, you will bring up this file from media into Word.
Let's discuss new, open save and save as. In bringing this up today, we did a default new. This is a new document. Nothing exists pertaining to it on media. Here's where the default name documentx comes into play. If not dealing with a new document, the only other possilility is to open a document from some media. This is open. By default open will show all possible word documents in all possible word formats. You already know this includes doc and docx. But there is rtf files and template files that will also be shown. You have the ability to select the location (folder) from which to select a document. Different views are available also and these correspond to what your operating system considers as a view as Word takes its cue from your operating system. There will be differences from what youare seeing on the XP machines in this class and your vista and Windows 7 machines at home.
Save and save as have a similar bent to them as does new and open. An already existing document on media can be destroyed and then written over with a save. This is what you use when changing already existing documents. Save as briongs up a dislog box to verify that it should save the document. This is generally not useful when doing straight modifies but is very useful in new documents or documents where you are changing the location they reside. Please keep in mind that Word handles your extensions. Combo boxes allow you to choose what type of extension you want and this is attached to the name when you save. There is no need for you to do this. Note however, that a change from docx to doc will force the program to determine whether it can fully save in the older version of Word. If not, you will get an option to cancel the save or accept the save with changes made making the file compatible with older versions of the program.
Now, before we go below the separator line, let's look at word options. It is here that we will spend most of our time today. This is similar to the tools/option menu item in previous versions of word and savvy users can get word to act more appropriately. Now, in doing this, your instructor is aware that novices will not understand what is happening. If a novice, just bear with this and we will shortly get back to subjects that you need for this class and tests.
Above, we have a composite of two of the dialogs boxes that options affords us. Up on the first, I want to show you where you can access something that advanced users of word need. This is macros and the visual basic for Word programming language. Although you may not be familiar with this, Word, excel, powerpoint and access are really prtogramming languages wrapped neatly to make you believe them to be your applications. Internally, a set of programming constructs makes Word do what it does. uou can click the developer chec kbox and an eighth tab (nineth in 2010 Word) appears. For those of you familiar with macros, here they are and there are buttons to stop, start and edit macros. Notice the button also for Visual Basic. There are controls that you can use to make your Word document look like a windows program and in previous classes, when I have had time, we've taken an hour and done a very simple addition of controls to a word document. This gets you into event driven software which is boring to most people but interesting to a small subset of people, generally known as programmers, of which your instructor is one (possibly unfortunately)
Fourth lecture: Feb 23, 2011
Below this, we see some options for a set of things that in previous versions of excel involved spell and grammar checking. Sometime during this term we will delve into the grammar checker. You probably at this point have a different feel for it that I although I do hope to change your opinion. But, in the interim, I want ot discuss modifications to the spell checker. You have already seen its use through the status bar. We will invole it, revoke it and then invoke it again. I hope to show you how custom disctionaries are maintained. In additin, of importance in industry, readability statistics will also be indicated although this makes more sense with a real document.
We also want to discuss the save portion of this. This includes the ability of the system to recover. You can set parameters for this. Below, is that section.
The location for normal saving is set by your operating system. In Xp, this is the my documents folder for the user section of the disk drive. Vista uses the folder designation Documents and Windows 7 also uses documents but applies libraries.
Let's also look at autorecover. This is set to 10 minutes by default. Your instructor will explain what this means. But, how does it work. Codes are put out to a file designated as $ and the file name. These codes indicate changes to the underlying doucment in use. Every 10 minutes (or whatever you set this to) this is overwritten. At the end of a normal termination this file is deleted. If an abnormal termination, the file remains. When Word comes up, it is looking for files starting in $ and if found will set a panel to your left indicating as such and you have the opportunity to modify your file with these changes.
We want to finish up with the customize section. If I do this right (which means I have enough time) you will several things about these versions of word. Here's what we are dealing with
Addition (and deletions) to th quick access toolbar for previous commands and existing ones
How something called autotext works
Use of building blocks
Look above. I am in the customize section and have clicked popular commands. To the right is none other than the quick access tool bar. Notice that 3 items are in there already and these are the three items you see up next to the vista symbol. Look at keyboard shortcuts customize. Your book makes a big issue of these shortcut keys. One might think a tremendous amount of research was involved in this. Not really. Click this button, click office tab and then file open and you will see what is below. All of these shortcuts can be so found. The hard part is writing them down
Now, let's click on commands not in the ribbon. Go down and find autotext. Click on autotext and use the add button to put this into the quick assist menu. As you add this, you may already be able to see this icn being added to the quick assist tool bar. If not, you will see it as you exit this section of the program. Now, write something. You can use the catch all of all college students: Hi, Mon and Dad, Send money. Highlight whatever you wrote and click the autotext icon on the quick assist menu.
Now, besides invoking and using autotext in this manner, we can see it somewhere else. Click the insert tab and go to quick parts. In this system, it seems as if the terms quick parts and building blocks mean the same thing and you can find a series of these here including what we have created in autotext. And, if you find the autotext building block that describes our inserted text, you can invoke it from here.
We should answer one more question:How is this saved. Microsoft uses several templates to save default info for the word application. One of these is normal.dotx which holds default info on font, point size, margins, etc. Whether this template is used for quick parts, I don't know. But , you will get a dialog bax asking for a save of the template in question when adding, changing or deleting a quick part and your answer of yes assures that you will see this quick part when you enter Word next.
Before we continue with several other definitions pertaining to your use of word processing, could we return to proofing. The autocorrect button above leads to what in the past versions of word was designated as the auto dialog box.
Fifth lecture, Feb 25, 2011
Note: We had set autocorrect to work on your system on Wednesday and then, stupidly, I went into an interest of mine: the history of technology. This works well on 4 hour classes but not on our 2.5 hour class. So, the first part of this lecture, which I am not changing from Wednesday, will be done solely on the projector and then when done, we go into the Seuss document
To the left is autocorrect section. Some of the check o become useful from time to time. I don't know if you have tried to uncapilize the start of something. it is difficult and you could turn that off by unclicking this check box. We are interested in a higher level - what is corrected automatically. We will give you a speciific definition of what a word is defined as in word processing but your understanding of language should give you an intuituve feel of what this is. Notice the autocorrect table: As you type a word, this table is accessed and if that word is found, the corrected spelling is applied. This is over and above the spell checker and works automatically. Let's try an example. Type in febuary and supply the real spelling of February. We will test this in a bit and what it does.
Let's also mention autoformat which has a few options. Smart quotes are useful although you have to watch out if you are using Word to supply text to internet programming programs as the smartquote will be misinterpreted. Another interesting feature is the use of a character to replace 1/2 and 1/4.
And this brings us to the beginning of our study of word processing. What are we processing in the word buffer? Fist, understand that this system is sensitive to language since it is sold around the world. So, besides language, the machine and program also inquires about the society that you are in. I assume language changes are relected on the tabs, tips and controls. The society may indicate right alignment preferences over left alignment.
Assuming we have the language, English in US, for our case, what is the smallest componnbt we deal with. If you are thinking a keyboard key to hit, you are in ther ballpark. 99% of the smallest things we enter are done through the keyboard. However, in the insert tab is an option called symbol and it provides for the kind of entry except not by keyboard.
Where by keyboard or symbol, this is called a character. Characters include the enter key and the space bar. In the olden days, this could be equated to a specific pattern of 8 bits. A bit is a designation for a binary digit and is either on or off (or 0 or 1). Today, some systems use 16 bits to derive something called unicode. Whether 8 or 16 bits, this is what is represented inside your machine as a character.
Now, one or more contiguous (together) charaters beginning or ending with a space or other type of beginning or end is designated as a word. Characters and words are important for character commands. We can prove this to you, Remember February from above. Let's create a word in the word buffer. Whatdo I need to do this. Several contiguous characters followed by a blank will do. Type in febuary (remember we are spelling it wrong to test auto correct) and hit the space bar. What happened? If you have put the Febuary to February changes correctly into autocode, the change should have occurred. We can conclude that autocode is oriented to characters.
Now, let's continue with our definitions. A set of words ending in punctuation is a sentence. This is similar to language. Now, what would you call one or more sentences that express an idea. Most of you would say paragraph. In word processing, there is an easier definition. The hitting of the return or enter key. Two such hits creates null paragraphs which are really not counted as far as Word's statistics as you will see.
So, in our document right here. hit the enter key after the space in January and then hit the enter key again. To see what you've done internally, on the home ribbon move your attention into the paragraph group and right top hit what looks like the backward p. You should see something that looks like what is to the right.
You should be seeing the letter February, a space represented by a dot in the middle vertically and the backward p's afterward.
Your system also keeps track of every character you hit vbreaking it down between a real character and a spacebar. it keeps track of the nujmber of paragraphs although it will not count two successive enters in this total. You are already aware the it is keeping track of the number of words given that your status bar indicate 1 word. You could right click the status bar to get a little more info but it would be better to access all the statistics word is keeping.
Click the review tab and the 123abc button and you should see something similar to that is on the right
One major difference between character and paragraph commands if what you have to indicate by your mouse. Character commands to work well need you to drag your mouse over code and highlight it although if you do not do this, you are setting the system to work on these commands when you enter text later at that point. Now, in our case, let's highlight all the letters of February by dragging our mouse startijng from the F and moving to the right or from the Y and moving backward. Click the B for bold. That B should now be yellow and new characters (representing February) should have appeared. Do you see that? The characters are wider. Next, ;et's do the i. Same thing. The I is yellow. The characters have been replaced with characters that are slanted. unselect these characters and do the same with your selection of b and i. Should be no difference at the moment. If you were to enter some sharacters where you did the most recent b and i, they would enter unbolded and unitalicized.
Alright, so what is a paragraph command. If working on just one paragraph, there is no need to select text. Let's do that by clicking anywhere on that paragraph. In the paragraph group you should see the first icon of the second row highlighted. click the third icon. Notice the entire paragrah has been right justified. Click the between the two (the second control) and notice it is centered. Can you mathematize what just happened.
Do you see the difference between a character and paragraph command? Now, let's work on another character command. This is cut, copy and paste through the clipboard.
First, what is the clipboard. It is a unique location in your computer that window oriented programs all can access. Cuts and copies place pictures or text (as you would call it) on it and this info can be retrieved by paste. Below, we have clicked the bottom control of the clipboard group. This will differ depending on operating system. The 24 that you see if what vista can hold as per the clipboard. I don't believe this is the capacity of XP but we will see. What you are looking at the the system clipboard.
Back to you in this class. We need a document to work on and therefore click here to being up the Seuss document
To the right is the document and I have included the statistics for this. Does this seem normal to you. It shouldn't based on the definition of paragraph indicated by me as I was working in autocorrect. We have to determine what is going on here. Now even before that, what would you call the line that reads: What is Dr Seuss wrote technical manuals. Is this a header.
The header question is quite clear and is no. You language instructor might tell you differently but in MS Word, headers have to be in the header section of the document and this is not. WHat is the header section. Double click at the top of the document between 0 and 1 inch (or enter the insert ribbon and use Header). You will see a change up there. THis is the header section. Most of you probably know this but in this version you can create substancially higher level headers than in previous version of Word. That's for the next document. To start us out today, let's cut and paste this first line into the header. I did a cut and paste (and remember this is a cut and not a copy). Let's do something similar to put this into the header section. Once done with the cut and paste, one should ask whether the formatting makes sence? As the owner of the document, you generally want readers to start at the top and work their way down. But, human eyes are attracted to darker objects. If my darker objects are lower on the paper, the eyes are distracted form what I normally would want. Therefore, let's determine the font and font size and increase the font size of the header to have the reader read this in a normal way. Let's increase the font-size.
While in the header, you will notice that the footer is also available. And, because the system senses that you are in the header and footer, by context an additional tab has appeared on the ribbon to deal with headers and footers. On this ribbon you may already notice several increases in technology which we deal with. In the footer, let's put in a page number. Click page number, select bottom of page and you can see templates pertaining to these. First, where are templates coming from. From quick parts which we have looked at before. For your footer, let's select one of the triangles at the bottom of the selection. Below, we see this
Sixth Lecture: March 2nd, 2011
We pick up from where we were on last Friday, but let me remind you that this week we have a lecture on Friday, the 4th and then spring break cancels class for next week. If you haven't set up your snap account yet, please do so next week. Keep in mind that snap2007 runs best on Ie6 or 7. marginally on IE8 but you can easy convert IE8 to act like IE7. Any other browser (Firefox, chrome, safari) will not work.
We need the file in a similar manner as when we ended on Friday. Click here to access the file as we left it. We were dealing with headers and footers. We had put in a graphic for a footer (I've used a triangle). I believe we were talking about cut/copy and paste and I don't believe we had moved the first paragraph into the header which we will do first. But I did mention the use of the clipboard and how text and graphic data can be put on it and accessed using it.
So, if we didn't do it, let's ve the first paragraph,"what if Dr Seuss wrote technical manuals" into the header. To do this, use copy and paste. Drag your mouse (or highlight the text in another way) over this test, use cut either in your home tab clipboard section, or through your right mouse click or ctrl x to delete the original text and activate your header section and use the paste control close to the cut control in the clipboard group or again your right mouse button or ctrl v
We have some other things to do in the header/footer section but we would be remiss if we didn't discuss styling at this point. English readers as a society rwad from top left to bottom right. This is the typical way a reader's eyes work. In using a header and footer, you want to emphasize this. Therefore, the standard practice is to use a higher pointsize in the header than the body and the body point size is generally higher than the point size of text in the footer. As an example, the use of 14/12/10 works well or 16/12/8. So, let's emphasize this header by setting it to 14 (it should be Times Roman 12 at the moment), bolding it and centering it. We have done all these components previously so let's do them all at one time.
A question arises as to handle this most efficiently. If doing this separate, we would need to highlight all the text and then set the new point size given that point size is a character command and works on text that is highlighted. Similarly we would need to highlight all the text and bold. Finally, we would need to place our cursor anywhere on this text to center. We can combine this all by just highlighting the text, immediately clicking 14 for point size, the b indicator and the center indicator to combine these operations into just clicks once the text is highlighted.
By the way, let's assume you do not like the placement of the header. You would like it either further up or down. This is easily resolved with this version of Word, compared to the previous. In the Header and footer tool bar at the right is spin controls. Manipulate them and you can move this header up or down. Note: you don't want ot get immediately at the top of the paper as Word enforces a minimal margin and you could find that your header is not printing.
While we are dealing with the header and footer, let's go back in and enter a date. Move your cursor to the left tab of the footer and click date and time.
You should see something like at the right. Can you explain these formats? Where are they being generated? Further, how does societal differences influence date and time?
Your operating system is supplying these to the word program and you could see this as part of any office application. What does update automatically mean. When we were looking at quick parts I made a reference to one of the options: field. Fields involve many different things that act as a kind of programming for word. One of the fields is date. Dates therefore can be text and therefore will never change or dates can be a field in which case as this document opens (assuming you were to save this) the effective date would be inserted as the file opens.
We may not get the chance to look at word art as our study of word continues. Let's do it now. This is an object that is part of the insert tab. Highlight our header, then click insert and word art. Click anyone of these and you will see the text in a box. Click okay and this caricuture is transferred to your text as indicated below.
Now, let's see some other things pertaining to the header and footer that were always there but difficult to get at. This is the beauty of the ribbon and how everything is open to you. Return to the document by clicking the body (now grayed out) with a double click. Notice the header and footer are grayed out as you should expect. We can page (and create pages) on this system very easily. By default, pages are designated per the info your printer gives the operating system. Print pages in that instance are designated as soft pages (soft is used when indicating a computer system decision). Let's create a hard page - indicating where the user chooses to page break. Your enter key combined with the ctrl key will do the trick. Invoke ctrl enter after the words "gonna crash". Notice a page break has been created. We now have two pages. On the second page, do this again after the words "gonna hang". We now have three pages. We are doing this to show how headers and footers react to multiple pages. Notice the header remains constant. Notice the footer has a change in page number. of course the date stays constant.
You can modify this further by using the ribbon functions, different first page and different odd and even. Your instructor will show you some examples but you should notice that there are signals given to you per the tabs that indicate header and footer and, in essence, there really are separate buffers for the different possibilities.
We have moved quite a bit per headers and footers but we need to return the document to what it was when we bolded and centered the header. We need just one page. How do we do this. Word keeps an extensive undo list. Click undo and you should see that we are returning the document back through all of our changes. You can redo as you do this and you will notice that Word is ready to redo what was applied. Let's move ourselves back to having the header just bolded and centered. If yu want tkeep he dte and page numbering, that's just fine.
Back to our document as it looked before. How many paragraphs do we have in this document. Most would say 5 or 6 depending on whether they consider the header to be a paragraph. Click word count. It shows 20 if not more. Why so many paragraphs? The reason for this is that the individual setting up this document did the cardinal sin of word processing. He hit the enter key after each line. Although this document looks like it has 5 or 6 paragraphs - based on the look and context - every line is a paragraph. We can see this more clearly using the hide/show button demonstrated previously in class.
What's wrong with this? plenty! In essence, you are using this word processor as a type writer. None of the features that aid you in layout that this program offers will be of help. You might as well have just typed this.
An easy example of this is margin. Even without knowing how to do margins, will a change of margin affect this document. No! Yet margins, and especially cheating on margins, allow you to set a 1 page 2 line document to 1 page or a 7/8ths page document to 1 page relatively easily. Your instructor calls this power word processing. Certain techniques including creative use of margins can create powerful looking word processing documents.
We should prove this out to you. Margins are part of the page layout tab. Click on that and you will see the margins control. Changes have occurred in this version of Word from previous versions. In the 97 and 2000 version of word, the standard margin was 1 inch around. The XP and 2003 version changed this to 1.25" left and right and 1" top and bottom. This is known as the word 2003 margin standard. The 2007/2010 versions of Word return back to 1 inch all around. Now, before we start to do anything to the document, click on the page layout tab of your ribbon. Click margins. It should be clear that we are dealing with the 2003 standard. (you could have also used the ruler to determine this and we will probably do so in class) Now, let's set this document to the new standard of an inch all around. Did anything change. No! Something, therefore, is wrong. Your change of margins should have changed the layout of the document. Switch you margins back to the 2003 standard. The problem is not the margins. The problem is the enters that are at the end of each line.
Follow your instructor as he deletes these enters and really sets up paragraphs. What's the definition of a paragraph? Text ending in an enter (or what older computer people called returns). When you are done you should have something like what is below.
Now, let's try this again as far a margins are concerned. Let's deal with the new standard by setting this to 1" all around. You should have seen a change similar to what is below.
We do want to remind you that layout is dependent on the printer. In the end, it is the standard you are aiming for. It is possible that by aiming to another pronter, this layout might change slightly. In a previous class, there was a difference between the instructor's layout on the portable and what the student's saw on their machines.
Now would be a good time to discuss cheating, As mentioned, our society is sensitive to top right. What about left and bottom. small extensions will generally go unnoticed. You can easily get away with .9 for both. Again, this allows an opportunity to get more on a line and allow more lines. This allows for creating smaller documents. conversely, setting right and bottom to 1.1" allows lengthening of documents. Keep in mind - don't try this with top amd left as most people are sensitive to this. Because of the last 2 versions of Word, people accept 1" and 1.25 " on the left. The standard remains as 1" on top.
While we have a moment and are discussing paragraph commands, I should go over the 4th justification that was igniored in our previous discussion. In general paragraphs are indciated a flush left or flush right or centered. In flusdh left, all the lines at the left in a paragrapg line up straight against the margin. In normal usage, this would be impossible on the right hand side as word wrap forces new lines where a word will at sometime encroach the right margin. In essence, a jagged line is created to the right. Now, justification (or full justification) tries to have it both ways by appearing to be flush left and flush right. Below, you see this.
Now, take a look at this. The first is the first paragraph pf pur document. The second is a paragraph dedicated to Richie Ashburn at the baseball hall of fame. If you were to determine the average letters in a word of the first paragraph almost assuredly it is less than the average characters in a word in the second paragraph. The first paragraph looks pretty normal while the second does not. This is the use of the fourth justification designated as justified but popularly called full justification. In the 1980's word perfect perfected this. But increasing the width of each space of the line, the normal jagged edge could be aligned at the right. But, again, this is only good if the reader does not realize what is going on. To few words on a line creates what you are seeing in the second paragraph where it is obvious that something is occurring. Notice, in both cases, the last line of the paragraph is unaffected by full justification for this lack of words reason.
Now, what about other ways of dealing with paragraphs? There are four things we want to do with these paragraphs at the moments. One is indenting. Another is the use of the ruler for paragraph topology. The third is spacing between the lines of the paragraph and before and after it. Fourth is the use of bullets and numbering. Let's start with indent.
Many students will indent (or try to indent) with the tab key. This was great when we used typewriters, not so great today. In this version we have the indent control in the paragraph group. Clicking on it will move all of your lines of aparagraph a default half inch in or out (depending on which of the two keys you use) The indent keys are geared to the most significant margin of the paragraph and in our society this is the left margin. Below, we see the first paragraph after the indent key has been hit. The circle shows the apcing. The line indicated the button. Using the button to the left is an outdent and would return us to flush left.
Next, let's use the ruler. We have already indicated the control just below the ribbon on the right that controls the hiding and showing of the ruler. My own experience with the rulwer for this version of word is that if you set the ruler to show and get out of word, word will assume the the ruler should show the next time you enter the program (and vice versa). Since the school resets everything, at the school the ribbon should not show when Word is entered. So, let's put it on. The plan is to deal with one paragraph at first and then multi paragraphs. So, move your cursor onto the first paragraph.
The ribbon is made up of 4 controls as your instructor will show on the portable but which is indicated below.
Now, at this point and in conjunction with our study of the ruler, we should discuss the topography of paragraphs. Today, our standard is straight up and down. Everything is flush left and jagged right (unless using full justification as indicated above). This was not always the standard. Your instructor (and possibly other students in the class) learned a different standard. Below we see the other standards. Also, what was the standard between paragraphs?
Why did this change? What was wrong with indenting (or as microsoft calls it, first line)? You are dealing with one right now. The computer and word processing changed the standard. On a typewriter, it was important to get as much on a page as possible since any mistakes required retyping. The more you could get done correctly in a shot, the better. We don't have those problems usiong PCs. Nevertheless, we should learn how to create this topography. You can do this through the paragraph dialog box as your instructor will show you later on, but it is easiest through the ruler. Position your cursor on the first paragraph. Move control 1 to the half inch marker to create a first line. Move your cursor onto paragraph 2. Move control 2 to the half inch mark to create a hang. Move to paragraph 3. Move control 1 to half inch. Move control 3 to half inch. You've created a firstline with a half inch indent. Now move to fourth paragraph, move control 2 to half inch, move control 3 to half inch and move control 4 in half inch. Now you've created a hang with both a half inch left and right indent.
Seventh lecture: March 4th, 2011
When we left off on Wednesday, we had used the ruler to create different topographies. Click here to open up the file in a somewhat similar situation than we left it.
Now, how would you do this through the dialog box. Click the little control at the right bottom of the paragraph group. You would set left and right indent to half inch. In addition, set special to hanging for half inch. and you have the topography of the fourth paragraph.
Now, we are about to discuss spacing above, below and between the lines of a paragraph. You can see in the preceding image the before and after spacing and single is entry for line spacing. We want to discuss the question of spacing. let's start with spacing above and below a paragraph. We want to add 6 pts before and after the third paragraph. Below, there is an attempt to show you this process and the result
What is spacing good for? Your eyes are attracted to darkness with light around it. By adding space, you are subtlely enhancing the appeal of this paragraph versus other paragraph. It is a very gentle nudge to the reader to look at it.
There are other spacing options for a paragraph. While we are looking at the document, we might as well deal with the ribbon. The next control is kind of interesting. The ribbon control is not consistent with the paragraph dialog control. Now this deals with spacing between the lines of a paragraph. Keep in mind that if you set up your document as we originally saw this seuss document with all paragraph breaks for each line, this control will not work for you. Follow your instructor and he will show you (and it should be to the right on the picture below) this spacing control. Notice the possibilities: 1,1.15,1,5,2,25 and 3 among others. Some of these make sense. Your English instructor or history instructor wants you to double space - this is 2. Or they could ask for 1.5 giving a little extra space between lines. Even 2.5 and 3 might be asked for although your instrcutor in this class feels that this is overkill. But how would you explain 1.15. This goes back to our conversation about fonts. A point is dependent on the cartographer and he has leeway in setting it. THerefore, as mentioned in class, Arial 10 had the same height as Times Roman 12. But calibri, thre new standard, is set for 11 points and you cannot conclude that calibri 11 equals the height of either Arial 10 or Times Roman 12. The 1.15 is the fudge factor that one would use with calibri 11. If you were to replace TR12 or Arial 10 with calibri 11, your document's length would shrink. The 1.15 in terms of spacing will get you close to the original length of your document.
As indicated to the left on the picture above. it should be clear to you about the other spacing options indicated in this control. How about on the dialog box as shown on the right in the above picture. Notice 1.15 is missing as well as 2.5 and 3. In place of this is at least, exactly and multiple. At least and exactly allow for a type of manipulation similar to before spacing and after spacing under the right circumstances. of more interest is multiple which has another name: leading. leading is another technique to gain space. But you have to be careful. Readers are not happy if they realize that you are using leading to deceive them. Below, we see leading on a paragraph.
All of these commands are paragraph commands. So far, we've dealt with one paragraph at a time. The next few commands are paragraph commands but make no sense if done only with one paragraph. So, let's take a look at smarty ways to select multiple paragraphs. Let's assume you need to select 2 contiguous paragraphs. There are two easy technigues. Sweep you mouyse across both of these in full. Or, select the last line of the first paragraph and sweep you mouse across the firstt line of the second paragraph. Both will take about the same time. How about if you need to select the 1st, 3rd and 5th paragraph. Sweeping won't work. Easiest process is to use your control key in conjuction with the mouse to select portions of the paragraphs in question. We haven't talked about styles yet, but you instructor will show an example of this using this document and the headijng 2 style. See what's happening, only the 1.3 and 5th paragraph are affect as seen below
Now, with this new skill, let's take a look at bullets and numbering, First when do you use these. Bullets and numbering should be used to indicate action items. You want someone to do something. Do not get into the habit of bulleting or numbering everything or these lose their effectiveness. Action items are important matters that someone should take notice of or have to act on. They should be rarely used in casula correspondence.
Now, having discussed action items, when do we use bullets, when do we use numbers. Bullets are generally used when the sequence of handling the action items is up to the reader. Number are used when sequencing becomes important.
Now, let's do a generic bullet on the first 2 paragraphs. Highlight the two in some way and click the bullet icon (leftmost control on the first line of the paragraph group). Having done that, let's genericaly number the last 3 paragraphs. Highlight the paragraphs in question and click the control to the right of the bullet control. At the right, you should see the paragraphs so bulleted and numbered.
Bullets are paragraph commands. These are not asterisks and autoformat will attempt to change leading asterisks of paragraphs into the default bullet. Notice how this also works. We are back to our previous discussion of how eyes work. Your eyes are attracted to darkness surrounded by light. You will notice that this is what a bullet or number has since the lines of the paragraph become indented. Now, what I've done with the picture above is show additional options of bullets on my system. The system keeps track of the last 7 bullet types used and displays this for you. You are allowed to add to the normal variety and one source of this is the symbol (and wingdings) fonts. Additionally, you can use little pictures as bullet images. It's possible in looking at the above you may be able to tell about one of the many interests I have and I use this picture as bullet indicators when writing.
Given that we can change this, let's add to our list of bullets. Below, we use wingdings to add a four leaf clover since we are getting near St Paddy's day (this year, celebrated as it always is, on March 17th, a sure sign that Spring is on the way
If you select the four leaf clover, it will become the bullet symbol for your use. But, let's handle my special interests. Click Here to load a picture. Save this picture to my pictures on your system. Now, highlight the first 2 paragraphs (for selection of the bullets) and click the downward arrow of the bullet command and enter define bullet and click picture. Select this picture and you now have a bullet set to this picture. And, now you are an informal member of what fellow aficionados call "bondage" and we'll let you decide how to take that discription.
Okay, how do you handle the tab between the bullet and the rest of paragraph. In prior versions of Word, tab info was included where we've selected the special character and the picture. In this version, you use the ruler and you will find that bulleted paragraphs can be controlled in a similar fashion that we studied when specifically dealing with the ruler.
If this hasn't shaken or stirred you enough, let's look at numbers. This is pretty defined. You have your normal numbers, alphabetic both capped and incapped, and the roman numerals both capped and uncapped. There is even provision for ordinal numbers such as fourth, fifth and the like. Let's use ordinal to number the last 3 paragraphs. Clixck define new number and select first, second third and place this in the document. Below, is our document as it looks now.
Before we leave the paragraph group, there is one more commnad that we should discuss. This is borders and shading. To start this, look at the second line of the paragraph group, rightmost commnad. The downward arrow will give you shortcuts in dealing with this. Similar to bullets and every other paragraph command, paragraphs have the capability to provide borders on each side and up and down. An option of this is no borders which is what paragraphs are generally set to. We can try some of these and you will see the effect. There is also a horizontal line (this command did not exist in previous versions of word) which is very useful when creating documents with quite a bit of graphic content. But, what is this is not enough. Chick the last of the options and you will go into the older style borders and shading dialog box. This is extremely powerful used correctly and can be quite difficult for the reader if used wrong.
It would be my contention that this should only be used once on one paragraph in a document. Select the middle paragraph in our seuss document. Turnoff the numbering by clicking the number control. These controls work on/off. Now, onto the border control and click the last option. You should see what is indicated below to the left. We have isolated several of the border styles and also shown you the selections of border width. To the right you will see the results of the selection using shadow. It gives a 3-D like apperance as you can see.
Now, let's add shading. This allows the system to add a tinting of a color (or gray) to the area that is bordered. I've chosen gray at 12.5% as indicated below left. Clicking okay shows me the result of this indicated below right. Now, as you look at this, consider how this would be printed? Any reader would see something close to 3-D which in essence would have the effect of the text coming out to them. The border nad the graying would automatically attract the eyes. On a first page of a document, this is unavoidable to look at.
Paragraph commands are very powerful and especially easy to work with. They provide a pizazz to the layout of your document. Our next set of commands straddle paragraph and character. It wasn't always this way as these commands startted as paragraph. Now, character seems to dominate. We are of course talking about the commnads on the riight of the paragraph group, designated styles. Similar to the header commands controling headers on the first page and odd and even, style have been an option since Word 2000. Every version since has tried to make them simpler to use. The ribbon concept moves them out of the shadows. here are a lot of options to styles and we have limited time. So, let's the highlight.
Assume that you have a set of formatting needs for a paragraph. Let's assume the algerian font, 24 point size, bold and underlined. In this document, seuss, we want to apply this to the 1st and 4th paragraph. What are our options. Well, we could highlight the first and fourth and invoke the necessary commands. Both the first and fourth paragraph would have formatting changes to it. The problem with this is whatif you don't like it when you see it. In changing both paragraphs you are limiting your ability to make specific changes. So, one alternative is to do only one paragraph, let's say the first. Make as many changes as you like. When you've gotten it right, copy the format. Your instrctor finds that this is a difficult concept for many students. It shouldn't be. If I said to you let's copy the text and put it somewhere else, youwould use copy and paste automatically. The command that we will b dealing with is a copy and paste for format. The command is called format painter. It sits on the clipboard group. Highlight the format you want to copy and then click the format pinter. It look like a paint brush. As you move your cursor off of this command, you will see a cursor consisting of a paintbrush next to the mouse I. Highlight the text you want to change (paragraph 4) and the format is changed. No text changes occur. Only the way this paragraph looks.
I suspect we are near the end of class. If we have time I will apply these ideas to the use of styles.
We do want to make sure you are aware that next week is Spring break. No classes are in session during the week. Use the week to review what we have gone over, possibly using this web site if you wamt. If you have not gotten on the snap site. make sure to do it next week. I believe that within a week or two of getting back, you will have the Word test and need to be on that site to do it. See you on March 16th.
Eighth Lecture, March 16, 2011. A premature Happy St Patrick's day for all concerned
Welcome back from Spring break. Hopefully, your spring break was more productive than mine as much of it was spent on programming bugs. I want to do several things with the seuss document and then onto a document somewhat more advanced. Let's finish up some loose ends before delving into more difficult material. Access a version of the seuss document by clicking here. We are interested in propogating format. You are already familiar with cut and paste which deals with text. What about format. The format painter on the clipboard group will do this for you as a character command. Take a little text and change the point size and font. Move your cursor to this so that the text cursor is set on something that has changed. Now, click the format painter which looks like a paint brush and move it into the buffer. Notice the change in the cursor. You are allowed one swipe. Select other text and as you release that text is changed to the format you originally selected.
To do this again, you must reprime this. Let's assume that we want to manipulate paragraphs 1,3 and 5. This is a lot of swipes. What easier is to set a style. You can see the style group next to the paragraph group. Several of the styles are paragraph commands and some are character commands and you can determine this by a process of elimination. Use heading 2 which I think in paragraph. Select 1, 3 and 5 using the control key to extend selection and click heading two. You should see what is indicated below.
What is you have unique characteristics you want to apply. You can set up your own style. In fact, if you answer yes to the program's request to save this in then normal template as you exit the program, you can use this new style on other word documents. Click the scroll bar to the right and at the bottom select set quick style. Below we see an example of this.
At the bottom you will see a button designated as format. Clicking that, you can see that you can make multiple changes to create yuor style although it is rare that you need to go beyond what is indicated in the rest of the page. Let's set up algerian, 20 points, underline, in yellow and set that to the cis103 style. Once this is created, clicking will set the paragraphs in this format. You can even go beyond this by hot keying the style. Click your right button on the style and select modify. Then click format and select shortcut key. Many of the keys are already selected and I would stay away from those. But keys like ctrl alt x are free and let's wire this key to this style.
Our second thing today is to look at the built in thesaurus. Probably this is an aspect of the dictionary(ies) talked about in one of the prior lecture. Let's use this document we already have and you can undo if it seems unwieldy to read. Highlight technical on the first paragraph and click review/thesaurus. You should see something similar to below
You can now change the document or do further look ups. Move to mechanical. A control opens up when doing this. One of the options is insert which would change the document. The other is look up which is the default if you should have clicked mechanical. Notice that the thesaurus starts again.
Notice on the review tab that translate is available. We will let you in on a little secret. If grammar checkers do not work well, translators cannot work well either. I used the translation service of microsoft to translate the Dr Seuss document into french and you can see the result of this document by clicking here.. The hardest thing to translate should be idioms which go against the grain of the language. If a grammar checker can handle idioms in English or any other language, pretty close translations should result. But as you will see, even the results of spell checkers are not too good. But, let's try that here. I'm using world lingo but it is possible that your computer is set to microsoft's translation service. It probably will not be better than what I'm showing
This which if Dr. Seuss wrote the technical handbook

If a package runs up against a pocket on a casing on a port, and the bus
is stopped like all last resource, and addresses
the memory makes your diskette fall through, then the package of casing
the pocket has an error to pay!

If your cursor finds an article of small follow-up of an indent,
And the double-clicking icons put your window in the refuse,
And your data are 'corrupted cause that the index does not chop,
Then your desperate plight, and your system going to break!

If the label on your cable on the pinion at your house,
Known as that the network is connected to the button on your mouse,
But your packages want to bore a tunnel with another protocol,
That is on several occasions rejected by the printer in bottom of the hall.

And your screen is very twisted by the side effects of gauss,
Thus your icons in the window are also undulating like souse,
Then you can as well reload and leave with a blow,
'Cause as sure as I am a poèt, the sucker going to hang!

When the copy of your floppy disc becoming wet on the disc,
And causes it useless RISC of instructions of microcodes,
You must flicker your memory and you will want TO INSERT your ROMANIAN,
Stop the computer quickly and are sure of saying your mom!
I'm afraid that most documents will not do much better no matter what language. We are against the toughest problem in computer programming. We'll prove this to you using the document you get when you click here
Running the spell checker against the seuss document will produce errors and we can use this to discuss spell checker options. In addition, we've already talked about autocorrect in a previous lecture. Now, run the spell checker against the spell document. What do you think about the results? The spell checker is not the problem here. It is the grammar checker and it is easily fooled as you can see.
Let's move into a more advanced file. By advanced we are talking about length and not content. If the term "book'em dano" is strange to you and you are not aware of the cinema's first Felix Leiter (who is a friend of James Bond in the books) and you don't know the actor who played Stoney Burke on TV, then you will have learned by clicking here, that the actor Jack Lord fits the bill for all three questions and it is his series, hawaii 50, that we will use for our long document.
With this document, we can go a little further into some previous discussions. The default in this version is calibri 11. Defaults in previous version were Arial 10 and Times Roman 12 which were of similar size as mentioned in a previous last class. Let's assume that we select all the text (possibly through ctrl-A but we'll show you another way today) and change an existing document from the previous defaults pertaining to font to this new one. What will happen? It will be about 15% shorter in length that in the previous default fonts. This is the reason for the inclusion of 1.15. It allows for users to move to calibri 11 and hold the length of the document to some extent. Personally, I think it leaves a lot to be desired but you may feel differently when you look at the esthetics.
Now, to more important things. What's a matter with this document? We hope that you are noticing that the orientation is set for landscape and the margins really won't work for our purposes. First thing to do: let's set portrait and then let's set margins. 1" around should do. But, before we do this, notice that there are 9 pages. What do you think should happen as far as pages are concerned as we switch to portrait?
Notice the red jagged lines under many of the words. This is the spell checker in action. Most of these words are proper names and therefore not in any dictionary. If this is disconcerting, use options in the spell checker (or the ms office symbol, word options, proofing and check "hide spelling errors in this document only". Similarly, you could do the same for the grammar checker. Keep in mind that spelling errors and grammar errors will still show up when clicking spelling and grammar checker in the review tab.
In fact, let's do this. In this case, as opposed to previous documents, there are planty of "errors". Many of these, if this was a real situation, you might want to add to your private (or custom dictionary). After a few of these we can cancel. If we have time we will take a peak into the custom dictionary to see what's there.
Again, as opposed to previous documents, there are plenty of pages here. Use your vertical scrollbar and you will be told when you are on another page. At the bottom of pages is the page break which in this view looks like the movement between sheets of paper. As we are about to discuss movement within a document, notice how the vertical scroll bar will move with us. Keep in mind that scroll bars are programmable (they are provided by way of the windows operating system but their movement must be programmed) so the programmers of Word are keeping track of where you are in the document.
Let's start small and use the ctrl home, ctrl end, home and end keys. The first two work as they did in the previous documents, but now we can see home takes the user to the beginning of any line, end the end of any line. You can also see that the page number and how many pages at the bottom status bar has some meaning. Now, two other buttons may be useful at this point. Page up and page down will move you through a screen length. This is different than a page length as there is about 2.5 screens per physical page (and this is changeable depending on zoom controls). You can move up and down a screen by the appropriate key
How do we handle navigation in general without being dependent on buttons. On the home tab, at the right, click the find control downward arrow. Use Goto. If you miss goto, don't worry about it. Find, goto and replace all go to the same spot anyway, a tabbed dialog box with these designations as the tab so it's easy to move back and forth. Below, we see this tabbed dialog box set for goto. The picture below is an example of this.
As indicated above, this is now set to move to page 4. Try it. Once in page 4, use -2 as an entry for page and notice how it does the math. Entries of + or - are used as incremental increases and decreases. Let's do the same for lines. use 200 as a starting point and then -100 and incremental.
A corollary to goto is a bookmark which sets a position in your document and allows you to return to that position. The position is fixed as far as subject is concerned - it is not fixed as far as page or line given that you could be changing your document before and after setting a bookmark. Move down the document until you see the paragraph heading, first year episodes. Book marks will not accept blanks (space bar entries). At this point we are going to set up a book mark designated as first_year. There are several ways to do this, but use the insert ribbon/bookmark entry. As you put this in, the add button will become enabled. Entries of bookmarks are not printed - they are for the writers use. This bookmark is now available for you to access from any point in the document. Let's use the goto dialog box for this. Goto goto and click on bookmark and first_year will be a part of this. Click on this and you will be sent to that location. You can also go to a bookmark location through this bookmark control on the insert tab. It also contains a goto ability. At the right, I have shown you the inclusion of the book mark.
Nineth Lecture - March 18th, 2011
Let's load the file where we left it by by clicking here. We had changed the margins and orientation and inserted a bookmark. I set a bookmark to move us to the episodes of the first season and you should be able to see this using goto or insert bookmark (where you can also go to). I also want to add that in the page layout tab is the ability to control paragragh before and after spacing and left and right paragraph margin. To say the least, it is unwieldy being put here and you may want to use the paragraph group controls on the home tab.
Another navigation technique takes its cue from powerpoint. When we get into powerpoint, by defaukt each screen is also shown as a thumbnail which means that an icon in the form of what's on the slide is displayed. Similarly, we can do the same on this document but in Word we are dealing with pages. Go onto the view tab and click the thumbnail check box. When on, the pages are shown on the right as thumbnails and you can move to that page by clicking its thumb nail. The control that these thumb nails are on is called a panel and panels are also part of document map and the reviewing pane. We will do a ducument map shortly but in clicking on this you will notice nothing shows at this moment. We should note for those trying this on Word 2010, document map, thumbnails and additional support for searching (we will do this below) is now part of what is called the navigation pane.
Before we continue with aspects of navigation, I did not finish a subject that was indicated in the last lecture and is part of the page layout tab. So, let's take a little detour on this. On the page layout tab are several additions to Word not present in previous version. One is a watermark. Watermarks were part of stationary in years past. A kind of imprint, if you will. Clicking this you will some standardized situations such as confidential, etc. Click custom watermark and you have the option of adding text or a picture. Let's addd the text, for educational purposes only. Keep this at semi transparent and diagonal and you will have in the background this watermark. If you turn off semi transparent, it acts as if it is part of the document which defeats the purpose. Watermarks are a result of Microsoft's studying and perfecting what is known as z axis (or z origin) and helps to c reate 3D type results. below is our example of watermark.
Let me also point out that you can get controls for indenting and for before and after spacing in the paragraph group of the page layout tab. I don't like it because it forces you to move between tabs but for some of you this may be easier. It affect for any paragraph selected the before and after spacing and the left and right indent.
While on the page layout tab, there is an inclusion from Powerpoint put here. In powerpoint, themes are used throughout slides on a presentation. Notice that themes are present here. For themes to work well, inclusion of smart art and shapes would be needed which we have not done at this point but you might want to look at this when we have finished this document to see if themes are a help.
Additionally, 2 other features which were hidden in preveious versions of word are readily available here, Page color and page border. preview exist on page color and let's try some. Generally, added color to background is bad on two aspects, unprofessional and expensive. However, look at fill effects. Some of these work out well and look somewhat professional. Click texture and then newsprint. What does this backgroud look like (which you can see to the right). Like old paper and this is a technique to make documents look older.
Someone asked about paragraph borders in our last lecture. Let's do this for the page and then you can try it on a specific paragraph. To start this, you are entering the old dialog box that controlled this. To the right are possibilities. One is no border and this should be the option for 99.99% of the time. I am not a big fan of 3D and I think it to be inpatly named and custom would allow you to take each side of the border and apply specifics to it which seems to much work for me. I limit myself to shadow (and very rarely box). In shadow you can choose a style but if attempting to create a 3D effect, the top style is the best. Width is the next selection and the higher the better. 3D technique does not work with 1/2 point. So, select 4.5 or 6. For page borders, shading is not allowed given the previous discussion about page coloring. But is you try this with a paragraph, you will see the box shaded and this can have quite an effect although keep in mind that older people have problems with this technique in seeing the underlying text. shading should not be used when directed to much older people. Anyway, below is an example of this used with this document.
Another thing we would like to deal with is search and search and replace. Large documents are exceedingly difficult to find things in and find makes it somewhat easy. Again, this is one of the tabs of goto/find/replace. Although we won't consider them, there are multiple options for a search (or find as Microsoft calls it). One is case significance which we will ignore. An other is whether this text to be found is an entire word or not. Another option is by sound as to what it sounds like. We are going to do a very chocolate and vanilla search. Move to the top of the document and let's find the first instance of James Bond. You should find this on page 9. You could use f3 to continue the search and the system would continue to find James Bond moving down the document. After the last appearance, you would be told that it could not find any more.
Now, what about changing words throughout a document. This is the duty of replace. Let's try this: replace all the instances of James Bond with your name (how exciting is that). There are two options: replace one at a time or en masse (for all). let's do these all at once.
The next few lessons pertain to the inclusion of objects into this document. We'll start today with including a hyperlink. The hawaii 50 fan club can be found at http://www.hawaiifive0.org/index1.shtml. let move to the end, using ctrl end and type something about finding this group and indicating this link. Now, how do we set the link and how does the link work. In the insert tab, click hyperlink and you will be shown a dialog box with the ability to indicate a text to display and the URL to link to. I show this below
I don't think I pointed this out but in your options for word is how one accesses this hyperlink. In older version, one used a click just like a browser. In this version, you use ctrl-click to access. This is a check box and you can revert back to just clicks by turning off the check.
I mentioned Document map and this is another way to navigate through the document. In this, Microsoft has provided a completely different structure than in previous versions. Each paragraph today has a level abd that level can be body text and level 1 through 9. In previous versions of Word, level1 equated to the style heading 1, level 2 equated to the style heading 2 etc. We are about to use this but we might as well be smart about thuis. Look at the document. Overview, Jack Lord bio, etc look like chapter headings if this was a book. Notice all of these are in Times New Roman 18. Move your cursor on overview and click select all text with similar formatting in select on the home ribbon. Notice all of these titles types are highlighted. Now, go into the paragraph dialog box and change body text to level 1. You won't see any effect at this point, but click document map and this will have changed to something similar to the right.
This can be used for navigation. Click on any of these and it drives you to the appropriate part of the document. Have you seen this before? This is frame technology as used on the internet. Although not too popular at this point, at one time this is all you saw on most web sites.
You can tier this if you want. You saw that we had levels 1 through 9. Go down to thefirst real episode, Full Fathom five, and set its level to level2. Notice that it becomes an indent to first season and you have a control to turn this on and off.
What else does this remind you of. Table of contents would be a good answer. You may not realize it, but you have already created such. Where does a toc reside. Generally on the first page. :et's create a new first page. This can be done by one of the controls in the insert tab. Go to the home position and click blank page. You could also do the same thing and click page break. The easiest process is to use ctrl enter on your keyboard. Since we want to place ourselves in a new first page, use ctrl home, ctrl enter, ctrl home. Now, let's invoke the table of contents control on the references tab. You have several choices - take the first. You should have a table of contents on a new first page.
After table of contents, we created a cover page on our document. These are preset templates taking info from the properties section of Word (which we looked at during one of the first days we studied word). One of the oddities we should note is that the option to remove a cover page exists on this control for adding a cover page when in native docx format, but gets grayed out when in compatibility format. If in compatibility format and there is a need to delete a cover page just put, use undo
Tenth lecture: March 23rd, 2011
let's put up the file where we left off on Friday. Click here to load the Hqawaii 50 file
Notice that the cover page is designated as MOD and should have info based on what has been set in properties. Let's look at properties first to verify this. The date has been set to today and I assume that when we pull this up on Friday, Friday's date will be displayed but we'll prove this out on Friday.
Mod is a theme and we will next use this theme by setting up a header. We have looked at headers (and footers) before but never based on themes and templates. Use the insert tab and click headers. WE are not installing our own header. Look at the templates and choose mod left. Below, you will see the header in place. Mod left means the ball is on the left.
Notice there is no header on the cover page. Word determines that a civer page is in existance and turns first page header off. In class, we'll try to put it back and then set it off again. And, let's complicate this by setting different left and right headers and set the odd mod template into the odd header pages.
What we have done with headers, we can do with footers. Below you can see an even header and odd footer.
In doing this we should also answer the question of what does them do. Go to the page layout tab abd click theme and run your cursor over the themes using preview. See the color changes. The use of templates for cover page, header and footer have allowed for the use of themes. Below, we show mod in a bluesh tone. I've shown you the end of the first page into the second to show you that the cover page is also affected
Move to the end of the document. Let's do something we have been wanting to do for the last 2 lectures, create a hyperlink. You've dealt with these in internet browsers and Word is considered as a low level internet browser. from above, here's the part of the hyperlink lecture
The next few lessons pertain to the inclusion of objects into this document. We'll start today with including a hyperlink. The hawaii 50 fan club can be found at http://www.hawaiifive0.org/index1.shtml. let move to the end, using ctrl end and type something about finding this group and indicating this link. Now, how do we set the link and how does the link work. In the insert tab, click hyperlink and you will be shown a dialog box with the ability to indicate a text to display and the URL to link to. I show this below
I don't think I pointed this out but in your options for word is how one accesses this hyperlink. In older version, one used a click just like a browser. In this version, you use ctrl-click to access. This is a check box and you can revert back to just clicks by turning off the check.
In looking through our document, we have two pictures already in place, one looking good and the other not. First of all, what is a picture. it is a set of pixels that when looked at from afar make a view. Look at it under a magnifying glass and you would see the individual elements (pixels) that make it up. It should be clear that pictures are not in any way similar to text except being made up of pixels. You cannot load a picture into a microsoft word document through the file open process. It must be done through the insert tab. Below, we have taken a part of Sean Connery's face and enlarged it 8 times or 800%. Take a look at the picture now indicated below. The face, as the rest of picture, is made up of blotches of color and you can easily mak changes. There is sotware to make this easier to do, but you instructor can show you were image have been changed to tell a story.
Our job is to move, insert or delete these pictures keeping in mind that the text takes precedence.
Let's deal with the first picture, the one of Jack Lord. Click on the picture. Notice that a new ribbon, Picture tools appears. This is part of the context sensitive nature of MS word. Before we play with the ribbon, let's look at the handles around the picture. There are 8 of these. Let's start with the four on the corners. Move your cursor on them and you will notice the cursor changes to a kind of grabber. Your ability to change the height and width of this picture in this capacity has been limited. As a picture comes in, an aspect ratio is established for that picture which is nothing more than the width divided by the height. This aspect ratio is kept on making changes. Aspect is not kept when using the other four handles and, unless you load this picture again, aspect is lost as a new aspect is established.
In addition, you can move the picture as a four directional arrow is established while within the handles. Depress the left button of your and move the picture. By the way, while your 4 corner arrow is in the picture, you can get some contextual help and see several possible options. Since we just did a hyperlink for text, you can see that you can do a hyperlink for this picture.
Eleventh Lecture for March 25, 2011
The main source of options for pictures comes from the picture tab of the ribbon that you see as you select a picture. Keep in mind that this usage of pictures is dependent on what type of file you are saving. There are quite a few more options for native mode than for compatible mode and you see this especially in the middle controls.
Now, let's start our discussion of the picture ribbon by indicating to you that when you insert pictures into a document, the pictures come in as in line with text. It looks at the picture as a very large character. Options now include square and tight which we'll be using. Other options which we show you below include in front of text which is self explanatary, top and bottom which moves your picture between text. We will also show you behind text but you have to be careful on this as you must be able to access the picture if you plan to change the text wrapping options again. At one time, more layout options were important, but this version of Word adds quite a bit of controls for you that you can access on the picture tool tab of the ribbon. Below, pictorially we show you the text wrapping options per the text wrap control of this tab.
An addition to the textwrapping option is positioning done both the position control or a combination of the align controls. We believe tight is the default text wrapping option when position is invoked. Align will only work if text is wrapped around the picture. Below is a pictoral indication of this
Now, as we start this lecture, let's load up the Hawaii 50 document as we left it (with a little enhancement) by clicking here.Let's go down the document a bit and set the 2nd picture (of Kam Fong) to some of the options discussed in postioning and alignment.
Start with Align at the far right of the picture tools tab. Let's do a few. Notice that we can start this procedure with the picture in any position. Let's start with the picture 3/4 over horizonally and 3/4 down vertically. Notice this is taken into consideration using align.
After this, to the left of text wrapping is position where you have 9 positions available to you on any page to set this picture. Think of a 3 by 3 matrix where the page is divided left, middle, right and top, middle and bottom. Automatically, the system will assume square (or tight) as to text wrapping when you select a picture
Below we can see the result of top,middle and you can the selection of position to do this. Position is similar to font and point size in terms of preview. It will move the picture around but leave it in its previous position if you don't make a choice.
Microsoft has added additional controls for positioning in terms of align. Assuming you have the latitude, you can set longitudal left center and rights. In the case of latitute that is set, you can set top, middle and bottom. Notice, that you can use align to margin and align to page to control some of the movement.
You can also deal with rotation of the picture. The easiest way is to grab the green control at the top of the picture. Spin it around as a example. Or, use rotate on the ribbon.
A nice feature in past versions was cropping except that you did not know where it was. Well, you can see it on the ribbon at the far right and it includes the ability to control the height and width of a picture. Let's deal with cropping first. Click the cropping tool and you will see the picture bordered by cropping indicators. Move your cursor to any one of these and the cursor melds in to the control. Move it in and you will start to crop (a photographer's term for cutting) and move it out and you will gain margin. Below we show a cropping of jack Lord's picture.
Another form of cropping is wrap points and we should show you that at this point. Go back to text wrapping and select tight. Now, back into text wrapping and you will see edit wrap points. This is adding additional margin with more control. On the red border, use you mouse to grab hold of the line and draw it in or out (we'll use out in class) Notice the red perferation. When done, you have set a line where text will not encroach around the picture. Below we have an example of this: we have used wrap points to add spacing to the right. In it, we have added a text box and a call out. You can also see the selection of wrap points on the ribbon. Reember, of course, to have selected tight as a selection for text wrapping.
Let's look at the middle section of the format tab designated as picture styles. This will not show up when you are in compatible mode. Since this document is in a docx format, we see everything. There are many styles to choose from and the picture below shows this as we choose a type of oval.
On the picture above, notice a slight 3D effect and a slight reflection. You can do this yourself using picture effects. This gives you the possibility of shadowing, reflection, glow (a type of shadowing),bevel and 3-d. We will try a few in class. but keep in mind that these effects are constrained when in compatibility mode. if you want to do these techniques yourself, picture shape, border and effects are available to you but need some insight to make them work properly.
Look far left and there are a few more controls most of which have limited use. Recolor will put a tint over the picture in general but can be used for other purposes including black and white cariacuture. Brightness and contrast, which existed in other versions, adds a washout or color contrast option for you if need be. We'll show you some effects but most are used for advanced photographic techniques.
Using what we have learned, let's move to the next picture. Let's do it by goto. Bring this up and ask fro graphic. Click next and the next picture should appear.
All right, what do we do with this picture. Text wrap is blown so let's experiment and get the picture to blend with the text.
the last thing we want to do with pictures is insert one. Click here to load a picture of Sean Connery and Jack Lord. If you are lucky, your instructor will not start to explain the significance of this picture taken from the movie, Doctor No.
Save the picture to my pictures and return to our word document. Position the Jack Lord picture top right. Move you cursor in the middle of the page, click the insert tab and picture. It should bring you up into my pictures and select the picture you just saved. Set text wrapping to tight and the text will wrap around the picture. You have already seen the use of handles and border to move a picture. What we want is to move both these picture in tandem. Very easy to do now - easier than in previous versions. Click one of the pictures and then shift click the other (we might add that there is a group command on the ribbon but this is easier). Notice movement is by both. Below we see an example of moving both pictures
Notice picture shapes, picture borders and picture effects. You can do your own efforts although it is harder. Click picture shapes and set jack lord as a home plate. Now, set a 6 point border in pale green. Finally, enter picture effects and set one of the bevels. You may end up with what we indicate below.
We will finish our discussion of pictures by looking very quickly at recolor, contrast and brightness.
Let's discuss captions of pictures and this will lead into table of figures. A caption is a description of the picture either above or below it. In this system, there are several possibilities of caption although we will deal only with captions of pictures. In this, the captions will start with figure:. Let's start with Kam Fong's picture. Click on his picture and in references set insert caption. We can indicate that this is a picture of Kam Fong. The default is to set below and this is fine. It still should say Figure 1. Now, keep in mind this is the third picture. The figure numbering system is based on the captions as they exist in the document starting the numbering from the beginning to the end of the document. Below is the sequence to do this. Above you see this being set and below is the caption for Kam Fong's picture.
We'll do similar situations for Jack Lord and the picture of Sean Connery and Jack Lord. Notice the system handles the count. When done, there should be three captions designated as figure 1 through figure 3. What do we do with this. The figure designations allow us to create a table called table of figures. Similar to the table of contents, this lists the pictres, what they are about and where they are. Normally, table of figures are a the beginning or the ending of a document and we will use ending. Click on ctrl end to get to the bottom of the document. If need be, set a few blank lines. Now, into references and click table of figures. Below we see the result
By the way, the ctrl click works in a similar manner for table of figures as it does for table of contents.
Whatever we have done for pictures, we can do for clip art. These are caricultures (and some pictures) provided by Microsoft for your use. I'm not sure to what degree your school computer has been loaded with these pictures and anything done in class can be tried on your home or work computer. Move you cursor some where where you would want to insert this clip art. Now, the system I am using to do this web site contains a copy of Office 2007 from the school and has no clip art. You should however have clip art availability so choose a topic such as hawaii and from that insert some clip art. Once inserted, you can deal with it like a picture if you want.
What if we wanted to apply text where the picture is. We would need the capability of the font group controls but also need the control for the outside of the picture box such as text wrapping, positioning and the like. This is a text box. Let's assume that on the second page we want in Times Roman, 16 pts, to announce that Hawaii 50 has returned to CBS as a new show for this year. Move to the second page of text and click text box. Not surprisingly, there are a set of templates. We will show you the old way and this new way. The new way takes a little time to get used to. Below, we start the old way
Insert your text. Instead of rotate, which also exists here, at the left is text direction. Click that and the text is rotated 90% which we show to the right. Now, make the text box smaller horizontally (and don't forget text wrap is not set correctly). Set the text to some other font and maybe 16 points or so. And you get something similar to the right.
For text boxes there are some control associated with the text but many of the controls should look familiar per pictures and clip art.
How about the use of the templates. We been dealing with mod so might as well continue with this style of template. Move somewhere else on this page and click textbox and select the mod style. Put in your text between the brackets. Now, there are many possibilities. It really is up to your imagination. You can change the shape. I will show a triangle. You can set 3D. You can change the color both specifically or through theme since ,od is so affected. By clicking on more options as far as text wrapping, you can get the text to really envelop this form. Below we show this example.
I would assume we are probably close to time. if we have time let's do drop cap. This is an important technique that is generally overlooked in most texts. Drop cap can be used to divide a document in efrfect for a reader. It changed the point size of the first character of a paragraph. let's choose a paragraph now. This is a paragraph command so you do not need to select the first character of that paragraph. When selecting drop cap, you can put this into the margin or leave it in place. I like putting it into the margin. You can indicate the height but not in points (although that can be done also) but in lines. I think 3 looks best. Let's try it with a line. Once this is set, one possibility of previous cersions has been terminated (as a certain actor said in a movie several years ago) and that is the ability to change direction as we did with the text box. But, if you you want, you can use all the capability of borders and shading to further enhance this.
Lecture for March 30th.
I want to deal with drop cap, insert special character and End and footnotes. Second half is into Powerpoint. Library lecture is April 8th
Let's start with drop cap. This is a printing technique applied to word processing. Gothic era novels would always start with the first word of a chapter enlarged and placed in the center of the page. We have the option of an enlarged letter in or out of the margin for any paragraph. Let's use the initial Hawaii 50 document to show this whixh you can get by clicking here.. Take the second paragraph and click insert and drop cap. If done in the margin, it should look like what's at the right.
Notice the handles. You have seen handles for a variety of objects and drop cap in Word 2007 is a "semi object" in a sence. (in previous versions it was a text box once placed in the document) Increase and decrease the size to test this out. And, when confident of that, move the H to the middle of the paragraph. This is what printers in the late 1800's (and later) would tradityionally do with the first letter of a chapter. You can even add a decorative border by right clicking and selecting borders and shading.
You may remeber that bullets allowed for the inclusion of special characters found in fonts such as symbol and wing ding. You can do the same thing in your document by clicking symbol. Some symbols (mostly currency designation) are first shown and then by clicking more characters, you get the dialog boxes seen when we dealt with bullets. Take a look at specail characters and you will now know how to insert a copyright or trademark tag into your text.
Sometimes you have info you want to share with your reader without changing the normal flow of the document. You can do this with footnotes or endnotes. These are the same except that footnotes appear at the bottom of the page, endnotes at the end of your document.
Let's find the first instance of James MacArthur using find. James MacArthur, who costarred in Hawaii 50, was the adopted son of Helen Hayes (of stage fame) who had married into the MacArthur family. If you ever get the chance, look at the ending credits for the McNeil Lehrer (now just Lehrer) program on PBS (channel 12) and you will see the MacArthur foundation which helps fund the program. This is the family of MacArthurs cited here. Now, with James MacArthur highlighted, mve to the references tab and click footnote. A bottom section of the page opens up and you can insert info there. These are tied together by a superscript designation. You instructor will show you how to set this as an end note and indicate the changes that occur. Below, we see the footnote set in the document
After break, it's into powerpoint. This will continue on Friday with the take home assigned and given then. Excel starts next Wednesday and your Library tutorial is April 8th, next Friday a week. We are intereested in an overview of powerpoint today. I want to show you themes and textboxes.
Let's open up powerpoint. Keep in mind, that this is to some degree Word without text. Text is very important, but it is part of objects. To the left is what is known as thumbnails which was pointed out in the lecture on Word but not used. It is situated where document map is located. As opposed to documents, Powerpoint works on slides and slides have one of 9 possible starting templates designated as layout which you can see by right clicking the thumbnail. One of these templates is blank. Below, is an example of this.
Notice these templates are made up of text boxes and what Microsoft calls smart boxes. We will return to these shortly. But first, how about the background. For this, click design. If we had the time, we could have done this in Word as the coding and principals are applied. You will see 20 themes (including the default white) and click on one, Even with the default layout, you should be able to see a difference. Now, each of these themes can be modified and the preview tools used in word can be used here. Click on font and see how the whole slide is affected. Similarly with colors where a set of colors are indicated. You can if you want affect the underlying style by using options of background styles in essence to make your own type of theme. If you really get good at this, find a piece of the background and click your right button and you'll get more options for this as to the left.
Now, let's return to the templates themselves. You are familiar with text boxes in Word and windows but these text boxes have a bit if smartness associated with them. We should be dealing with the default template. One of the text boxes should say Click for title. Move your cursor inside and start typing CIS103. Notice that a certain height and justification is assumed (the justification is centered) automatically. You can change the font size if you wish, but in my case I am seeing an assumed 48 points.
Right below is the text box indicating click for subheader. Move inside this and type Section 181. Again, defaults are at work as far as centering and font size.
Let's alter the template to the most advanced possibility - this would be comparision. Click this and you will see that our text has been incorporated into the new template. Now, you have some added text boxes and we can assume that defaults as far as justification and font size are established for them. We, however, are interested in what Microsoft designates as a smart box and you can two of these. The smart handles 7 different functions. You can insert tables, charts, smart art, pictures, clip art or media (audio and/or visual). Not surprisingly these options are available to you on the insert tab of the ribbon except that it is more convenient to do these insertions through here. Now, surprisingly, we will ignore all of these. You will notice a seventh option, click to add text which we are about to do.
Start typing the microsoft office components we are to study in this class - Word, excel, powerpoint and access. Notice that these become bulleted as you type them.
This smart box has become a text box. What is a text box. It is a separate area from the word processing buffer (assuming we were in Word) where you can deposite text. Before going further in the discussion of text boxes, let's spend some time dealing with bullets and numbers in Powerpoint. It is similar to Word with several exceptions as you are in a text box. There is a verticle alignment feature which we can test amd, even more surprisingly, a text direction component. We touched on this when talking about drop cap ion Word but you can now see this in play here.
Similar to what we looked at in Word as far as pictures, text boxes are movable which we will demonstrate and you can affect their size. Notice that aspect is not a problem since each piece of text is defined with a font size.
Text boxes in Word and powerpoint can be inserted but there is a difference in Word versus powerpoint. In word, you define the height of a text box. In Powerpoint, your entry into the textbox defines the height. You define the width. As you create the text box, a format tab becomes available on the ribbon and you can see that this is similar to several tools we already studied. Take a look at the preset shape styles and the ability to make the text look like word art. You can even change the shape which your instructor wil ltry to do. What you can see here is that you can make a text box into an annotation and the other things we studied in Word. In fact this is what word does.
Now, let's deal with the second smart box and insert a picture. I know you will be shocked, but your instructor has been studying the life of a former very prominent Philadelphia area resident who wrote the famed book, Birds of the West Indies, in 1936, later reissued in 1948, 1960 and 1999 whose name is James Bond. Surely you also have read these books pertaining to ornithology. He was a very famous ornithologist and worked for the Academy of natural sciences. Of course, it's possible that you may have run across the name 'James Bond' in another capacity and, while your instructor doesn't think that this really is true, there are some that believe that an author used this name, given that the author was a birder and was familiar with these books, when he went on to write a set of books involving a character who dealt with espionage. You can access the Philadelphia, James Bond's, picture with that certain author, Ian Fleming, whom your instructor also studies by clicking here
Your instructor will kead you into the creation of a powerpoint slide as indicated below
Powerpoint lecture for April 1st, 2011. Happy April Fools
Your test is up and running. We would hope by this point that you have tried it at least once. If not, let's get in gear.
This week, it is on to Excel and then we detour into Library science on Friday. It is interesting that this is the sequence although it is by coincidence that this has occurred. Libraries, today, are practical users of databases. One of the modern functions of databases is to create excel spreadsheets for users to further refine their statisitics and needs. Anyway, today, we start the third of the office components we will discuss. It is expected that this will be our subject of study for the duration of the class and I believe we will be using Excel as our final taken sometime during early may. Excel, being a spreadsheet, can do almost everything ggod, if not well. It's a tie in to the rectilinear thinking that most of us deal with naturally and it allows us to use this package to solve many different problems.
Your instructor should discuss the following points with you about excel as we start
Similarities (and differences) of the ribbon structure to Word
Navigation around a spreadsheet
Use of multiple spreadsheets in a file(What Microsoft calls a workbook)
Bias in entering data - what's horizontal and what's vertical
Types of data that can be entered per cell - numeric, alpha and formula
Note: We may get to this today. Selection of multiple cells and use of ranges. Note:starting several versions back this was extended but for this class we keep it to the rectangular view.
Throughout our discussion of Excel we should be doing multiple problems demonstrating it's use. You, as a student, should be doing these problems at home and/or outside of class alone to build up your expertise. Your test will be in class doing problems similar to what we are doing together. It is very important to continually try these problems as this will train your mind into this type of thinking.
For this week's class, let's do the handout - the Big V auto dealership which you can access below. This is a very rudimentary problem which is based on 1985 usage of excel. In dealing with this problem, we are starting our discussion of the nuts and bolts of excel. Starting from addressing we can deal with:
Using ranges, determine sums, averages, counts, maxs and mins
Discuss the use of Ifs. Note: Excel has become in reality a programming language whose face is what you see. In programing languages, if statements provide the beginnings of code control. In Excel, if statements are a basis of controlling the logic of data.
The hardest part of this is understanding relational addressing. Keep in mind that when you put =a2+1 into a cell, excel does not set this as the specific cell a2. if uses an offset (or difference) to tell itself how many rows and columns from the entered cell a2 is. If you are in a4 while putting in =a2+1, excel sets this as a offset of =2 rows, 0 columns. If you are in a1 and set =a2+1, the offset is 1 row, 0 column. If in c2, the offset to =a2+1 is 0 row, -2 columns and in the case of g5, the offset is -3 rows, -6 columns. It is this offset that is used for determining relationships. However, in the case of absolute addressing, =$a$2+1 for instance, a2 is always used.
If you understand relational vs absolute addressing, excel becomes very easy. A 2000 line item table (rows) is as simple as dealing with a 5 line item table with the only difference being the physical need to move through the line items. To this effect, Microsoft has developed the new construct, table, to deal with this. Now, in class, before dealing with the problem for the day, your instructor will show you some examples.
We are going to look at a problem that your instructor has previously done in classes. By time we're done, we will have done many of the techniques discussed in every Excel instructional book. But before we start, you must understand that the use of Excel has evolved over the years. The problems we are doing, and the techniques your book describes at the beginning are circa 1985 in use. Today, Excel is used as a supplement to database info (and similar type situations). There is an expectation that raw data is already available in some form (generally from a database although your instructor deals professionally with a set of problems where data is generally kept on excel spreadsheets) and that this information will need at minimum something called subtotaling. Once this is done, Excel's excellent chart (graph) tools finish up the project.
However, for our first problem, we are looking at entering our own data - we have no where to retrieve it from - and this data has already been subtotalled. Nevertheless, this problem should give us an idea about entering data and formulas, looking at the normal bias of excel, use of ranges and fills, use of various functions and the use of graphs.
So, if your instructor has not given you a handout - or you are going over what was done in class - let's bring up this problem and first discuss it in terms of what you know business to be and to need as far as information is concerned and then we'll start to apply some excel on it. Click here for the Big V auto dealership
Before discussing this problem, keep in mind that 6 salesmen is not a reasonable assumption today, In real life threr would have to be more salespeople and this is not even considering that most auto dealerships are chains. In doing this problem, we will handle it as if there were many more rows. This would be in preparation of further problems this term that will contain much more information.
In addition, all spreadsheets for commercial use have headers. We will ignore column headers as we start this problem and they will be put in later. Use A1 through A6 to enter the salesman's name. Use B1 through B6 to enter the amount sold for last month. Notice that excel is giving you informatiin as you enter the data. Non numeric data is left justified, Numeric data is right justified. Notice that Excel has not made any assumption on decimal points and as you put in an integer, that's what's there. Since this is money, should it be left as an integer? Do you have any other options when imputting? Yes, you could enter commas as separators but we will not be supporting that in this problem.
Even before putting anything else in, let's handle column width. Widths start out as standard. At minimun, you can manipulate column width by placing your cursor between two columns at the top (where the colunn indicators are) and use the cursor you aee at that point (I call it a grabber) to change column width. Below, you can see this in operation as both column widths have been decreased.
Besides the movement of the columns, look what happened to the data. Text is truncated. Numerics become first scientific notation (one of the allowable entries of numeric data on this system) and then pound signs. Excel is geared for math and it wants to make sure no decision is made on wrong assumptions. If it is trancated as done in string data, one might make a wrong decision seeing the wrong numeric entry. You can bring this back by invoking autofit for column width. A poll is taken on the width of each entry in a column and the widest entry determines the width of that column. If you can fit the widest, all the others will also fit, of course. There are ways to do this by the ribbon which your instructor will show you and by mouse. In terms of mouse, take the column in question and at the right gridline of the column description, double click.
In this problem, each salesperson gets $12000 a year split over the year. That is $1000 a month. Now, we could put in a 1000 for each entry next to a salesperson (column C), but we are going to use some math and relational operators to do the job. Math uses operators to determine what to do with numbers. Common operators (for real math and Excel) is + (addition) - (subtraction) * (for multiplication) and / (for division). To tell excel that you are dealing with a math operator, you need to start the entry with an equal sign (=). If you don't, you violate what excel feels is numbers and your entry defaults to text. The mathematics of this is 12000/12. Put this in at c1. Notice this is left justified and no calculation has taken place. Now try =12000/12. The equal sign indicates to exc el that we have a formula. 1000 shows up indicating that a calculation has occurred and it is right justified. Congradulations, you have done your first calculation albeit an easy one. Now, this is important. There are many things that make excel powerful and one is the ability to replacate relationships. The easiest relationship is a calculation. Move back into c1. There are 3 cursors in excel. The big plus sign is used to select cells and this is a way of creating ranges which we will talk about shortly. At the bottom right of any border in excel one would see a crosshair and put your cursor there now and you will see what I'm talking about. Finally, at the bottom left is both a crosshair and normal mouse cursor symbol combined. This is for moving and would be like a cut and paste in Word.
Now, in C1, move your cursor to the right bottom. When you see the crosshair, click your left button and drag the crosshair down the column. Below, you will see an example of this.
Let go of your mouse button and you will have copied this information. Waht was copied. Your relationship. You could see this by moving into each cell in column c and looking at the formula bar. It is easier to look at the screen with just formula. Go into the formula tab of the ribbon and on the right click show formulas. Below, you can see the result.
So you can see that you really did copy the cells as far as formulas are concerned. Now, hit show formula again to return to normal mode. We need to calculate the commission defined in our documentation as one percent of the sales amout for each salesperson. First, what is 1%. One could look at this as 1/100. Also as .01. And these are perfectly reasonable. But excel allows you to use 1% which is the easiest. Now, how do we calculate the first salesperson's commission (B1 for the sales, D1 for the result). We could use =1%*240000 or =240000*1% - this is one of the laws in our math which you should have learned in high school. This will work but it is limited. What would happen if the 240000 sales figure was changed (a late sale, a sale that was missed, or a busted sale where the figure goes down) WE would need to change this twice. One in B1 and the other, here, in D1. It is easier to reference the value of a cell than continually use the number. Therefore, our math relationship in D1 should be =1%*b1 or =b1*1%. Put this into your spreadsheet. Now, I am going to use E1 to put in what was originally proposed: use the math expression =1%*240000. Now, let's change B1 to 200000 (a sale of 40000 did not go through), Look at the result in your spreadsheet. Below, we have the example.
See the difference. The moral of this story: use references to cells. Now, let's do the same thing to column D that we did to C. Move your cursor to D1 and its right bottom border. Use the crosshair to fill down. Notice numbers are being put into the cells. They are 1% of what is 2 columns to the left. Use show formulas again and you will see what I have below
Notice that B1 was changed to B2 through B6 as we went along. You didn't do this. You had originally set B1. If B1 would have showed up, you would have been dealing with an absolute address. Excel determined that B1 was 2 columns to the left of D1 and 0 rows offset. As you filled into D2, the corresponding cell would be 2 columns to the left and 0 rows offset. Of course, we are therefore talking about B2 in this case and this was substituted. Look at the others: you will notice that this analysis is working for all these cells.
Lecture for April 13th, 2011
Before we start, there are 2 things to go over. Your test is done as of midnight (11.55PM) tonight. By Friday, I will be able to give you an idea of how it will be scored.
In addition, I was very pleased with the lecture by Andrew Lopez on Library Science that we had on Friday. Hopefully you felt the same. A lot of info was passed both ways and I would like to thank Mr Lopez for his efforts in this
Now, back to Excel. We have 5 more lectures pertaining to this subject. April 29th is cancelled as it is School study day. Our excel test will be taken during Final's week and will be an in class test. There are 2 possibilities, May 4th or May 6st. Either of the days will work for your instructor.
Now, back to our problem. We were dealing with the Big V auto dealership. click here to load the excel spreadsheet as we had left it on April 6th.
We left this with D1 being loaded. Look at D1. you should be able to see that it references b1. How does Excel look at this. Not as the cell b1. it looks at this as the cell 2 columns to the left. As we copy down this relationship, as it hits a cell and needs to enter a formula, the reference to a cell two columns to the left is enforced. Now copy this down to fill d2 through d6.
Previously, we have clicked within cells to see the formulas in the formula bar. Is there some way of doing this on a more geenral basis. Yes! In the formulas tab, on the right click show formulas and you will see what we have to the right. This is a good tool to use to see formulas in general as it lays it out on the spreadsheet. Ypu can even operate your spreadsheet this way in terms of entering formulas but you would not see the results. Your instrcutor would recoment that every now and then you click on this, especially if you have a big and complicated spreadsheet, to see if the patterns of the formulas make sense.
Click show formulas again and you are back to the regular aspect of excel. Excel has some other tools that you can use to get a feel whether you are proceeding as planned. Move your cursor to D1. Staying in the formula ribbon, click trace precedents and an arrow will appear emanating from B1. You can eliminate the arrow by using remove arrow/remove precedents. Precedent is a nice way of saying the di uses b1 in its calculation and b1 is 2 columns over to the left.
Reversely, click in cell b5 and click trace dependents. Notice the same type of arrow going from b5 to d5. On complicated spread sheets this can be a help to trace the flow of the data. Below, we have composited these two controls.
While we are on the formula tab, let's indicate a new control for excel in this version and that is evaluate formula. It's use is better seen with more complicated formulas and you should use this as you study for your test in a few weeks, but it will show you the sequence of calculations that excel uses for get an answer for any cell. Move onto D6 and click this control and you will see these calculations in action.
We have one more column to calculate. The sum of fixed and variable. Let's sum up column C and D. E1 will be =c1+d1. Let's copy down. By E6, what do you think will be our formula. If you guessed =c6+d6, you are correct. And keep in mind, this is the same as =d6+c6.
While we are looking at calculation, this would be a good time to talk about ball parking. Excel does what you want it to do. There is no editorial comment from the program. It has no way of knowing or interpreting what is the ultimate purpose of these calculations. It is up to you to make sure that these calculations make sense. I use equivalents of 1% to determine if in the ballpark. !% is easy to deal with since you drop 2 zeros. In other problems 10% is the marker and yuo drop 1 zero. Let's assume that this problem was working with 1.2% commission. I'd still use 1% as my marker doubling the result to look at 2%. The end reult, when applying 1.2% should be between 1% and 2% and it should be biased closer to the 1%. Look at our calculation at this point 1000 for the monthly fixed should have looked somewhat correct based on the statement "12000 over the year". The number in the D column should correspond to 2 zeros being dropped from the values in B. Finally, the calculations should be easy enough to check the accuracy of column E.
Let's continue. Sheet operations are independent unless you yourself change this. You have been working with sheet1 and probably have not realized that sheet2 also has calculation in it. Click on sheet2. Here's are problem again but with 2 columns. Look at the last column indicated in blue. We have been dealing with something called relational addressing. 3 other addressing schemes exist in Excel. For this class, we will deal with one other, absolute addressing. Using trace precdents, click on G6. You should see something like below which is very different than what we have seen before. This is crosiing rows. In absolute addressing, which is indicated by a $, you really are using the addresses indicated. Therefore $c$1 stays as $c$1 as a fill takes place.
Having dealt with absolute addressing, what about column F. The results look the same as E but the calculations are done very differently. We are using a function designated as =sum(). As with many functions, this can be widely used: as an example =sum(first, second, third, four) would be legitamate where first, second, third and fourth are something called ranges or cell or constants (in math). So, this brings up what is a range?
For this class (and this has changed with the additon of the use of the extended selection by way of the ctrl key) a mouse selection that resembles a rectanggle is a range. Take an example. Select c1. Drag your mouse through c6. C1 to c6 make a rectangle and a range. You can designate as c1:c6 or c6:c1. Similarly, we have the same situation with c1 and d1. They make the range c1:d1 (or d1:c1). By placing a range in the sum function, you can sum up all the elements (cells) indicated by the range. So, you see the f1 contains =sum(c1:d1). Ranges are similar to cell addressing in that they can be manipulated. One fill filled up column F.
Let's go back to our sheet1. Column totals wouldn't be a bad idea for B,C,D and E. Can you figure out the fastest way to do this. If you said range, you are correct. We'll show you two ways to do this as we are in class
Execl Lecture for 4/15/11.
On Wedenesday we discussed relational vs absolute addressing (and we are using relational for this problem although I may show you an example of absolute at the end of this lecture, today. Manipulation of widths of columns and how Excel deals with numbers when the width is too small vs numerics. We looked at ranges and how these are used with the function Sum() and used Sum() (and autosum) in column totals among other things. You also saw how to turn the spreadsheet into a table of formulas. Now for today, we are going to deal with insertion of rows (possible columns) and setting up a set of column headers. Also, how to gruop columns (and rowsfvor the matter) and the creation of a very limited graph).
Click here to load up the file as it was left on Wednesday. I have knocked out the second sheet.
We are going to look at insertion. This can be done on many levels including insertion of a cell, a range, a row and a column. Unless you are at the row and column level, a second question is asked of you. Are you moving down the other cells by rows or by columns. You are not asked this question when a row or column is inserted. In additon, there are two ways of requesting insert. The one not recommended by me is the formal approach using the insert control on the home tab as indicated below.
In the case of an insertion of a row (or column) to use the context sensitive popup using the right click of the mouse. To sdo this, click the row that will move down when the new row is inserted. n the case of several rows being inserted at the same time, drag your mouse and select the number of rows where the first row will move down. In our example we need to add 3 rows. One for the title of the table, a blank and then the column header. Below, you see the start of this, Rows 1 to 3 are highlighted. A right click has made the pop up menu appear and we are about to click insert on that menu.
We can handle the title first and it can be as simple as the Big V Auto Dealership. We want this to center over our table. Insert Big V Auto Dealership in A1. It will bbleedc into b1 abd probably c1. Highlight the range a1:e1 and click the merge and center button in the alignment group of the home tab. What we've done here (as mentioned on Wednesday in class) is create a large A1 spanning to F1. And our result should look similar ot what we show below.
Now, we will allow the blank row to stay at row 2 as it is but now let's concentrate on the header row which we will put in row 3. Each cell of row 3 will provide header info for that column. But it's not going to look good as we first put it in. We will have to manipulate the row as you will see. But first, let's enter the info. Column A is Sales Person. Notice how it bleeds into the next cell. That next cell should be Sales Amount. Column C is fixed. Column D is sales Commission. And, finally, column E is total Salary.
One solution would be to widen the columns as demonstrated on Wednesday. While it will work, it will make the spreadsheet look odd with the columns being to big. WHat we would like to do is have the system break the cells so that there may be multi-leveled descriptions. And that's what we are going to do. But first, let's bolden these descriptions and increase the point size. With row 1 selected (and this is done by clicking in the descriptor of row 1 where it says 1), increase the point size to 12 and click the bold button.
Now, you have two choices as to selection. You can use the pop up menu as we have done before and select format cells or the format control on the home tab and select format vcells. Below we show both possibilities.
Click on format cells and you will se a dialog box pertaining to 6 possibilities for the range selected. One, protection, we will not deal with. Font generally can be dealt with using the font group of the home tab of the ribbon. Even number, which is very important, can be dealt with through the number group of the home tab. But alignment still holds importance and we want to click this. Notice there is a check box, merge cells, and in essence this was used to create the title in Row 1 although it is easier to control through the icon we used.
There are two combo boxes which control the type of formatting on a vertical and horizontal level. To start out, use center and center and click the wrap text check box. This is the most important of the control although you would not know it by the placement. Below we show a compoasite of these selections and the result.
Fixed really should be at the bottom and this would have occurred if the vertical controls were set to bottom. Further, you might want to set this text at an angle and the picture below shows this using a 45 degree angle.
If you want, you can set this back. We now want to set up 3 rows below this table indicating for each column, max, min and average. Our table stretches to row 10 so let's use row 12 to start this. To get an averagbe, indicate a range in the =average() function. Likewise for max using =max() and min using =min(). So in B12, set the function =average(range) where range is B4 through B9. Why not use B10?
Similarly, in B13, set up the max and in B14, set up the min. Similar to our totals, these are relationships that can be copied over. But you do not have to do this a row at a time. Excel is smart enough to fill up ranges. Select the range B12 though B14 and then grab the handle and copy over. See how easy this is! Below is a composite of this.
We have our spreadsheet and then some. Suppose we would like to prepare it for a few viewers. But the needs are different for any of them. There is the owner who wants to know what amount was sold and what the salaries were. There is the accountant who need to see all numbers. To resolve this, Excel provides from grouping which on the operating system is called un Or decompress and compress. Here we have group and ungrouping of rows and columns. This is done on a specific entire row or column basis. Group and ungroup is found on the data tab of the ribbon.
Let's start this looking at columns C &D - fixed and variable. The big boss is probably not interested in this so highlight the entire column c and the entire column D by clicking insider the descriptor headings of c and D. Now, click group on the data menu. A new section opens up with new controls. Use of the controls (both to the left and above the columns) allows you to compress C & D from view or make them visibile. Similarly, let's do the same for rows 12, 13 & 14. hen compressed, by the way. a printout will not showe these columns and/or rows so this works even when printing. Below is an example of this.
A graph or chart might look good here. Let's reference the sames person's name and show their salary. What type of chart would work to do this. Probably a bar/column chart. Microsoft calls that we woud normally call a Bar chart, a column chart. For this class bar abd column is interchangeable and you can do either when asked to do a bar chart.
Over the years, excel has made it easier and quicker to invoke a chart. Here's how easy it is. Drag you mouse over the names of the sales people including the column header, Sales person. Do not include total infor. You have selected a range, A3 through A9. Now, depressing your control key, extend the range by dragging your mouse over the salaries. Again include the column header by do not include the total. This is the extended range I alluded to previously and it is only with this type of charting that we will support it. Now, at the moment, A3 through and E3 through E9 have been selected and you should be able to see thiso nthe spreadsheet. Now, click the insert tab of tghe ribbon and hone in on the middle section of graphs. Click column and choose whichever "sub graph" you want to produce the chart. Below is a composite of this.
Third from final lecture, April 20th, 2011.
As indicated, today, Friday, Arill 22 and next Wednesday, Apr 27 are the lectures that remain for this class. Today, we would like to introduce the =if function and spend half the lecture working on this as we finalize the bigv auto dealership. After that ,we would like to introduce you to the books of Ian Fleming problem as we get into more advanced aspects of excel. To start today, click here to load up the spreadsheet as it looked at the end of Friday.
We want to make some modifications of sheet2. Sheet1 is the actural calcs and sheet2 will be the proposed. Move to the tab indicating sheet1, right click and rename to actual. Do a similar situation for sheet2 designating this as proposed. Part of thes process is indicated to the right. Now let's copy our spreadsheet A1 through E10 onto sheet2 by way of copy and paste. THis is similar to what we did with copy and paste in Word. Use either the context sensitive pop-ups of your right click mouse operation or the clipboard controls to accomplish this.
We are about to study another function designated as =if(A,B,C). If tests the condition A and if true produces B. If false it produces C. Now what do we mean by conditon. Tests of equality and inequality will do for this class. =,<>,<,>,<=,>- (equal, not equal,less then,greater then, less then or equal, greater then or equal). We'll show some examples of this in class on a blank spreadsheet. The If statement, which was created by Lotus for Lotus 123 version 2 in 1987, answered a equest by spreadshhet users to control entrys on a spreadsheet pertaining to information alreadty on the spreadsheet and is a form of computer programming.
As far as our problem is concerned, we want to cut the percentage commission to .7% (.007) and provide a bonus of $800 for those having $150000 sales or more for the month. In class, we will use the IF statement to set this in the proposed sheet and compare the results with Sheet1, the actual model now in use.
So, what do we have here. in sheet2, designated as proposed, look at D2. The underlying formula is 1%*b2. Change the 1% to .7% and don't forget to copy down. To the right, we see the new formula and the results for that column. Notice the difference in totals for column D and the .7% does make quite a bit of difference.
Now, let's work with the first salesperson, Val/ We need to test his results in b2 as to whether the sales are equal to or above 150000. Notice the equal to or above. This translates into a greater than or equal situation (or less than or equal if you reverse the logic pattern). We are comparing to b2 and ourr testing formulax would be b2>=150000/ If this is true, we register an 800. If false, we register a 0. Our IF statement looks like =if(b2>=150000,800,0). Now, where do we put it?
We will need a new column and we are in the position of placing that column as a new C,D or E. You can place it anywhere but if you don't want to make additional changes (remember, this bonus will have to be added to the fixed and commission for the new salary configuation), placing it in the middle of the range c2:d2 will be the most optimal. So, create a new column D. If D, set the If statement as indicated and copy down. Notice, in terms of how we have manipulated the ranges, that all the calculations just float into place. Finally, what is the differencene in total salary. We could look on sheet1, now designated as actual what the result is and place it on this proposed sheet. But we can do this on a real time basis. E10 on actual is what is being paid now. You can access this on any sheet by giving the cell its full name which is =actual!e10. This reads as actual bang E10 and will access that cell. (The official designation is ='actual'!E10 but you only need the quotes if there is an embedded blank in the name of the sheet.
Our final thing to do with the Big V auto dealership will involve absolute addressing and if statements. We will just show this to you as you are not responsible for calculations as advanced as this. This is just ot show you what you can do in excel. What if we decided to hold a contest. The highest sales amount wins 1000 dollars. We weant the spreadsheet to not only calculate this but to include it automatically in our calculations. In additon, we must consider ties in which case both parties win a 500 or if there are 6 winners in which case they all get 166.66.
In Sheet3, I have copied sheet1 in its entirety . We are not including what was done in sheet2. Below. you see the ending dcalculation and your instructor will explain how he got to this.
All right. Onto the next problem. Although this seems as if it is a problem of the 1960's (and with a title of the books of Ian Fleming, that's a good assumption), this problem is more like what you would see today. Information from another source and containing what I call detail information must be messaged to give answers on a totals level. We are going to do this problem 3 ways. One use a technique called subtotal which involves sorting (done the easy way for a change) and then configuring into a set of sum of totals. Subtotals go back to the 1920's if not earlier in terms of concept so you are certtainly not dealing with very new conceptual math here. The second way we will do this is by pivot table which dates back to 1992 (first appearing in excel in 1997) but uses as an underlying concept the old database technique of cross tabulation dating back to the early 1950's. Finally, we will do this problem using the new table construct which is new for this version of the software. Now, to see the problem in print, click here
Now, we have to let you into a little secret. This obviously is a forgery as it purports to be data from 1965. Excel did not exist at the time and relational databases had yet to be created. We are doing this because Ian Fleming is your instructor's favorite author and the literary James Bond is your favorite fictional character. it also allows your instructor to include poster art from Goldfinger and if you are lucky your instructor will not start to sing or play this movie's theme song although he does allow himself to hum the James Bond theme in class.
Forgetting the reminiscenses of the 60's, what do we have here. A worldwide set of master distribution points that service local distribution points dealng with 16 titles. Books are shipped to these local bookstores and eith sold or returned. If returned worldwide, the cost to Fleming's heirs is 50 cents. A book returned cannot be sold so we can conclude that the books sold are books sent to the local book store minus those returned for each title. Apparently the publisher has made agreements as to profit for each book sold and this Gildrose's royalty per book which you see on each line item. So, what is the net profit for any book at a distribution point. Sales (distribution - returns) multiplied by royalty/book - returns times 50 cents, the cost of the return.
Now, If we had more time I would require that we cut and paste this information into a new spreadsheet and talk about the sylk format that Microsoft has created to handle tables throughout the windows operating systems. But, given the lack of time, I have set up a spreadsheet for you which you can access by clicking here
Because we are going to do this problem 3 ways, I have loaded sheet1, sheet2 and sheet3 with the entire table you saw in the word document. Notice that there are 113 rows. The first row is the column header meaning that 112 of these rows are line items. There are 16 books and you will notice that they repeat 7 times each (16*7=112) and our assignment is to determine the profitability world wide for each book and worldwide for all the books.
Let's begin by renaming the sheets. Sheet1 will be designated as subtotal. Sheet2 will be designated as pivot table. Sheet3 as table construct. Move back to the renamed sheet1, subtotal.
As indicated here, we are doing sheet1 as a subtotal. Your instructor will give you an example of the use of subtotal on the board. This was done prior to computers by old fashions sorting and accounting machinesx and moved to computers when they became available during the 1950's. However, before doing the processes needed for subtotalling, we need to determine the profit (or loss) of each line item. In class, we will put to formula what was discussed above. The profit or loss of a book title at a distribution point. Each line item contains the number of books distributed. The number returned and the royalty per book. For subtotals, we will use 4 columns to determine the profit or loss per book title. In the next sheets, we will use only one column.
G,H,I and J are not being used. Let's title these as books sold, profit on sales, cost of returns and profit. In G, calculate books sold (books distributed minus books returned). In H multiply what you just calculated by the royalty for that line item. In I, caluclate 50 cents multiplied by the returns - this is the return cost. Finally, in J, calculate the results of H minus I. Let's set these for all the line items. To do this cell by cell is 448 calculations. Think you can do that correctly and in the remaining time of class. It's easier to set a range of g2 though j2 and fill that range though row 113. Below, we see this in operation.
Next to last lecturem Friday, April 22nd, 2011
Before we start, several administrative items. We wil not be meeting this coming Friday, April 29th, as this is the school study day and classes are cancelled. THerefore, Wednesday, April 27th is our last day to meet for class.
Our final will be May 4th or 6th depending on what the class decides. The subject of the final will be Excel.
I have activated severla tutorials on the snap site for Excel but your test is an in-class exam. Your should also look at previous excel tests that I have given and you can do this by clicking here.
Our last thing done last class was the filling of the four columns. You can load the excel spreadsheet as we left it by clicking here.
Notice as we load this up that the last 3 columns are highlighted. These columns represent money in essence and have several different decimal points associated with them. Let's set up a consistency and set these to 2 decimal places. In real life, we might add the British pound sign for currency but I 'll leave that up to you.
We could do column totals at this point and we would find the number of books written by Fleming sold world wide and the total profit. We would like to get this info, but our main focus is taking this detail info and getting composite totals involving the profits of each book. This is harder to do than just one total (designated as a grand total). So, we are about to follow what tab operators have done for almost a century. One sort's data on the column that the subtotals provide inforamtion about. In our case this is book titles, but let's assume a case where we are a bank determining the assets of each gender. We have a set of states where we have accounts. Each account indicates the amount and whether Male or Female by M or F. What's the procedure to determine amounts held by Female and amounts held by male (these would be 2 subtotals) and the grand total for everyone.
Below is our accounts:
NY      200     M
NY      300     F
NJ      100     M
NJ      200     F
NJ      300     M
PA      300     F
PA      100     M
We start the process by sorting on sex. We have two possibilities, ascending or descending. If ascending, we see these accounts as F to M. If descending, M to F. Least line of resistance is ascending. When sorting, different algorithms are used to sort and collate info together. You have no guarantee of positioning beyond what you ask. In this case, if we were to use Excel's sorting, the only thing guaranteed is that the F are together as are the M's.
Whatever algorithm we are using, below is what we wind up with as we attempt to congregate Fs and Ms
NY      300     F
NJ      200     F
PA      300     F
NY      200     M
NJ      100     M
NJ      300     M
PA      100     M
Now, whatever technique or software that would be used, it would work this way. There would be two accumulations, one for subtotal, the other for grandtotal. At a break in sex - break indicating change or end of data - the subtotal would be printed and the subtotal counter set back to 0.
                        Subtotal counter    Grandtotal Counter  Print
NY      300     F           300                 300
NJ      200     F           500                 500
PA      300     F           800                 800
                    Break     0                         F       800
NY      200     M           200                1000
NJ      100     M           300                1100
NJ      300     M           600                1400
PA      100     M           700                1500
                    Break(Eof)0                1500     M       700
                                                  0     Total  1500
Now, let's do the same for this problem of the books of Ian Fleming. We need to congregate all the casino royals together, all the goldfingers. We should sort on the book title. Now, one note. In a previous sort we failed given that another line item was added for totals. We have not done that here. So, we can use the simple sort A to Z or Z to A that we have seen on the Data tab of the ribbon.
Move your cursor anywhere on the first column of books. In fact, we'll split this up so that we will all see the same result even though we start from a different place. Click a to z. below is a composite of the result.
Notice hte grouping of the titles. We are almost done. We need the system to give us subtotals on these grouped titles. The data ribbon provides a tool for this which you can see far right. This is sub totals and clicking it produces the dialog box described below. Note, however, that if you set your table ot the new table construct, subtotal is grayed out since the new table construct gives you many of the eatures of subtotal and much more.
Clicking yes adds a set of rows to your spradsheet. Every subtotal is added as is a grand total. In our case, there are 16 books and a grand total giving 17 new rows. In additon, a set of controls are instituted to the left. Below we see part of the spreadsheet after clicking yes to subtotals.
Look on the left at the controls. Notice that there are 3 of these (1,2,3) at the top. 3 is detail and subtotal info. 1 is just grand total info and 2 is what we want: subtotal only info as indicated below. Notice grand total info is also included. Columns which are not used for breaking or for totalling appear unpopulated. You could group these and, in essence, hide them from view. Anyway, below is our subtotalled info.
Excel treats cells that are grouped out of view as not part of the spreadsheet when selecting. This is true in terms of sorting. There are 130 rows. In view, there are 18 at the moment. The first row is the header row, and then we have 16 rows of subtotal info and then the last row, grand totals. In a previous situation, we tried to sort with totals and totals moved through the spreadsheet. With subtotal, the system knows that grand total should be at the bottom. We would like to sort these titles on the basis of profitability - the highest at the top to the lowest. Move your cursor anywhere on the last column and click z to a in the data tab.
Now, the same principle applies to graphs. let's do a bar/column chart on the books and their respective totals worldwide. Highlight the books (except for grand total) in column A (in essence the first 17 of the rows shown) and likewise use your control key to add the first 17 cells of column J. Use the insert tab of the ribbon to create a bar chart. Below, I've gone a little further by setting an angle for the descriptors. The principle is similar to the other time we sloped text. Move your cursor on the titles and click your right button and select format axis. You will see the more modern version of the dialog box we had seen in the previous example. Click alignment and set 45 as the degrees in custom angle.
With pivot tables, the ability to get to this result has been speeded up. Pivot tables is an advanced version of cross tabulation. Oerhaps next week we will give an example on this site (although if we have time we may show it on the board tonight). In setting up this new more dynamic version of cross tabulation, the designers automatically created a better way of subtotalling as you will see. We said that the second sheet would be used for pivot tables so let's get there now. Let's create a new column which has the line item profit. In the previous example, we did this in 4 columns. Can you do it in one. the following formula should work =(d2-e2)*f2-e2*.5
Try it and you will see the same numbers we dealt with on sheet1. This gives me the opportunity to indicate that on your test if this problem was given, either insert of 4 columns of info or one, would be acceptable assuming you got the right answer. In the past, I would indicate that the 4 columns gives you a greater chance to debug the equations. But, the additon of evaluate formula on the formula tab of the ribbon now gives you the same capability no matter the number of columns.
You have just completed the prep work necessary to get the pivot table to work. Prep work is a necessity in subtotals at least at the minimum of doing the right sort. Prep work is even less in subtotals. Click the insert tab of the ribbon and click pivot table, verify the range and set as new spreadsheet as indicated to the right. Click ok and a new sheet, sheet4, will be created and you will be on it.
It is now l:45PM as I write this and I have a session with my personal trainer, Rob, at Bally's at 2:30Pm so we end the description of our lecture here. Assuming that the coming aches and pains of Rob's workout for me are not tooo excruciating, I expect ot see all of you tonight and if we get to this we will explain the rest of the operations needed to create a pivot table at that point
Last lecture, April 27th, 2011
Tonight is our last lecture. I want to thank the class for your attendance and behavior during this class. It was certainly a difference from the last time I taught this wed/fri class last year.
As voted on, we will have the final on Wednesday, May 4th, next week. The final is an in-class test on Excel. And speaking of excel: Click here to load the spreadsheet as we left it on Friday.
Now, apparently I am wrong in terms of the designation of the sheet used for the pivot table. Mine is coming up as sheet6, which you should click on. Sheet4 and sheet5 were used but deleted. Perhaps the progrrammers of Excel take that into consideration. Best I can tell you now is that new sheets pertaining to pivot tables are designated as sheetx but how the x is determined is now a mystery.
Anyway, click to enter sheet6. Below, is what you should be seeing. Note, to the right is a list of columns. If columns are to be listed by the column header designation, you can understand why there is a need for a column header which was what tripped us up at the end of the night on Friday. This version of excel will allow for duplicate headers by setting a 1,2,3 in brackets as the headers are displayed but good practice should require you to come up with unique header designations so that no doubt on your part is involved. Now, before doing anything, keep in mind that excel is pretty sharp in determining what type of data each of these columns contains. By polling the column, excel can determine whether a column contains numerics or is text. You can select columns to appear on this pivot table by clickuing the check box of a column header or dragging that column hesder into one of 4 components. The four components (and you can see them below, are row (default for a text column), column, data (default for a numeric column with an additional default of summing) and report filter which in previous versions of excel was designated as page. A click to a text column puts it automatically in row, a click to a numeric column puts it automatically in data with the mathematical function set as summation.
In the previous solution, we ended up looking at each book and its profit world wide. In essence, we used 2 columns - book title and net profit. Click on title and then click on net profit. Default on the row indicators are a to z (alphabetical order) which you should be seeing. Subtotal info per book is now being displayed as is grand total info. Check sheet1 to determine that the numbers are the same. You should understand that a mathematical function is at play here, summation, and that is the default for these calculations. You should be at the point that is shown below.
We have more to do with the use of sum but what if you wanted to use a different function, let's say max. Could you have the pivot table display the max profits of any book for a distribution point. Of course! Below is a composite shot of how to choose max as your numerical operator. We will point thiso ut in class be return to the use of sum. In the end, you have to know your problem and what math you should use. Rresolving the maximum profit of a distribution point for each book is not going to answer the questions of the heirs but below is an example of using another math function if your problem should warrent.
I have returned to sum. Again, probably the heirs would like to see this list of books in reverse order of profit. Similar ot what was shown on Friday, move your cursor on any of the profits in column B and use the z to a control on the pivot table tools/options tab. It wouldn't be a bad time to include a graph and again we can stay on this tab to accomplish this. What's also nice about this is there is no need to multiple select cells. Again, with your cursor where it was, select pivot graph and then column. You should be seeing what is below.
I did mention that you have quite a bit of controls available to you once a chart is created. We see the same controls at this point. Notice how the ribbon reacts to us. Additional tabs are there for our consideration. 2 tabs exist for pivot table options. Additonal tabs are offered for the chart created within the pivot table. We could have 4 or 5 new tabs in display at this point but keep in mind, you still have access to the original 7 tabs. You can see why it took some time to create this version of office. A lot of thought had to be done to get a clear understanding of what was needed by the user at any time. This problem, among others, shows the power of the ribbons.
One more thing about pivot tables and then we are on to bigger and better things. Once the pivot table is created, it runs independent of the underlying table. THeoretically, at this point you could delete the unserlying sheet. If changes are made to the underlying sheet and you want these changes to be reflected in the pivot, you can either run through the creation of the pivot table or, even better, refresh the data. It is important to understand in pivot table operations that changes to the underlying table are not reflected in the already exising pivot table. On the other hand, changes are immediately realized in subtotals.
All right. We are about to embark on the latest and greatest. The use of a table. I call this the new table construct. I hope you enjoy this as much as I do as I think it is a great addition to spreadsheet operations. First, a little overview. It was clear that subtotals had been superceded by pivot tables but in many instances it was necessary to look at detailed info which you cannot do on pivot tables. Summation totals could only be applied through the pivot table and the filtering process (looking at limited types of detail info) also was difficult to do. Finally, there were limitations to the table autoformat process. This has all been fixed or improved with the new table construct.
Let's start this process by shifting to sheet3. Let's set the new table construct. We will need one more column similar to what was done on sheet2.
With your cursor inside the table, on the insert tab click table. A default banding blue and white table format is applied to a1 through f113. Click in G1 and type profit. click. G is now part of the table (if not there are other techniques to handle this). If g2, sety your formula. =(d2-e2)*f2-e2*,5. When you click, the entire column is set. Like this table already. If you don't like the formatting, tyou have a design tab above and you can change this. Below is the beginning of what we are dealing with.
Look at this design tab. Header is clicked as is band. Total is not. Click the total row check box, A total row on 114 is created with the last column set as sum. Move your cursor into E114 and you will notice a right hand control. Click that and you will have the option to create a column total using a multitude of functions. This is an extended column totals row with the option of using multiple math function. we see this at the right.
Move up to the top of the sheet. Notice that the column headers have controls to the right of them. Let's use title although they all work the same way. First, you will get a sort selection possibility and then you will see all the unique entries in that column as shown below. By the way, it would be interesting to discuss text filters (and numeric filters) but we dont have the time.
Foloow your instructor as he shows only Casino Royale. Notice that this is all the detail items shown. Also, that the ending totals only pertain to Casino Royale. In essence, we have duplicated subtotals for one title. Here we start to see differences. If you click goldfinger on to accompany casino royale, notice that the totals pertain to both books.
How about running a pivot table. You can do so as done above but notice that the design tab includes a summerize with pivot table which starts you on the way.
For this problem, the books of Ian Fleming, we have resolved this 3 ways using 3 worksheets. If we have the time, we can do the same with other problems. Click here to see the CBL documentation and click here for this as a spreadsheet
Note:Enrollment code for OA106-018 is lessons-aluminium
Your final is today, Saturday, April 30th. There are 2 multi-part questions to your test. One problem has you putting in the data and the other problem uses this excel file
This version, The Marquee series, is issued in several books including one on Word, the other for Excel. The suthors are Rutkowsky, Sequin and Rutkowsky. The publisher is paradign/emcp.
We are interested in the books for 2 reasons: as a reference and as a entry to the publisher's web site designated as smap2007 and accessible at snap2007.emcp.com
The intension of this course is to use the snap2007 site for your Word test, a computerized test you will do outside of class. To be able to do this test, you will have to be able to access and use the sanp2007 site. This can be done in 2 ways:
Purchase of the books in their wrapper (new) should provide you with a pamphlet that contains a code to be able to register on this site. Next week we will attampt to use a student's pamphlet and code to register them on the site in class so that you can see this.
You can purchase a code from the publisher without purchasing the book. I am told that with a credit card the code can be emailed to you. The telephone number for the publisher is 1-800-535-6865.
Enrolling on Snap2007
The book's (and publisher's) web site is at www.snap2007.emcp.com although it is easier to use snap2007.emcp.com
You cannot use any browser other than Microsoft's Internet explorer. Further, if you have IE8, which is probable, you must moodify IE8 to run as if it is IE7. To do this, click page and then click compatibility view as indicated below
Assuming you have set your username and your password (if not, look below for a tutorial right after this discussion), enter the username and password. you should see something like what is below left and this is where tutorial and tests will be available to you. Below, right, I have shown you what I see and periodically I will activate tutorials.
First Lecture (to some degree)
First, as we start, I would like to make an Email list. We are going to do this real time, use the form above to Email me your most appropriate Email address with your name. We'll watch this, hopefully, on my email site as you do this.
For the excel test, you will be required to Email an attachment. Click here to load a file. Bring up your Email and attach this file and Email it to me.
What you brought down is designated as a file. it's official definition is that a file has a designation on a media so that it can be accessed. The file name is Blondie2010.doc. This is composed of the name Blondie2010 and the extension doc. The extension is the operating system's way of determining what type of file it is. Doc means that this is a Word file. The way this is set you do not need to know what type of file it is. You can just access the file and the system will bring up the appropriate program for you which will contain this file. Let's try it with Blondie2010.
I asked you to put the file into something designated as my documents. You are running an operating system, XP, that is now quite old. It may not work like your machine at home. My documents is such an example. In Vista and Windows 7 this is designated as Documents. It is where, by default, application programs save files. The school has added things that certainly make it different from other machines you have used outside of this school. When you turn of and rebbot your system, files such as the one you brought down are deleted. Do not put needed files on your system at school and then power down expecting them to be there the next time you power up. Save needed files to a flash memeory device. To prove this, let's bring our system down and then up. To bring down a windows oriented system. hold the outside power on button for 6 seconds. To bring it up, hit the power up button.
Second lecture: Jan 29,2011
There are several students not accounted for on my Email list and I expect on Friday night to exercise this list for the first in this class. I also have information to some degree about Office 2010. You may (and you don't have to) use my supplier for acquiring Office 2010. THe preofessional version which includes outlook and Access and the applications we will be studying costs $95 and can be applied to your computers twice. If you want to go this way, contact Juishi Dian at Apex computer at 610-695-0695. I want you to understand that Juishi is my supplier of computer equipment but I am not involved in any way, especially monetarily, with any transaction that you have with him. Keep in mind that there is a possibility that the software may come with the books in which case everything is resolved. Any software with the book should have a shelf life that will emcompass this class.
Another possibility is accessibility through the department but you would have to visit C3-1 in the commerce and industry building on main campus to effect acquisition of this software.
You can also bring down a trial version from Microsoft's web site but it does get a little more complicated. A code is Emailed to you and then you can download using to code to activate the software. I believe this is a 30 trial which may be enough time per this class. Below, are pictures of what to do although I had to stop when we got to the the actual request of a pass code. Microsofts web site can be accessed by clicking here or accessing www.microsoft.com. Once there click the office tab, select office trials and then select try it now (or you can buy it) to get you to the point where Microsoft asks for a Email address. Below are screen saves of this.
The next thing we want to do is send an attachment to your instructor, me. Click here to start the procedure to download a file onto your computer in class. Follow your instructor and he will show you how to save this file onto your system at school. We want ot end up with this file, designated as bondreceipts.xlsx, in a position where you can access it through my documents. Bondreceipts was one of the files in last terms excel tests and the xlsx designation indicates this. After we deal with mailing an attachment, your instructor will talk about filenames and what they mean.
Once the file is in my documents, your instructor will show you how to attach a document to an Email. Attachments can not be used with the formmail procedure we used last week. So, you are left in using something that most carriers (ISPs) call web mail. I will show you how I can use the school's Email system for instructors to send this to me and below is a set of screens that do this and we will follow these screens as I use my account on the school's Email. What about you? look at my example and after we are done, you can try it with your own Email and maybe we will get a volunteer to do this. However, below is a set of screens showing this process as far as your instrc utor is concerned.
I start by entering my Email and clicking new for a new Email
We continue as if this is a regular Email. When Emailing me on a test, indicate in subject your name and the problem designation. This makes it eeasier for me to determine who is sending what and there are less mistakes. I, as your instructor, want ot give you the grade you have earned and any mistakes, such as if I missed a problem you sent, will eventually be corrected but why go through the bother. By sending me a subjec t indicating your name and problem number, less mistakes will occur. In addition, I have not shown this, but in cc which stands for carbon copy, you should carbon copy yourself on any problems sent to me during a test. If anything goes wrong at my house in receiving things, you and I have a backup - your carbon copy.
The school system for the instructors has a button designated attachmen t which I have clicked. Browse is the easiest way of telling your Email where the attachment is. During the test, look ion my documents and your file is probably there. In any case, during a test, if you have problems finding the file to attach, feel free to ask me and I will help you
Most web mail requires you to verify that you do want to attach the file. You can see above the attach button which I will click. Thios is not uniform throughout the internet, but in the school system I will get a verification that the attachment was successful
We have returned to the Email and in this case you will see that attachments indicate the file. Most web sites do this so this is something to verify. I will click mail and everything should go to 777rauer@voicenet.com. By the way, thanks to voicenet this is a hepped up Email site with quite a bit of memory capacity. On the test you will see rthis EMail address prominently displayed and this is the Email address you should use to send me attachments. In spite of what I say, some students insist on using the school system but the school Email properties for the instructors is very limited. If I can access your Email and attachment, I will but if I can't this is not my responsibility given that I have been telling to use 777rauer@voicenet.com.
I am on my machine at home. I use Outlook 2010 to receive mail on that machine. Above you can see that my Email message has been received.
We started to talk about files and file names. A file is nothing more than material that can be accessed by a specific name. First, what is a name. A file name consists in this class of a name and an extension. Above, we used bondreceipts.xlsx. In this case bondrecipts is the name and xlsx is the extension. On a hierachy, there can only be one instance of a name. A hierarchy in this system is called a directory or folder. My documents is such a hierarchy - it is a folder. The desktop itself is another folder. The root directory of the C drive (and if you don't understand this, I'll try to explain it in class) is another folder. I could have separate listing of bondreceipts.xlsx in the root directory, the desktop and my documents all at the same time. There is no guarantee that these files are all the same. What i can't (and neither can you) is put 2 instances of bondreceipts.xls in My documents, or in the desktop or in the root direc otry or any folder directory.
Now we said that bondreceipts.xlsx is made up of a name (bondrecipts) and an extension (xlsx). What limitations do we have for the name. Various systems of windows invoke a 128 or 256 character limit - I think XP, the operating system on your school machine, allows for 256. Use what you need but in this class there should never be a need for that many characters in a name. What characters can we use. All alphabetic and it doesn't matter whether capped on not, all numbers, many special characters including . (dot) and _ underline. You cannot use - (minus) + (plus) * (asterisk except in special cases and this is not one file specific), / (slashes), \(backslashes), $ (except in special situations) ? or commas among others.
Now, what about the extension. This in this class will be defined and manipulated by the software application we are using. When in MS Word, we are dealing with doc and docx. In excel. we are dealling with xls and xlsx. In Powerpoint we are dealing with ppt or pptx although you should understand that powerpoint has several other extensions including pps. Now, you can answer the following question: what application is bondreceipts.xlsx a part of?
Now, what does the extension do for us. It makes the operating system documentcentric to coin Microsoft's terminology. Double click (or right click and request open) on this file. What happened? If you did this right, you should have loaded the program excel and when excel was ready, it should have loaded bondrecipts.xlsx.
Now, let's try this anorther way. Your instructor will show you how to load excel by itself. Notice that when excel comes up, there is no data inside. Now, let's do the same thing as done above. This time you are going to need to navigate to find the file. Click open and you will get some type of browse configuration. Use that to direct yourself to my documents and once there click on bondrecipts.xlsx and load it up.
You have now accessed data in two ways. Which is easier? Most users would say the first way. Not only that, it's quicker, too.
For the rest of the class, let's talk about several things: equipment and history. Below is the lecture on history used last term. You are welcome to look at it now and I will try to hit the highlights for you in class. We also want to discuss equipment so your instructor will discuss what's inside these boxes with you in the time that remains.
reprinted from last term:
Welcome the students to the class. Let's discuss the syllabus and what we hope to accomplish. We might as well start with a history of computer science/data processing and how we got here. This will include a discussion of the history of Microsoft Office. Next week, we hope to get into the operating system, but for this week let's look at equipment. What is a case? a system board? A chip? Ports? Disk drives, CDs and media? How does a keyboard work? How does a mouse work? How does the terminal work? This should keep us somewhat busy for this class
We didn't go as far as we thought last Week as we got hung up on History. Let me indicate the history of MS Office - especially the applications we are going to use.
Word Processors as a class of programs go back to the early 70's. Some early established microprocessors were written specifically to do word processing and one example of this was Wang. Later Wang would create a set of general processors, but their first foray in a computer system was a specific machine only geared to what is now called Word Processing.
Sometime in the early 80's, Microsoft introduced Word (now known as Word for DOS). It wasn't a bad product but two word processing packages had greater market impact. At first the leader was a product designated as Word Star which had been created during the late '70s and had been popular on other microcomputers including the Apple that IBM used as a model for creating the PC. It was ported to the PC and, if I remember what I had been told, Wordstar was a component of one of first DP103 classes that is the forerunner of this class. It was a knock off of the Wang word processor as a stand alone program.
Out of the high tech environment of Utah, another word processor appeared and this was called Word Perfect. For it's time, this was a great program and became the standard for word processors in the middle and late 80's. Interesting, enough, it created a variation of a text file using beginning and ending codes to put features on and off. And, I believe, that if you went into the code, you would see something like Make this bold as indicated here. Of course, most users wouldn't see this - you would have to access the file structure to see how Word perfect did its commands but this became the basis of another technology, HTML, when this concept was borrowed.
During the 1980s, Word might have had 5% of the market share. But, technology has a way of moving ahead, and you have to keep up with it or you may lag behind. In 1990, Microsoft introduced the Windows (really designated as the Windows 3.0) operating system and very few application programs were ready for it including any of the Word Processing applications
Micrososft ported Word into this void and supplied it with a new technology designated at wysiwyg (What you see is what you get). Because Windows became popular, Word naturally bacame popular, too. Today it is the leading Word processor in the world.
Almost a natural outgrowth of word processing would be modifying printed documents for presentations (let's say slide show presentations). Many cases there would be a need to combine this with the output of another type of application program to be discussed, spreadsheets (and specifically graphs created by these spreadsheets) as in the case of Lotus, for instance. Apple led the way on this turning their GUI interface (the one copied by Microsoft to create Windows) into a receptacle for bulleted and numbered text in combination with graphs. In Apple's nominclature this became known as presentation graphics. Other companies steped into this in the PC market including a company called Harvard Graphics (Which I don't belied had any tie in with Harvard University and was California based). After Windows was introduced, many of these companies did port their products to Windows which would have been natural given what was their look and feel. Microsoft joined this in 1994 by introducubg Powerpoint at that time and it become one of the factors in Microsoft's idea of a suite of application programs consisting of the aforementioned Word and the soon to be mentioned Excel designated as Office. Originally Word and Powe5rpoint did not share many features. Today, through a concept designated as object oriented programming, they are quite similar and your instructor generally describes Powerpoint as Word without text although there are plenty of other differences.
In 1978, a software engineer who had been working out in California and had been involved in the microcomputer "revolution" discussed last week was taking courses in the Boston area having been transferred by his company. Legend has it that what I am about to tell you occurs in an MBA course. He had moved east with a new Apple and it had to be new given that this is supposed to be occurring in 1978 when the two Steve's intoduced this machine. MBA courses at that time were a grind of calculations. Do the same problem with the same figures but at different rates of interest. The engineer, Dan Bricklin, programmed his apple to do these calculations readily and, since he was in an MBA class, he created his own business in selling this program to the rest of the students (and probably sold them the Apple computers, also). This is visicalc which is the first electronic spreadsheet and became a popular program to be used on Apples.
Visicalc was ported to the PC, but another situation was occurring. By 1981/82, Wall Street had discovered "PCs" and this industry. Another entrepenoir, Mitch Kapor, secured financing for a proposed company to take the general ideas of Visicalc, with many changes, and create a public company whose aim was to see a spreadsheet designed specifically for the IBM PC and designed for market penetration into large companies and this was creation of Lotus, Inc and its spreadsheet 123.
Visicalc had proved the possibility of spreadsheet. Lotus proved the nuts and bolts of it and many of the ideas behind Lotus were central to the ideas of Excel when it would be introduced in 1990. 123 was DOS based running (and needing) Microsoft's operating system. In the meantime, Microsoft had purchased a small company who also marketed a apreadsheet product. Unfortunately, I am one of the few people who will admit to using this product called Multiplan and it was just awful. Needless to say, it didn't have much market share but again in comes the new technology. Lotus refused to move up its flagship program to Windows when Microsoft introduced the new operating system in 1990 and Microsoft completely rewrote Multiplan giving it the look and feel of Lotus 123but with enough changes to legally withstand any challenges, gave it a new name, Excel and marketed it with the new operating system. Lotus' refusal and then delay produced a window for Excel to become prominent and even though Lotus was later sold to IBM, even IBM couldn't recapture the market.
Today, there are 4 office suites in existance for the PC and 3 are fee based. We are studying office from Microsot. IBM has a suite it sells under the Lotus name. Corel, a canadian software maker, bought Word perfect and portions of a product line from Borland to create its Corel Office. There is also a freebie called Open Office which you can download from the Internet.
Now, I would also like to discuss some of the hardware we didn't discuss last week. I have a disk drive to look at and we can discuss how this works. A CD also for that matter. Now as far as disk drives, several platters are positioned on a spindle and, when active, the spindle is truning at a constant speed. To the side are heads that can move around the platters and read them. It sounds a lot easier than it is. At these speeds, any really minor problem as far as the heads are concerned will destroy the disks. Yet, engineers have made tremendous advances over the years and have increasing the speed that the platters revolve. This creates what engineers call compression: the ability to read the same amount of data in less time and this has resulted in trememdous increases in disk capacity. In the computer industry there is something called Moore's law which states that technology should be ongoing to the effect that double the speed and capacity of computer equipment should be occurring every 2 years. For the disk manufacturers, this seems to be increased to a factor of 3. Two years ago, for instance, 80 Gigs was the norm for new disk drives and today, that norm is 250 Gigs.
What is the heads, whatever the speed, reading. Well, its a version of magnetic tape, generally called mylar in previous eras, that have been with us since World War II or slightly later. Similar to computer memory, sections of it can be magnitized or not, giving 1s or 0s. The platter is divided phyiscally into blocks and each block is dicvded logically into what is called sectors. The disk drive pushes through from the rim of the platter to the middle. Now, whatever the speed of the platters as they move around, the heads move faster and to the heads it seems as if the platters are stationary. This would be comparable to you slicing a pie while it is slightly moving.
For CDs we are taking about light and optics. Bumps are situated along a path and a laser (light) is shot at the bumps. The bumps are such that either the laser beam will reflect back and be recognized or will not. If recognized, we have a 1, if not a 0. Data ia populated in tracks around the CD and there are several ways of formatting CDs dependent on whether we are talking data or music. And, please don't get confused: MP3 file formats are data, CDA formats are music. Music is the most interesting because it is saved on a CD in 2 tracks like a stereo as far as I understand. Now, I have never talked to an audio engineer about this but mp3 files (and mp4) which have their origins electronically must be better than a similar file in CDA format on a CD given that MP3 would be nuanced beyond pure stereo. However, in most cases, MP3 files are stored on CDs in CDA format and then recreated in MP3 format when ripped. This is what people talk about when they say music deteriorates when copied. I doubt if this is true when going mp3 to mp3 but it has to be true when an original mp3 is moved to CDA.
What about flash drives. These are involved Eproms. In the computer industry, several different components were perfected for computer boards disignated as Roms (read on memory) which would hold computer instructions within it. Proms were developed so that users could create their own ROMS. The term meant permanent read only memory and could be done once. Eproms are proms that allow continued rewriting into a prom, in effect. Mobile use of Eproms is what you have for flash memory. We use the same terminology that we have on disks for flash memory, but remember you are dealing with something that might be more unstable and less durable than the mylar on a disk drive. Theoretically, new materials used in flash memeory is attempting to give flash memory the same shelf life as a disk drive but I don'tv think they are there yet. Further the connector is always an achilles heel as it can wear out through constant use.
How about a mouse? I like to talk about your mouse because I can ask you, what is a mickey? This is micrsoft's talk for an amount of movement of the mouse (I think it is 1/32nd of an inch) that produces an "event" as far as your operating system is concerned. The mouse wheel (either mechanical or logical in the case of a laser) indicates the movement and in what directions and the operating system interprets this movement as per your mouse cursor. While a lot better than the earlier windows operating systems, sometimes your mouse can go haywire. When that occurs there is an attempt to restart your mouse and this would placce it at the center of your screen. Whethert or not you can run into the problem of the mouse disappearing has to do with the other perifierals on your system as they could interfere with mouse movement.
Everything designated above is independent of language and society. A disk drive will work whether the data it holds isin english or german given that in the end we are talking 1s and 0s. Same with music as this gets transferred to 1s and 0s. Mouse operations deal with mickeys which are measures of length. But, what about your keyboard? In the end, society matters as many societies have different keyboards. Even in the US we have the normal QUERTY. Other keyboards, including the DVORAK have been invented and are prevalent in many other societies. Further, what about the different letters such as semite script or cyrillic or picture as with asian cultures. Your keyboard has to handle all of this, This is done by a system of technologies. Number, you are submitting tones into your system when clicking a button and the tone represent the maximum 64 keys with an additional number of changes based on added keys such as auxilliary, control and shift. When you set up your computer originally, you were asked about the society you were in and your answers determine what the operating system designates as a codepage which is a software program that interprets the keys that you are hitting. Each key, under codepage, is translated into a 2 byte designation (now, possibly going to 4 byte) indicating the following : a byte to indicate special keys depressed such as ctrl, shift and alt and any combination and a second byte having the value 0 through 255 indicating what is known as ascii. For instance an ascii hex 20 or decimal 32 is a space. A hex 30 or decimal 48 represent a character 0, etc. Modern keyboards have become more fragile, bucking a trend in the computer industry. Wireless devices are now a part of keyboards and, for some reason, antennae are not well protected in these and it is not unusual for a wireless keyboard to stop working when dropped. Wireless mice don't seem to be as much affected.
Windows is designated as a graphical user interface. What does that mean. What it doesn't mean is that specific characters are written to your screen. What is does mean is that pixels, millions of which now exist on modern screens, can be turned off and on to create the look of characters. This is what is meant by a graphical user interface. Mathematics (and examples) of letters and figures to be put on the screen are passed to routines written for the operating system. By use of these parameters, the correct pixels are turned to various colors to create the illusion of the character or figure. If you are studying a computer language rfor instance that has the ability to go down into the lower levels of the operating system you will run into commands such as drawrectangles, drawellipse, drawpolygon, drawarc, roundedrectangle, drawline, drawpie, etc. You can most see this using the paint program on your system and maybe we will take a look at that today to show you.
Anyway, what you want to appear on screen is passed by your program to components of the operating system which interpret them for your screen. Information on this would include font (which we will discuss this week or next), point size which is a sizing factor and location on the screen. The components indicated produce the results on your terminal by first producing the results within your system and these results can be passed up to 90 times a second to your terminal in what is known as a raster scan.
There are no curvews in this technology. In what is the best example of the ter digital, curves become pixels put into lines. Below, we have taken the letters ccp and blown them up. Notice how the curves are not curves but a set of straight lines.
This is the GUI in action and this is done throughout the windows operating system including in Word. Now, below, even thiough it started out as text, it no different than a picture. What allows pictures (Microsoft would designate thia as a windows metafile) to become text as in word. Whatever word processing program is being used, tables of information are stored about each letter as it is placed on the screen including how far to the left it is, possibly how far from the previous letter (or character), how wide this letter is, how tall it is, it's distance from the previous line above and its distance form the top of the document. When you move your mouse cursor (or move our text cursor by the middle buttons on your keyboard) these tables of information are used to determine what character you are over and a text cursor is nothing more that highlighting this picture of a character and giving you the opportunity of change.
We hope to finish the class today dealing with files, folders and directories (directory is another name for folder). All of this starts with names. Different versions of windows allow for different lengths but I think in your version XP, 128 characters are allowed for the "name" of a file. This is broken down into name and extention separated by the last dot (.) that can be found. Your operating system is documentcentric which means the extention governs what application program is associated with the file. Here's some examples
Marc Rauers.resume.2010.docx a word 2007 document probably is a resume
Marc Rauers.resume.2010.xls despite the name this is a spreadsheet
Marc rauers resume.2010.jpg this is a picture in jpeg format.
While the name is important, the real power is in the extension. In older days, you could set your own extensions for most applications when saving. This has been restricted severely over the years.
For our purposes today, we need a few files. We will be creating our own directories to hold these files. Now, first, let's bring down some files.
First a picture. Click here. Your instructor will show you how to save this to your hard drive.
Now a word document. click here. Again your instructor will show you how to save this on your disk.
Now an excel spreadsheet. Click here. Again you instrcutor will show you how to save this.
3rd Lecture Ms Word: Feb 5, 2011
We will start today with the snap2007 site. Since your first test, on Word, will be through this site, you must be able to get on. You will need two things: your pamplet having a code on the inner cover: this is the activation code. And you need an enrollment code and this code is lessons-aluminum (don't forget to include the hyphen which is a minus on your keyboard). We are going to take one real student and a fake student and register them on the site. There will also be a discussion of how to access the site in terms of internet browsers. This involves Firefox, which you can't use and Ie 7/8, both of which must run as IE7. At the top of this script is a tutorial on enrolling and using snap2007 with IE 7 and 8 and you can see reference by browsing above.
Let's bring up MS Word on your system. At home you can access this by a variety of methods. In class here we will go through XP's program listings to find a shortcut to this program. Therefore use start/programs/MSOffice/word 2007
I have a tutorial discussing the changes pertaining to 2007 versus previous versions. You can access this by clicking here but in previous classes several students were able to indicate 8 changes just on the word buffer screen. Let's see how this class does. Now, your instructor also wants you to know that there is no need to have had previous experience in other versions of Word for this class - in fact there is no need for previous experience with Word, itself, but those who have dealt with Word in previous versions without having had exposure to this version, will have some difficulty adjusting and there is only one way to do it: spend your time on this version.
With our blank document, let's start to move off this screen (generally called the word processing buffer) and look at other parts of the program. First, let's deal with the ribbon which has 7 tabs in Word 2007 (and 8 tabs in Word 2010 with the inclusion of the file tab) which we will move in and out of and discuss which parts we will (or may) deal with. Below is the tab for insert. and you can see many possibilities in terms of inserting.
Why use ribbons as opposed to the previous use of the microsoft menu system. The problem, today, is the wide range of characteristics of different displays. It is not unusual to have very large number of pixels in plasma screens (one of my machines is set at 1680 by 1050) yet others are constrained to 1050 by 750 (or thereabouts) when using laptops. Whether you will see this in class or not, the ribbon expands and contracts to be able to handle any size screen which was a problem with the text based MS menu system.
Now, click the microsoft office (Vista) button and a dialog box will be extended as shown to the right. Of interest here is the option on the left which are simuilar to the options available on the file menu in orevious versions. The pick list which is nothing more than the previous word files that have been accessed and, at the bottom, the buttom designed as word options.
As a quick explanation, new sets up a new word buffer. Keep in mind that Word can attach many word documents. This is known as MDI, multiple document interface. In fact, with this version, it is almost impossible to launch two separate instances of Word at the same time yet it can contain multiple documents until memory and resources run out. A shortcut to New is ctrl N. In fact, when we have a chance, remind your instructor to run a test on CTRL N in class.
Open is an attempt to load a document that had been saved to media. Office defaults to a specific area of your hard drive if you do not interfere. It sets this up while installing the office programs on your system. We will see where this is shortly.
If you look at the bottom you will see a designation document1 - microsoft word. The default name for any file in Word is documentz.doc[x] where z starts at 1 and works its way up dependent on your use. If your document is so designated or you press save as, you will go to the save as section which allows you to set a real name (or change an existing name) and change the type of docvument, which we will explain later. Now, if you have loaded a previously created document, made some changes and want to save the changes to the location where you loaded from, save is your option in this case. Note: there will be no prompt telling you that you are overwriting the previous version on the screen.
We will shortly deal with print and properties, but first let's look at Word options which is the buttom on the bottom of this dialog box. While several of the choices are important in your use of MS word, I want to concentrate on 3 choices: popular, save and customize as indicated in a composite picture below
First, as to popular. Usually there are 7 tabs on the ribbon. Additional tabs show up as needed: what would be called context sensitive tab options. But, an eighth ribbon is available and this is the developer's ribbon. On this ribbon is macro usage and visual basic for applications usage, which are advanced and powerful additions to Word. Some of you may have used macros in the past and here is where you would invoke this for this version of Word
We talked about saving before. Where and how. Well, the saving section of word options indicates where and you can see this. What about recovery options which will become important is your machine would lose power. That also is indicated here and we'll hold a small discussion in class on the need for this and what to do.
Finally, for those familiar with word from previous versions, it should be clear that some commands are missing. What to do about that. We will do a little exercise bring back an older command called auto text as indicated to the right in the 2003 version. What ribbon will this appear on? None, as what we are about to do pertains to the quick access tool bar. We are about to add autotext to this version of Word. But, in doing so, we will see another component of word which has been added for this version known as quick parts/building blocks.
Now, let's start in word options, customize. Click the top combo box (and by the way, you are seeing listboxes and combo boxes throughout here. A listbox shows a list of info - thats the bottom box. Selected items are highlighted. A combobox when clicked expands to a list box but the selection is shown as it it is a text box) and select commands not in ribbon. Now, in the list box below, look for autotext. When found, click on it ahnd use the right arrow to add it to the list box on the right. YOu will notice that the right listbox already has 3 entries and these are the entries you already saw in the quick access bar. Not surprisingly, you are adding an icon to that bar. Below is what we should have done at this point.
Now, let's exit this part of the program and get back to the word processing buffer. Notice the additional icon in the quick access toolbar. In the word buffer, type in what ever college student sends home: Hi Mom and Dad, send money. This is what we want to put into autotext such that with a few clicks, we get this to duplicate in the buffer. Do you understand what we are dealing with here. This is an automatic way of setting this text by mouse click.
Later on we are going to discuss mouse operations involving drag and drop. We will also discuss the use of the shift key to highlight text. But for this, whatever way, highlight this text that you just typed. Click the autotext icon and click save selection.
Now, things are changing from prior versions. An extra dialog box confronts you. This dialog box is part of something called building blocks which we will look at after finishing with autotext. It will be part of the catacombs tutorial you will do in a few weeks. To the right is what I have and you can see that I've added Dad to the title although there was no need. Now click okay. Now, we are back to controlling the word processing buffer.
Hit you enter key to move down the page. Again, click the autotext icon. Notice another selection is available, the text we want. Click on that and it will be replicated in your buffer. What you are not aware of and we will show you is that you have used an exciting new concept in Word called building blocks. In the insert ribbon, find quickparts and click building blocks organizer. Below is something that looks similar to what you are seeing. In fact, click the title "name" (this is the first column) and this will sort the entries. Work your way down to Hi,Mom and Dad and this is the entry you put in. Many things are now part of building blocks which for objects (to be explained later in the course) works similar to cut and paste and the system clipboard for text.
Now, having seen some of the power of the new version of word, let's return to basic word provcessing. It's back to definitions. We have defined a character also known as a byte. As we move up we now can consider a set of contiguous (together) bytes delimited (separated) by spaces or the beginnng of a paragraph or the ending of a paragraph (which we will discuss) or involved with punctuation is a word. Notice that this definition does not involve whether the word has meaning so don't use this definition with any language instructor. Next, a group of words ending in punctuation creates a sentence. Again, the sentence does not have to have meaning. A group of sentences delimited by use of the enter key denotes a paragraph. Now, again, don't use this definition with your language instructor. But, paragraphs, delimited with the enter key, are important since many Word instructions are defined as such - paragraph instructions or commands. Paragraph commands can be easier to indicate to word than character commands since you only need to move your cursor onto the paragraph to indicate an instruction to it as you will see. Now, continuing, A set of paragraphs fitting on a page printed by your printer denotes a page. We'll discuss printers below which have a major impact on how your system defines a page. Finally, the set of pages that make up your document denote a document as far as the operating system is concerned and a document is, in essence, a file and we've come full circle in our discussion as we started by discussing the 2 allowable extensions of word (although, be aware that Word can save documents in other forms)
You should be asking about the printer, then. How does it determine a page. Printers have a physical quality: only so much, given the parameters of the document, can be printed. Any more, and you create a pysical page break. How does your system know when that capacity is met? Through the use of drivers that interact between your printer and the operating system. Microsoft has some specific requirements for each printer and the printer manufacturer tries to fulfill these. In essence, what you are typing and seeing in word is a representation of what your printer should look like. Keep in mind, even with this interaction between Word, the operating system and your printer, that there are differences that crop up between your terminal and printer and this comes out when lots of graphics comes into play. To overcome this, print preview has been created to bridge the gap but even this is not 100% accurate. You can find print preview using the MS office button. print, print preview.
Let's bring up MS Word on your system. At home you can access this by a variety of methods. In class here we will go through XP's program listings to find a shortcut to this program. Therefore use start/programs/MSOffice/word 2007
I have a tutorial discussing the changes pertaining to 2007 versus previous versions. You can access this by clicking here but in previous classes several students were able to indicate 8 changes just on the word buffer screen. Let's see how this class does. Now, your instructor also wants you to know that there is no need to have had previous experience in other versions of Word for this class - in fact there is no need for previous experience with Word, itself, but those who have dealt with Word in previous versions without having had exposure to this version, will have some difficulty adjusting and there is only one way to do it: spend your time on this version.
With our blank document, let's start to move off this screen (generally called the word processing buffer) and look at other parts of the program. First, let's deal with the ribbon which has 7 tabs which we will move in and out of and discuss which parts we will (or may) deal with. Below is the tab for insert. and you can see many possibilities in terms of inserting.
Fourth Lecture Ms Word: Feb 12, 2011
Why use ribbons as opposed to the previous use of the microsoft menu system. The problem, today, is the wide range of characteristics of different displays. It is not unusual to have very large number of pixels in plasma screens (one of my machines is set at 1680 by 1050) yet others are constrained to 1050 by 750 (or thereabouts) when using laptops. Whether you will see this in class or not, the ribbon expands and contracts to be able to handle any size screen which was a problem with the text based MS menu system.
We should add since many of you have Office 2010 that there a slight difference in the use of the ribbbons in Word 2010. An additional tab, designated as file, exists in that program. For our purposes at this moment, if the following text, where your instructor indicates the microsoft vista/office button, if you have Word 2010, you will use the file tab of the ribbon.
Now, click the microsoft office (Vista) button (in Word 2010 you would click the file tab of the ribbon) and a dialog box will be extended as shown to the right. Of interest here is the option on the left which are simuilar to the options available on the file menu in orevious versions. The pick list which is nothing more than the previous word files that have been accessed and, at the bottom, the buttom designed as word options.
We should note that the look is somewhat differnent in Word 2010. Besides a pick list, Word keeps track of the folders (directories) you have recently visited. In addition, new options such as info and help appear and save has been extended to include blogging. One other addition in Word 2010 should be indicated. the 2007 version allowed for the creation of pdf files and this version adds several options to the creation of such
As a quick explanation, new sets up a new word buffer. Keep in mind that Word can attach many word documents. This is known as MDI, multiple document interface. In fact, with this version, it is almost impossible to launch two separate instances of Word at the same time yet it can contain multiple documents until memory and resources run out. A shortcut to New is ctrl N. In fact, when we have a chance, remind your instructor to run a test on CTRL N in class.
Open is an attempt to load a document that had been saved to media. Office defaults to a specific area of your hard drive if you do not interfere. It sets this up while installing the office programs on your system. We will see where this is shortly.
If you look at the bottom you will see a designation document1 - microsoft word. You may remember the discussion from last week that the default name for any file in Word is documentz.doc[x] where z starts at 1 and works its way up dependent on your use. If your document is so designated or you press save as, you will go to the save as section which allows you to set a real name (or change an existing name) and change the type of document, which we will explain later. Now, if you have loaded a previously created document, made some changes and want to save the changes to the location where you loaded from, save is your option in this case. Note: there will be no prompt telling you that you are overwriting the previous version on the screen.
We will shortly deal with print and properties, but first let's look at Word options which is the buttom on the bottom of this dialog box. While several of the choices are important in your use of MS word, I want to concentrate on 3 choices: popular, save and customize as indicated in a composite picture below
First, as to popular. Usually there are 7 tabs on the ribbon (8 in Word 2010). Additional tabs show up as needed: what would be called context sensitive tab options. But, an eighth ribbon is available (ninth in Word 2010) and this is the developer's ribbon. On this ribbon is macro usage and visual basic for applications usage, which are advanced and powerful additions to Word. Some of you may have used macros in the past and here is where you would invoke this for this version of Word
We talked about saving before. Where and how. Well, the saving section of word options indicates where and you can see this. What about recovery options which will become important is your machine would lose power. That also is indicated here and we'll hold a small discussion in class on the need for this and what to do.
Finally, for those familiar with word from previous versions, it should be clear that some commands are missing. What to do about that. We will do a little exercise bring back an older command called auto text as indicated to the right in the 2003 version. What ribbon will this appear on? None, as what we are about to do pertains to the quick access tool bar. We are about to add autotext to this version of Word. But, in doing so, we will see another component of word which has been added for this version known as quick parts/building blocks.
Now, let's start in word options, customize. Click the top combo box (and by the way, you are seeing listboxes and combo boxes throughout here. A listbox shows a list of info - thats the bottom box. Selected items are highlighted. A combobox when clicked expands to a list box but the selection is shown as it it is a text box) and select commands not in ribbon. Now, in the list box below, look for autotext. When found, click on it ahnd use the right arrow to add it to the list box on the right. YOu will notice that the right listbox already has 3 entries and these are the entries you already saw in the quick access bar. Not surprisingly, you are adding an icon to that bar. Below is what we should have done at this point.
Now, let's exit this part of the program and get back to the word processing buffer. Notice the additional icon in the quick access toolbar. In the word buffer, type in what ever college student sends home: Hi Mom and Dad, send money. This is what we want to put into autotext such that with a few clicks, we get this to duplicate in the buffer. Do you understand what we are dealing with here. This is an automatic way of setting this text by mouse click.
Later on we are going to discuss mouse operations involving drag and drop. We will also discuss the use of the shift key to highlight text. But for this, whatever way, highlight this text that you just typed. Click the autotext icon and click save selection.
Now, things are changing from prior versions. An extra dialog box confronts you. This dialog box is part of something called building blocks which we will look at after finishing with autotext. It will be part of the catacombs tutorial you will do in a few weeks. To the right is what I have and you can see that I've added Dad to the title although there was no need. Now click okay. Now, we are back to controlling the word processing buffer.
Hit you enter key to move down the page. Again, click the autotext icon. Notice another selection is available, the text we want. Click on that and it will be replicated in your buffer. What you are not aware of and we will show you is that you have used an exciting new concept in Word called building blocks. In the insert ribbon, find quickparts and click building blocks organizer. Below is something that looks similar to what you are seeing. In fact, click the title "name" (this is the first column) and this will sort the entries. Work your way down to Hi,Mom and Dad and this is the entry you put in. Many things are now part of building blocks which for objects (to be explained later in the course) works similar to cut and paste and the system clipboard for text.
Now, having seen some of the power of the new version of word, let's return to basic word provcessing. It's back to definitions. We have defined a character also known as a byte. As we move up we now can consider a set of contiguous (together) bytes delimited (separated) by spaces or the beginnng of a paragraph or the ending of a paragraph (which we will discuss) or involved with punctuation is a word. Notice that this definition does not involve whether the word has meaning so don't use this definition with any language instructor. Next, a group of words ending in punctuation creates a sentence. Again, the sentence does not have to have meaning. A group of sentences delimited by use of the enter key denotes a paragraph. Now, again, don't use this definition with your language instructor. But, paragraphs, delimited with the enter key, are important since many Word instructions are defined as such - paragraph instructions or commands. Paragraph commands can be easier to indicate to word than character commands since you only need to move your cursor onto the paragraph to indicate an instruction to it as you will see. Now, continuing, A set of paragraphs fitting on a page printed by your printer denotes a page. We'll discuss printers below which have a major impact on how your system defines a page. Finally, the set of pages that make up your document denote a document as far as the operating system is concerned and a document is, in essence, a file and we've come full circle in our discussion as we started by discussing the 2 allowable extensions of word (although, be aware that Word can save documents in other forms)
You should be asking about the printer, then. How does it determine a page. Printers have a physical quality: only so much, given the parameters of the document, can be printed. Any more, and you create a pysical page break. How does your system know when that capacity is met? Through the use of drivers that interact between your printer and the operating system. Microsoft has some specific requirements for each printer and the printer manufacturer tries to fulfill these. In essence, what you are typing and seeing in word is a representation of what your printer should look like. Keep in mind, even with this interaction between Word, the operating system and your printer, that there are differences that crop up between your terminal and printer and this comes out when lots of graphics comes into play. To overcome this, print preview has been created to bridge the gap but even this is not 100% accurate. You can find print preview using the MS office button. print, print preview.
Fifth Lecture Feb 19,2011
Today we start by dealing with a set of increasingly difficult documents. We are going to start out very easily and look at several factors. From the last lecture you should remenber how to open up Word when not dealing with a document. While doing that your instructor will discuss the change of extentions that Word 2007/Word 2010 has created. From the 1997 version through 2003, the system used a .doc extension to tell the operating system that a file was a word document. Files created in the 1997 version were upward compatible with 2003 - this is what is expected in the computer industry. But, files created in 2003 were able to be read in the Xp, 2000 and 97 version of word known as downward compatitbility. Understand,a new feature in 2003 would not be able to be produced in prior versions. All we are saying is that the file could be read.
With this version, 2 extensions are maintained. The DOC extension for backward compatibility and a new extension designated as docx for this version. If in docx, all features of the program are available to you. If in doc, several features are not. The docx extension is a misnomer given that it really is 4 files that are created. Your operating system has been rigged to look at the four (and even better to treat the four) as one file.
We are in the program ready to type something in. Notice that at the top you do have a name but it's a default. The system defaults to documentx (where x is an increasing number dependent on how many new word buffers you have created during a launch of word) and this would change when you saved the file. Typing is staight forward in word. Use of the mouse is not for new users. Let's type in our name. I'll use 'Marc Rauer' since it will do nicely here. What have we entered here? If he has not, your instructor will discuss some definitions in word, including character, word, paragraph, page and document. By default this is a paragraph and because of the space between the two names, we have two words. You can see this more fully by clicking hide show as your instructor will show you. Below, wecan see what your instructor is seeing on his machine.
Your system keeps track of what you are doing on a real time basis. At the bottom, right click the Word status bar and you will see a lot of information including word count, line number, etc. Click at words and a table of such info will appear as indicated to the right. We should have 1 paragraph, 1 page, 2 words and a number of characters designated twice with the additional space indicated. While we have hide show on, notice that paragraphs are indicated a backward p's and typed spaces are designated as dots in the middle of the space. This is useful when trying to find out why things are not going to plan.
Now, with your typed text, lets work on the mouse. Word maintains two cursors (cursor is a printing word indicating location). One is the text cursor which is sitting here blinking at us and the other is the mouse cursor which changes shaoe as yuio move it around. In older days students were told that the text cursor had priority although this has changed somewhat with this version. What is still true is that text can only be inserted (or deleted or changed) at the text cursor. Word tries to determine the legitimate positions of text and will only allow manipulation of text within allowable positions. Even with our small text that we typed in, we can see this. Beginning of document, designated as the home position, can be accessed by using the ctrl key in conjunction with the home key. This is also known as the home postion of the document. Likewise, the end of the document, known as end, can be accessed by ctrl key and end. Legitimacy on a line can be determined by home and end by themselves, but in this case this is the same as what we just did and we will try this again when dealing with a bigger document. You instructor will show you all this on the screen and you will be trying this yourself.
For this version of Word, a change has occurred. In previous versions, you could not violate legal locations of text. In this one it is different. Move your cursor below your name and double click. The system will fill in blank lines (you can see this by the backward P's). If you start to type, this is the new ending of your document. If you click, everything reverts back to what it was. This is shown below.
Let's drag the mouse. For this you position your mouse at a point, depress the left buttom and move the mouse through text. Notice that text is now highlighted. You can do something similar with the use of your keyboard: click shift and use your cursor control keys as your instructor will show you. In both cases you are selecting characters. To select all the characters in a document, you can press ctrl A or on your home tab of the ribbon, go to the far right and use select and then select all text.
You may not realize it, but you have now done something that is of tremendous importance in Word. Among the things that Word does is divide operations between paragraph and character commands. Your ribbon tries to do this by indicating the font group which is character commands and the paragrapgh group which is paragraph commands. For paragraph commands all you need to do is be located on a paragraph or indicate paragraphs. For character commands you should highlight through mouse operations the characters you want to deal with.
Let's show you some differences here. Move your cursor and click anywhere along your name. Do not highlight any text - we are just talking about a click. Look at the paragraph group. On the second line you will see 4 boxes dealing with justification. Click the third box. What happens. Click the second box, what happens? These are justifications for paragraphs and you have seen this movement. This would work, as it has, with a click on the paragraph or a full highlighting of the paragraph.
Character commands work differently. You can just place your cursor at a location and click controls but what you are telling the system is that in the future, if you should come back to this location, without any other instructions, do the following to the text. These are placeholders for want of a better name. 99% of the time, you highlight text and do the character command to it and watch the results. Let's try this ourselves. Highlight your first name. Click the A upward hat button and notice that your first name is larger than the second. Do that again. This time, click the box where the point size is, and select 36. This is point size by the way and we will discuss fonts later on today or next week in more detail. Notice though that only your first name was affected. Highlight your last name. Click where calibri is shown and select algerian. Notice the difference. Even more important, notice only your last name was affected. Below is what I have at this point.
We also have preview capability (both in cgharacter and paragraph commands) and might as well handle this at this point. Again, highlight your last name and click the control for font. Move your cursor through the fonts and you will see the change. This change only goes into effect if you click a specific font. Move off the control and you will return to what you had.
A special form of character command is the clipboard controls to the far left of the home ribbon. The clipboard is a system wide facility on your system. It will hold data that has been cut or copied to it in a variety of ways. A cut is a copy with an added delete. Once on the clipboard, data can be pasted back. Before trying this, I did something last week that I should discuss. Normally by this time I have talked about GUI which is how info gets on your screen. If I type the letters Rauer, somewhere in memory the letters (or bytes) Rauer exist. The one spot that it does not exist is your screen. Your screen is made up of pixels, small rectangles that can be a varying colors. This is called resolution. The school machines, I believe, are set at a 1024 by 768 meaning that your screen has three quarters of a million little rods to do things with. By setting some of these rods different colors, you think you see text. It really is a picture. The only way that Word differenciates text from pictures is that Word keeps large tables of info that allow it to move the text cursor to a position next to the 'supposed' character. This is how text becomes pictures using the clipboard. It is easier for the clipboard to deal with these pixels as a picture as opposed to text.
Let's try this cut (or copy) and paste but with some surprises. Highlight your name with all the format changes we have done. Click copy by one of several ways. The easiest is the middle control at the clipboard group but you can use the context popup menu on the right mouse button or even ctrl C on your keyboard to accomplish this. Now, hit your enter key to move down the page and hit paste. Notice the text and format is back. Now, come down again. This time go into the paste command and click paste special. Choose unformatted text. The result has stripped out the formatting as indicated below.
It's not only word that you can paste to since this is a system wide resource. Your instructor will paste back his name in notepad, which is a text editor, excel, which you will be studying after Word and, even more surprisingly, into paint which handles pictures. Notice as we put this info into paint, the name comes back as a picture. Even better, your instructor will do the same trick in Word, bringing the name back as a picture as explained above.
Look at the statistics. You will notice that the system is keeping up with us. And, now try the ctrl home, ctrl end, home and end keys and you will be able to make out the fine differences.
Lecture for Feb 26th, 2011
It is not just data in your word buffer that Word contains. It has meta information about your document. Click the office symbol and prepare and then properties. You should see something similar to what is below. Note: In Word 2010 this location has been changed. You can find this in the file tab, info selection, to the right is properties and when clicked, you will have the opportunity to click advanced properties.
On my system, it says administrator. You will see CCP. Now, you can fill in this info and it further explains you document to someone who is reading it for the first time. Although we can't get into this, this would also help in some curcumstances in finding the document on a system. Let's delve a little deeper into this. click advanced properies. The statistics tab is the statistics we've seen before. Click the custom tab. You can put in additional info at this point as your instructor has dome and is showing below. Keep in mind that this is not the info in your document which at this moment is only your name. This is "mata" data dealing with the description of your document and i of some importance in Microsoft's attempt at group computing.
Now, sum up all of your changes to the buffer and this meta buffer. It really isn't that much. Maybe a hundred characters. let's save this file to name.docx. Click the office button, click save as (because it is a new file, save will work as save as) and type in name and click save. We talked last week that Word has a default location for saving and that's where this is. Below, I am showing this on my system at home which uses Vista. Above name.doc is ~name.doc which as explained somewhat last week is something used by Word to determine backups in case of system aborts. But the file we are interested in, name.docx, is 11K in length. A K in data processing represents roughly 1000 characters so this file is 11000 characters in length. Why? And, if we were to try to do something similar in notepad, would we have used 11K. I seriously doubt that.
Now, we are about to work our way to more serious files pertaining to Word and word processing in general. We will do this by stages. First, we move to an intermediate file where we can easily perform cut, copy and paste functions: look at headers and footers: deal with editing while we look at definitions such as word wrap, margins, justifications and the like. We can even use this file to get into spell checkers and grammar checkers. This small amount of code will also allow us to look at the new Word preview controls. Let's load up the seuss file by clicking here.
First, what happened to the other word document. It's still there. Look at the bottom of the screen where the xp status bar is. You will have reference to both documents. You click the one you need to get access to it. I have only tried this on operating systems more advanced than XP, but clicking the x at the top right of the window closes only the document that is active. We can try this in XP to see if it does the same.
This "poem" can be found all over the internet. Other spoofs of Doctor Seuss can also be found. We are going to use this for a discussion of MS Word. First, how many paragraphs are there in this poem. Generally, students focus on the beginning title. Is this a paragraph or not? That's the wrong focus! The question is, what ends with an enter key? To confirm this, click hide show. A lot more paragraph symbols than was expected will show up. Count the paragraph symbols (except for null paragraphs) and you have your answer. You can verify this answer by looking at statistics at any time. Note: two straight returns (designated as hard returns) make a null paragraph which is not counted in statistics.
Now, students always ask, what's the big deal? Who cares if I end a line with an enter key as opposed to using word wrap. The answer! You are going around tools that word processor's provide you and in the end, with a complicated document, you will feel the effects. In the case of just margin changing, to get as low of an idea as possible, what we have here in this document that will defeat the use of margin changing to alter its layout.
And speaking of margins, what is the margins for this document? There are 4 margins: top, bottom, left and right. What is the norm for the world? What was Microsoft's norm in Office xp and 2003. What is the norm for office 2007?
Now, another question of a similar nature. Does this document have a header? Informally, the first paragraph acts as such. Officially, you should double click the top of the document (or click the insert tab and then header) and you will see something like what is below.
Above, you can see the header buffer which does not contain anything, least of all the text in question. This shot will also show the effects of hide show in the word processing buffer and you can see that every line has a paragraph symbol at its end. Notice also that the word processing buffer is grayed out and we should mention in class, and show,both header and footer and word processing buffer cannot be active at the same time. Why do you think this is the case?
Now, let's click back so that we are dealing with the document. We want to set this document so that we can use the word processing tools at our disposal. To do this, we need to delete the returns at the end of the lines except where we end a legitimate paragraph. You will notice as you delete these returns, the lines fill out as indicated below.
You should notice that there has been a change here. Using word wrap, more can be put on each line. Word wrapping is occurring at different spots. You should understand that even though this is supposedly a paperless society, there is still plenty of paper that we are dealing. Many document, including resumes, still need to be laid out so that they fit in one page or two pages, etc. While this does not apply to electronic resumes, you still need a paper based one. What happen when you are dealing with a paper based resume that is 1 page, 1 or 2 lines. This is not professional and use of margins can effect the change needed.
Let's work on a small situation. The word standard for margins was 1 inch around for word 97 and word 2000. A change occurred for Word XP and Word 2003 such that the margin was 1.25 inch left and right and 1 inch top and bottom. The seuss document is from the XP era and has 1.25 in margins left and right. Let's change that to the new norm for this wersion, 1 inch all around, margin changes are part of the page layout tab. Now before we do anything, notice that the first line ends at 'a very last' because of word wrap
You can see changes per word wrap. On the first line of a paragraph, an additional word. For each line of the paragraph, this momentum continues as additional words get manipulated. Now, this document has paragraphs that do not provide the ultimate benefit as described here but what if the last line of a paragraph was small enough that it disappeared when the margin was changed. In other words, let's say a 5 line paragraph becomes 4 lines. This is a technique to decrease a document size from 1 page 1 line to 1 page. In additon, you instructor will modify the margins some more by cheating on the right margin. Do you see a difference when that margin is set to .9 as opposed to 1 inch? Could you use this technique?
Now, this is a good time to discuss cheating on margins. In our society, the important margins are left and top (although there are societies that are sensitive to top right and other that are just sensitive to top). If you have a margin 1" around, as we are here, you could cheat by setting the right margin at .9 and the bottom at .9. Only somebody really observant with documents would know you have done this and this might give you the space necessary to go from 1 page and change to 1 page.
Okay, let's start working on this document. Let's handle the question of real paragraphs. If you include the title, there should be 6 paragraphs. To the right, you will the effects of this "trimming" (and that is the word processing term for this) where we have deleted the paragraph symbols of lines of a paragraph to the end. You can see the form of this for these new paragraphs: margin to margin for each line except the last line which tags on (Now, I'm using a term from parcing dance steps, but I think you understand what we're saying and showing here. Look at this as a whole and you will see that each line on the left starts flush left with the left margin. In addition, the first line (which we had designated as title) is flush top with the top margin. And, speaking of margins, it should be apparent that there are four margins on the page. Appropriately named as top, right, left and bottom. The top and bottom margin contain buffers (you've seen one already) which we will call headers and footers. You can, if you want, determine margins by looking at the page layout tab/margins, but you should be able to determine the margins of this document through the ruler. Its gray space at the beginning and end on the horizontal ruler indicates as such. On the vertical ruler, you would be looking at the top and the bottom. Now, speaking of margins, which Microsoft standard is applied here?
Why do the first lines - or any lines as a paragraph is laid out - of a paragraph move into the next line? Well, this is word processing, this is what it is supposed to do and this is what you paid for. A word processor provides word wrap for the lines of a paragrah. As you type, the system determines how wide the word is that you are typing and if too wide to be able to be contained without encroaching the margin, it forces a break to the next line. This is always being polled and you can make changes anywhere in the document and the text, after that change, will be laid out again and everything will be applied using word wrap. In fact, we about to prove this. Let's change this document from the 2003 office standard it is now, into the office 2008 standard which is 1" margin around.
While you can do this by manipulating the ruler, we will do this more traditionally by moving to the page layout tab. But first, let's document this change. Look at your document and see where word wrap has occurred. Now, in your mind, consider that we are increasing the effective space for each line by half an inch. What do you think should happen? Let's change the margin and see! Yopu should notice that word wrap occurs later as the paragraphs are laid out and, no doubt, knowing your instructor as I do, he make note of this to you.
How, about the reverse, padding a resume. Margins can be used for this, but let's look at another technique and in doing so look at some enhancements in this program from previous versions.
With this version, the designers of word have given the user preview possibilities so that you can see what will be the result if you were to change something without physically changing it (unless, of course, you want). We will do this first with fonts and font sizes. Before we begin, what can you tell your instructor about what is a font? Unfortunately, given the font addiction that your instrcutor has, we'll discuss this in class. keep in mind, however, as in many things, your instructor is not an expert. How do you determine what is meant by font-size? Again, we'll give you some definitions as we go along. In fact, there are a lot of definitions that we could go into and you instructor will attempt to moderate his interest in font trivia and provide the most salient of terms for you. But, we can start this process by looking at a tutorial on Fonts which you can get to by clicking here.
Let's use preview to look at fonts and point size. Use either Ctrl A or Select all in editing on the home tab. Now, let's click the font control. Move your cursor over a font and you will notice that the text changes to that font. Before you get scared, move off the font control. Notice that we are back to what we started with. Now, try it again and look at the length of the document. Notice it changes. For the same point size, Times Roman is smaller than Arial. In this system, Calibri (and Cambria for headers) is the default and the point size has changed to, to 11 points for default. In previous versions, Times Roman 12 and Arial 10 have had this distrinction. Now, pick a font and let's do the same with points. Notice that the higher the point size, the longer the document. In fact, you should notice that 14 points is about double what you will see with 10 points. Remember, both length and width is affected by the change in point size therefore the math to this is 1.4*1.4 = 1.96 to 1. Here's an example that can be used for padding a document. Increase the point size (or change the font) throughout a document so that it looks consistent.
We want to get back to what the document looked like at the start of our discussion. You don't remember the font or point size? No matter. Word is keeping track of what you are doing and can undo most of your commands to the program. The undo (and redo) buttons are on the quick access toolbar (icon bar). The one pointing to the left is undo. Let's use this to get back to where we were. While doing this, keep in mind that this is an important tool. At some point text will disappear or reappear where it shouldn't be. Your first thought in rectifying this problem should be undo. And the undo in Word is quite effective, generally (maybe over 90% of the time) you will be brought back to where you want to be even if you have been making significant changes.
Seventh lecture for March 5th, 2011
When we ended up last week, we had set the seuss document to 6 paragraphs. Click here to open this file.
Today we are going to concentrate on paragraph commands. Previously we worked on 3 justifications: left, center and right. There is a fourth. What does it do? Highlight the entire document using Ctrl A. This is the same as sweeping your mouse across the entire document only easier. Remember. with the ctrl key down, you need another key hit to do something and ctrl A selects all the text. Click the fourth justification. This is known as justification or full justification and was originated by word perfect in the 80's. Now, what do you see? It looks like the document is both left flush and right flush and we know that is impossible. Below we see this.
How is this being done. Notice the space that we would have at the right margin when left justified is spread throughout each line's spaces between words. This works well on documents such as this, but can you think of documents where it wouldn't work well. Now, using ctrl A again, let's left justify this again as before.
We want to discuss at this point paragraph topography. There are some of us (my self included) in the room who did not learn paragraph layout as we do it today. Below, we show the possibilities for this.
You can see above 3 possibilities. People my age learned the second way and at the time this was called indent. Today, Microsoft called this firstline. The reverse of it we would call outdent and Micrsoft calls this hang.
Microsoft changes the terminology because they already have an indent and outdent. This affects all lines of a paragraph. Let's do this first and it is what is shown at the right.
Notice by default that the movement in occurs in spurts of half and inch. Now, hit the button to the left and you will come back to where you started. This is the outdent.
Anything with added space around it will be more prominent and this is an obvious way of moving reader's eyes to this. If you want a less obvious way, this is not it. Further, How do we control indent and outdent using the right margin?
We are about to answer that question. We talked in a previous class about the ruler. You can turn it on with the control at the right just below the ribbon (or on the view tab at the control designated as ruler). Let's put it on. We will work with one paragraph at a time and start with the first multiline paragraph.
The ruler has 4 controls that are always seen. Other controls designated as right and left tabs can be set but we will not cover these in this course. The three on the left control the first line of the paragraph, all the other lines and all the line use of indent. The control on the right controls all of the line use of indent on the right margin.
Let's do the following. Set a first line of half and inch. In paragraph topography, this is a first line. Now, control the other lines by moving them 1 inch to the right. Now we have a hang. The hang is not a inch. In essence we have created an indent of half an inch and a hang of half an inch. Extend the indent to 1 inch by adding a half inch to the indent - this would use the third control. Finalize this by setting and indent on the right margin of half an inch by use of the fourth control. We can do this several paragraphs and below is the use of this as such in the seuss document
Now, what if you don't want to use the ruler. The little control at the bottom right of the paragraph group shows a dialog box that is familiar to any one with experience in the prior version of word. This was the format/paragraph dialog box. it is keeping track of what we are doing and below we see an example of this marked up.
Now, let's use this dialog box for more manipulation of paragraphs. Do you see space above and below. Go back to the document and study the intervening spaces between paragraphs. Now, back to the dialog box and set it to 6 pts above and 6 points below. Come back to the document and notice the subtle change. More space is above and below the paragraph. This is a subtle way of attracting someone's eyes to the paragraph as eyes are attracted to darkness surrounded by white space. Below, there is an attempt to show you this subtle approach.
Microsoft is a little less subtle. On the control next to the justifications in the paragraph group, the bottom allows the user to set this additional spacing to 0 by removing it and then set it to add again but the default is 12 pts both above and below.
Now, this handles spacing above and below the paragraph. What about spacing between the lines of the paragraph. This same button can be used to start this. Notice the options: 1, 1.15,1.5,2.2.5 and 3. Except for 1.15, these make some sense, do they not. But what about 1.15. This is the fudge factor for switching between the font/font size defaults used in the various word versions. In a previous class I told you that Arial 10 was the size as Tiimes Roman 12. Calibri 11 is about 7/8 the size and this use of 1.15 allows a user to change to calibri 11 and get back approximately the same length of document
The seuss document may not be the best document to test this. At home, I;m seeing TR12 has a length of 4.1 inches. Changing to Calabri 11 moves this down to 4 inches. calibri 12 moves this to about 4.5 inches and returning to calibri 11/ 1.15 spacing also seems to run to 4.5 inches. You might want to try this with larger documents where the average number of lines per paragraph is larger.
Let's return to TR 12. We could just reset this but previously I told you that Word has an undo and it works pretty well. Use undo to get back to TR 12.
I want ot add another facet of spacing that is used for cheating about length. This is something your instructor is interested in and probably is not covered in the test. This is leading where you set spacing of less that 1. This decreases the space between lines in a paragraph. This is powerful but easily abused. Make sure to use this wisely. But below, we try to show an example of using .95
All of these commands are paragraph commands. So far, we've dealt with one paragraph at a time. The next few commands are paragraph commands but make no sense if done only with one paragraph. So, let's take a look at smarty ways to select multiple paragraphs. Let's assume you need to select 2 contiguous paragraphs. There are two easy technigues. Sweep you mouyse across both of these in full. Or, select the last line of the first paragraph and sweep you mouse across the firstt line of the second paragraph. Both will take about the same time. How about if you need to select the 1st, 3rd and 5th paragraph. Sweeping won't work. Easiest process is to use your control key in conjuction with the mouse to select portions of the paragraphs in question. We haven't talked about styles yet, but you instructor will show an example of this using this document and the headijng 2 style. See what's happening, only the 1.3 and 5th paragraph are affect as seen below
Now, with this new skill, let's take a look at bullets and numbering, First when do you use these. Bullets and numbering should be used to indicate action items. You want someone to do something. Do not get into the habit of bulleting or numbering everything or these lose their effectiveness. Action items are important matters that someone should take notice of or have to act on. They should be rarely used in casula correspondence.
Now, having discussed action items, when do we use bullets, when do we use numbers. Bullets are generally used when the sequence of handling the action items is up to the reader. Number are used when sequencing becomes important.
Now, let's do a generic bullet on the first 2 paragraphs. Highlight the two in some way and click the bullet icon (leftmost control on the first line of the paragraph group). Having done that, let's genericaly number the last 3 paragraphs. Highlight the paragraphs in question and click the control to the right of the bullet control. At the right, you should see the paragraphs so bulleted and numbered.
Bullets are paragraph commands. These are not asterisks and autoformat will attempt to change leading asterisks of paragraphs into the default bullet. Notice how this also works. We are back to our previous discussion of how eyes work. Your eyes are attracted to darkness surrounded by light. You will notice that this is what a bullet or number has since the lines of the paragraph become indented. Now, what I've done with the picture above is show additional options of bullets on my system. The system keeps track of the last 7 bullet types used and displays this for you. You are allowed to add to the normal variety and one source of this is the symbol (and wingdings) fonts. Additionally, you can use little pictures as bullet images. It's possible in looking at the above you may be able to tell about one of the many interests I have and I use this picture as bullet indicators when writing.
Given that we can change this, let's add to our list of bullets. Below, we use wingdings to add a four leaf clover since we are getting near St Paddy's day (this year, celebrated as it always is, on March 17th, a sure sign that Spring is on the way
If you select the four leaf clover, it will become the bullet symbol for your use. But, let's handle my special interests. Click Here to load a picture. Save this picture to my pictures on your system. Now, highlight the first 2 paragraphs (for selection of the bullets) and click the downward arrow of the bullet command and enter define bullet and click picture. Select this picture and you now have a bullet set to this picture. And, now you are an informal member of what fellow aficionados call "bondage" and we'll let you decide how to take that discription.
Okay, how do you handle the tab between the bullet and the rest of paragraph. In prior versions of Word, tab info was included where we've selected the special character and the picture. In this version, you use the ruler and you will find that bulleted paragraphs can be controlled in a similar fashion that we studied when specifically dealing with the ruler.
If this hasn't shaken or stirred you enough, let's look at numbers. This is pretty defined. You have your normal numbers, alphabetic both capped and incapped, and the roman numerals both capped and uncapped. There is even provision for ordinal numbers such as fourth, fifth and the like. Let's use ordinal to number the last 3 paragraphs. Clixck define new number and select first, second third and place this in the document. Below, is our document as it looks now.
Welcome back: eighth lecture: March 19th, 2011
I believe we left our seuss file with some bullets and numbers applied to the paragraphs. To start out today, I've set the first 2 paragraphs with bullets, the next 2 with numbers and you can access this clicking here.
Before we leave the paragraph group, there is one more command that we should discuss. This is borders and shading. To start this, look at the second line of the paragraph group, rightmost commnad. The downward arrow will give you shortcuts in dealing with this. Similar to bullets and every other paragraph command, paragraphs have the capability to provide borders on each side and up and down. An option of this is no borders which is what paragraphs are generally set to. We can try some of these and you will see the effect. There is also a horizontal line (this command did not exist in previous versions of word) which is very useful when creating documents with quite a bit of graphic content. But, what is this is not enough. Chick the last of the options and you will go into the older style borders and shading dialog box. This is extremely powerful used correctly and can be quite difficult for the reader if used wrong.
It would be my contention that this should only be used once on one paragraph in a document. Select the middle paragraph in our seuss document. Turnoff the numbering by clicking the number control. These controls work on/off. Now, onto the border control and click the last option. You should see what is indicated below to the left. We have isolated several of the border styles and also shown you the selections of border width. To the right you will see the results of the selection using shadow. It gives a 3-D like apperance as you can see.
Now, let's add shading. This allows the system to add a tinting of a color (or gray) to the area that is bordered. I've chosen gray at 12.5% as indicated below left. Clicking okay shows me the result of this indicated below right. Now, as you look at this, consider how this would be printed? Any reader would see something close to 3-D which in essence would have the effect of the text coming out to them. The border nad the graying would automatically attract the eyes. On a first page of a document, this is unavoidable to look at.
The only thing left for paragraph commands is the paint can. This is similar to backgroup painting for characters except that it does this for all the lines of the paragraph. What it really is: The shading we used above as a separate tool.
We have completed as much of the paragraph group as we will do in this class. Next to the paragraph group is the style group and it is planned to do that today. But, first, I want to discuss several aspects of the review tab.
In essence, let's assume the document is done. What other resources do we have? Microsoft has expanded this asection from previous versions. We will do a few of the options but not all that is featured. You have capability (some good, some bad) for spell checking, grammar checking (done with the spell checker), thesaurus support, research and translation while in the word program. Let's start with the thesaurus. Highlight the word interrupted and click thesaurus. You should see something like below.
Now, you have a choice. One thing is to do nothing. But, you can replace the word that is highlighted with one of the words indicated to the left. You could also start the to look for like meaning of one of the words to the left without having replaced the first word. Each of the words on the left has the option for insert (change this on the document) or lookup.
This is the basis of the research capability of Word. The only reason to use this capability is not to have to get out of word to accomplish what you want. To the right is the sources of info allowed on this word version. All of these are Microsoft supplied (or owned) web related sites and some may not even exist anymore.
Further, please keep in mind that web related searching can be deceiving. Much of the "research" is not vetted. The school provides you through library resources the ability to do professional research and, if this is the need, you might want to talk with one of the school librarians. In the 103 class, it is required that a librarian show the class examples of the research databases available to them through the school
Translate is a new service of Word using several sources now available on the internet. You may not be aware but translation from language to language is a big feature of many sites. Microsoft has its own site to provide translating capability and this is one of the options tapped in this version of word. Another source is Word Lingo. If you want ot see an example of translation, click in the cis103 section of this web page and work your way down to the questions of translation of the Seuss document. We don't have the time to do this and it is not required for OA106.
But a question should come up in your mind. How good is the translation? Well, in my mind, it depends on the capability of grammar checkers of the various languages. The hardest thing for a grammar checker is what is called idioms and every language has them. Some phrases of words become idioms based on tone of voice. You instructor will give you an example in class.
Given this discussion, let's run the spell checker/grammar checker on the seuss document. Those supposed errors in red jagged underlines are spelling questions, those in green jagged underlines are grammar questions. Below you can see an example.
Errors can be ignored for this time (which is ignore). Ignored in general every time during the launch of the program (ignore rule or ignore all), or you can change the text using suggestions or putting your own amended coding. Running the seuss document through these checkers gives you an idea of what these can find. How effective are they? Let's see if we can give you an answer!
Bring up a little poem (and I'm not the author of this) by
click here. Do you notice that this poem makes little sense at the bottom. Let's run the spell and grammar checker. What's the result? With that result, how good is your estimate of these checkers now?
Let's return to the home tab and look at the style section. In essence this is a pre-set combination of character and paragraph commands. move into that section and click the bottom of the scroll bar and the styles that are preset will be shown. You have preview capability so in class we'll run through a few of these. Some of the styles are paragraph commands (affecting the who paragraph) and others are character oriented (just affecting selected text). Below is the change when previewing heading2
You can also affect the entire document. Click on change style and style set. Let's preview these offerings. Notice how all the paragraphs are affected as indicated below.
Now, you are allowed to modify styles (which I would suggest you do not do) or create your own as we are about to do. In fact, once you have created a new style, if you answer yes to the program's request to save this in then normal template as you exit the program, you can use this new style on other word documents. Click the scroll bar to the right and at the bottom select set quick style. Below we see an example of this.
At the bottom you will see a button designated as format. Clicking that, you can see that you can make multiple changes to create your style although it is rare that you need to go beyond what is indicated in the rest of the page. Let's set up algerian, 20 points, underline, in yellow and set that to the cis103 style. Once this is created, clicking will set the paragraphs in this format. You can even go beyond this by hot keying the style. Click your right button on the style and select modify. Then click format and select shortcut key. Many of the keys are already selected and I would stay away from those. But keys like ctrl alt x are free and let's wire this key to this style.
This is a one page document. Let's create some more pages. In the insert tab, there is a group designated as pages. Look at page break and create page. Page break can be done though this control or using ctrl enter as will be shown in class. A new page is a page break if at the home or end position of the document or 2 page breaks anywhere else. So, let's create a new first page. A new last page. And a middle page.
A special first page is a cover page. This is new to Word in this version. The cover page is a pre set design and in many cases information from the properties section (which we looked at in the third week of class and we can look now). dates are also available which come from the operating system. One of the cover pages is designated as mod and we will use this. The mod style appears as a cover page, header and footer inserts and page numbers as you will find out.
With multiple pages, we now can discuss headers and footers in a little more detail than we have done before. As explained before, the top margin contains the header buffer and the bottom margin contains the footer. These are useful in multi page documents. Included in this is the ability to keep track of pages. Let's try this here. Enter the header and footer buffers by double clicking those sections. A context sensitive tab - header and footer tools - is displayed. One of the icons is page no. Click on that and you will see an option for for bottom of the oage and clicking on that will give you options for the type of page numbering. Notice the variety of these. Pick a graphic. Now, return to your document by double clicking the body of the document and put in some page breaks which you can do using the ctrl key in conjunction with the enter key. Now check your page numbering. Notice how it keeps up with the paging. Notice also that you cannot be in the header/footer asnd body at the same time. The system does not allow for that - one of these is grayed out.
Nineth lecture: March 26, 2011
Today is our last lecture on MS word. Next week onto Excel. We will concentrate on a marketing letter which I call the catacomb problem. This is a one page marketing piece which you can see in its full entirety by clicking here.
You will see example(s) of the following in this project
Address block and the use of shift enter (optional)
A Picture and the questions of layout which is designated in Word processing as text wrap
A table which in Word is a way of organizing layout of information (optional)
Textboxes and this version's ability to extend textbox characteristics
Clip art which is caricultured pictures
Word art which is caricultured text made into a picture. Note:There are major differences in Word Art in the 2010 version.
We also want to discuss the templates that Microsoft has put throughout the system. Let's start with a blank page (in fact we can create a second doocument in word besides the catacombs document and look at multiple document interface if we have the time). Click the insert tab of the ribbon and look at headers. Notice there are a set of pre configured templates. The templates are part of the quick parts/building block section and display information taken from the properties section of the document. let's try a few of these.
When we are done with looking at Headers, lets use remove header and begin the catacomb docuemnt. We'll work in a left handed way - going backwards.
To start, let's bring in our picture of Michelle Pfiefer by clicking here. Save this to my documents. Now in our blank document type in "Ciou and Meow, Selina". In Word, text takes precedence and other object must be given info to deal with text. Let's load the picture into our document through the use of insert picture on the insert tab of the ribbon.
Things are still set as if dealing with text. The picture comes in as a large letter. This is known as in line with text. Clicl on the picture and you will see a border around the picture with handles. Handles allow for resizing which your instructor will show you and also make available a new ribbon, the picture format ribbon. In this new ribbon you will see the control, text wrapping, and you should click tight or square. Notice the change as to the text. It now moves around the picture. Below is a picture of this.
Now, under the picture is a coupon. This is really what is known as a text box. Again, moving to the insert tab, click on textbox. This, too, has been changed in Word with avaialbility of templates. We are going to draw a text box however and click that. Use the cursor to create an outline from one side of the paper to another. When done, the textbox format menu should become available which we will use shortly. First, position your cursor inside the textbox and type "good for a 25% discount when presented. Now use the preview function of Word to set a correct font size so that the text looks appropriate for the text box. Using the text box format controls for fill and outline (insdie and border) set up a discount coupon. I've done one below for you.
Above the picture we should have a table. Your instructor has a tutorial on table which you can access by clicking here. We may look at this or just plunge on.
Whatever, tables are an accumulation of rows and columns. In this example there are 5 rows (including the header describong the columns) and 3 columns. In the insert ribbon, click the appropriate representation to put a template of a table on your word document. Tables act as text and move with the flow of the document so we should have inserted the table in from of the picture. Let's fill in the info and you can direct your cursor through direct movements into the appropriate cell or through the tab key that moves you cell by cell through the table. Be care ful on using the tab key at the last cell as this will create a new last row. Once done, the appropriate format for word is your main job. Notice two new ribbons that appeared while in the table. In the design ribbon, click the appropriate settings (header and banded) and look at the options. Choose one and it will format your table as indicated below.
Above the table is a paragraph set with borders and shading as described last week. Let's fill it in. With all's that's going on in this document, you can see that this is an important issue to direct the viewer's eyes here.
I have been skipping the text between each object and you can fill this in outside of class. By this point in the term, you should have expertise enough to do this. We now concentrate on the address block. Changes had to be made here given the spacing changes throughout tghe system. Microsoft has handled this by making it easier to produce a non paragraph return known as a break on the internet. This is accomplished by using a shift enter where you would normally put an enter. THis make the entire block a paragraph and the spacing therefore for the entire block is like spacing a paragraph which we discussed last week. Now fill in the address as indicated using a shift enter instead of an enter for each part. Now, let's play around with this by changing line spacing. Notice how every line is affected as it would be is this was a regular paragraph which had multiple line. With hide-show on, you will see that the normal beward P's are not evident at the end of each line. Instead a new symbol, a kind of broken arrow indicator is in place and this is what tells the system that these are non paragraph breaks. By the way, in the page layout tab of the ribbon there is a control designated as breaks and this is a text wrap break just in case you need a formal way of doing this. Below, is the address with this type of break.
I don't think we will have the time to resolve the header fully. But here's what we do. Let's go up to the header section. Now on the insert tab, click WordArt. In 2010 this has changed but in 2007 it still has the templates. Pick the yellow on the 4th row at the end. You will be asked to put in text and type catacombs and hit return. This looks like a cat in a position only a cat could do. Now, textwrap so that it is tight. It should look like below
Center this. Now, with text wrapping set to tight, any other objects should not interfere with this. So, let's insert a claip art of a cat. There is a Halloween cat which would be perfect, arched so that it can be placed astride the second C of Catacombs. Insert this cat onto your document. Textwrapping is set to tight. Make it a little smaller and then move it over the second C. Below we show this.
With these objects set, it becomes difficult to insert text. For this we need a textbox. This is a box with object capability that holds text and you can find it on the insert tab. We'll use draw text box and when you do that a cross hair becomes available. Depress you mouse's left button and draw a text box to the left of what we have. Two tabs have been added here. One is the header tab as we are in the header and the other is the tab for this tool. Enter the textbox tool ribbon and click shape outline and set to none. This should clear the line around the text box. Highlight the text and go into the home tab and increae the point size. Make it bold if you want. We are now looking like what's below.
One more thing to go. We need the text - Emporium - to the right. Again, a text box will be the answer but there is a twist. We need it to look like a cube with a 3 D effect. Again, into the insert tab and click text box. Draw a text box to the right. Type in Emporium. Now, as before, into the home tab and change point size, bolding, italic or whatever. Now, back into the text box tools. use 3 D tools to create a cube. I've chosen one as indicated below.
First Excel lecture
Your test is up and running. It starts as of 7 this morning and runs to 11.55PM on April 16th. There are 36 questions. You have 30 minutes to do this on each attempt and 3 attempts. We'll talk more about this today.
This week, it is on to Excel, the second of the office components we will discuss. It is expected that this will be our subject of study for the next 4 weeks includding today. Excel. being a spreadsheet, can do almost everything well. It's a tie in to the rectilinear thinking that most of us deal with naturally and it allows us to use this package to solve many different problems.
Your instructor should discuss the following points with you about excel as we start
Similarities (and differences) of the ribbon structure to Word
Navigation around a spreadsheet
Use of multiple spreadsheets (What Microsoft calls a workbook)
Bias in entering data - what's horizontal and what's vertical
Types of data that can be entered per cell - numeric, alpha and formula
Selection of multiple cells and use of ranges. Note:starting several versions back this was extended but for this class
Throughout our discussion of Excel we should be doing multiple problems demonstrating it's use. You, as a student, should be doing these problems at home and/or outside of class alone to build up your expertise. Your test will be in class doing problems similar to what we are doing together. It is very important to continually try these problems as this will train your mind inti this type of thinking.
For this week's class, let's do the handout - the Big V auto dealership which you can access below. This is a very rudimentary problem which is based on 1985 usage of excel. In dealing with this problem, we are starting our discussion of the nuts and bolts of excel. Starting from addressing we can deal with:
Using ranges, determine sums, averages, counts, maxs and mins
Discuss the use of Ifs. Note: Excel has become in reality a programming language whose face is what you see. In programing languages, if statements provide the beginnings of code control. In Excel, if statements are a basis of controlling the logic of data.
The hardest part of this is understanding relational addressing. Keep in mind that when you put =a2+1 into a cell, excel does not set this as the specific cell a2. if uses an offset (or difference) to tell itself how many rows and columns from the entered cell a2 is. If you are in a4 while putting in =a2+1, excel sets this as a offset of =2 rows, 0 columns. If you are in a1 and set =a2+1, the offset is 1 row, 0 column. If in c2, the offset to =a2+1 is 0 row, -2 columns and in the case of g5, the offset is -3 rows, -6 columns. It is this offset that is used for determining relationships. However, in the case of absolute addressing, =$a$2+1 for instance, a2 is always used.
If you understand relational vs absolute addressing, excel becomes very easy. A 2000 line item table (rows) is as simple as dealing with a 5 line item table with the only difference being the physical need to move through the line items. To this effect, Microsoft has developed the new construct, table, to deal with this. Now, in class, before dealing with the problem for the day, your instructor will show you some examples.
We are going to look at a problem that your instructor has previously done in classes. By time we're done, we will have done many of the techniques discussed in every Excel instructional book. But before we start, you must understand that the use of Excel has evolved over the years. The problems we are doing, and the techniques your book describes at the beginning are circa 1985 in use. Today, Excel is used as a supplement to database info (and similar type situations). There is an expectation that raw data is already available in some form (generally from a database although your instructor deals professionally with a set of problems where data is generally kept on excel spreadsheets) and that this information will need at minimum something called subtotaling. Once this is done, Excel's excellent chart (graph) tools finish up the project.
However, for our first problem, we are looking at entering our own data - we have no where to retrieve it from - and this data has already been subtotalled. Nevertheless, this problem should give us an idea about entering data and formulas, looking at the normal bias of excel, use of ranges and fills, use of various functions and the use of graphs.
So, if your instructor has not given you a handout - or you are going over what was done in class - let's bring up this problem and first discuss it in terms of what you know business to be and to need as far as information is concerned and then we'll start to apply some excel on it. Click here for the Big V auto dealership
Before discussing this problem, keep in mind that 6 salesmen is not a reasonalble assumption today, In real life this would hav e to be more and this is not even considering that most auto dealerships are chains. In doing this problem, we will handle it as if there were many more rows and further problems this term will contain much more information.
In addition, all spreadsheets for commercial use have headers. We will ignore column headers as we start this problem and they will be put in later. Use A1 through A6 to enter the salesman's name. Use B1 through B6 to enter the amount sold for last month. Notice that excel is giving you informatiin as you enter the data. Non number data is left justified, Numeric data is right justified. Notice that Excel has not made any assumption on decimal and as you put in an integer, that's what's there. Since this is money, should it be left as an integer?
Even before putting anything else in, let's handle column width. Widths start out as standard. At minimun, you can manipulate column width by placing your cursor between two columns at the top (where the colunn indicators are) and use the cursor you aee at that point (I call it a grabber) to change column width. Below, you can see this in operation as both column widths have been decreased.
Besides the movement of the columns, look what happened to the data. Text is truncated. Numerics become first scientific notation (one of the allowable entries of numeric data on this system) and then pound signs. Excel is geared for math and it wants to make sure no decision is made on wrong assumptions. If it trancated as done in string data, one might make a wrong decision seeing the wrong numeric entry. You can bring this back by invoking autofit for column width. A poll is taken on the width of each entry in a column and the widest entry determines the width of that column. If you can fit the widest, all the others will also fit, ogf course. There are ways to do this by the ribbon which your instructor will show you and by mouse. In terms of mouse, take the column in question and at the right gridline of the column description, double click.
In this problem, each salesperson gets $12000 a year split over the year. That is $1000 a month. Now, we could put in a 1000 for each entry next to a salesperson (column C), but we are going to use some math and relational operators to do the job. Math uses operators to determine what to do with numbers. Common operators (for real math and Excel) is + (addition) - (subtraction) * (for multiplication) and / (for division). To tell excel that you are dealing with a math operator, you need to start the entry with an equal sign (=). If you don't, you violate what excel feels is numbers and your entry defaults to text. The mathematics of this is 12000/12. Put this in at c1. Notice this is left justified and no calcfulation has taken place. Now try =12000/12. 1000 shows up indicating that a calculation has occurred and it is right justified. Congradulations, you have done your first calculation albeit an easy one. Now, this is important. There are many things that make excel powerful and one is the ability to replacate relationships. The easiest relationship is a calculation. Move back into c1. There are 3 cursors in excel. The big plus sign is used to select cells and this is a way of creating ranges which we will talk about shortly. At the bottom right of any border in excel one would see a crosshair and put your cursor there now and you will see what I'm talking about. Finally, at the bottom left is both a crosshair and normal mouse cursor symbol combined. This is for moving and would be like a cut and paste in Word.
Now, in C1, move your cursor to the right bottom. When you see the crosshair, click your left button and drag the crosshair down the column. Below, you will see an example of this.
Let go of your mouse button and you will have copied this information. What was copied. Your relationship. You could see this by moving into each cell in column c and looking at the formula bar. It is easier to look at the screen with just formula. Go into the formula tab of the ribbon and on the right click show formulas. Below, you can see the result.
So you can see that you really did copy the cells as far as formulas are concerned. Now, hit show formula again to return to normal mode. We need to calculate the commission defined in our documentation as one percent of the sales amout for each salesperson. First, what is 1%. One could look at this as 1/100. Also as .01. And thes are perfectly reasonable. But excel allows you to use 1% which is the easiest. Now, how do we calculate the first salesperson's commission (B1 for the sales, D1 for the result). We could use =1%*240000 or =240000*1% - this is one of the laws in our math which you should have learned in high school. This will work but it is limited. What would happen if the 240000 sales figure was changed (a late sale, a sale that was missed, or a busted sale where the figure goes down) We would need to change this twice. One in B1 and the other, here, in D1. It is easier to reference the value of a cell than continually use the number. Therefore, our math relationship in D1 should be =1%*b1 or =b1*1%. Put this into your spreadsheet. Now, I am going to use E1 to put in what was originally proposed: use the math expression =1%*240000. Now, let's change B1 to 200000 (a sale of 40000 did not go through), Look at the result in your spreadsheet. Below, we have the example.
See the difference. The moral of this story: use references to cells. Now, let's do the same thing to column D that we did to C. Move your cursor to D1 and its right bottom border. Use the crosshair to fill down. Notice numbers are being put into the cells. They are 1% of what is 2 columns to the left. Use show formulas again and you will see what I have below
2nd Lecture in Excel, 3rd from last for the class
While I don't remember much from last week - the result of a very heavy cold - I think we left this problem at the spot that the variable part of the salary in column D had just been calculated. We can load the file to that point by clicking here.
I've added some comments to the cells. Comments have been a feature fo Excel from the 2000 version but this version makes it very easy to use. Notice that a red triangle is placed top right in a cell when a comment is inserted for that cell. The comment is shown when your mouse is over the cell in question. Using add comment, let's put a comment in at A1, where Vicky resides, indicating that we need a header. Also, at A7 below Val indicating a need for a comment to calculate column totals.
I do want to emphasize what happened as far as column D is concerned. Let's click a few cells of column D. Notice that B1 was changed to B2 through B6 as we went along. You didn't do this. You had originally set B1. If B1 would have showed up, you would have been dealing with an absolute address. Excel determined that B1 was 2 columns to the left of D1 and 0 rows offset. As you filled into D2, the corresponding cell would be 2 columns to the left and 0 rows offset. Of course, we are therefore talking about B2 in this case and this was substituted. Look at the others: you will notice that this analysis is working for all these cells.
Back to the question of comments. Comments can allow users to understand the formulas and manipulations that are in the cells somewhat better and I have added some info for you in terms of what we did. But, in this case, it can also indicate what still needs to be done. Look at the comment in e1. In e1, I have given you some indication of what we will do. We need to sum up the fixed and variable salaries for all c oncerned.
We are at a point which is the toughest to deal with in practical uses of excel. What were we doing last week? We always can look at the documentation for the problem, which, if you don't have, you can obtain by clicking here, but if you are interested in seeing just the formulas we dealt with and created last week, you can go to the formulas tab of the ribbon and click show formulas. Below we have done that and you should see something similar.
We can see what was done in the prior week. We entered the names and the sales amounts. We enter =12000/12 in C1 and filled down. We entered =1%*b1 in d1 and filled down. In that fill, b1 was replace by b2 when we got to d2, etc. You instrcutor pointed out that this was what was expected. Excel creates a delta meaning offset when you enter cell designation. b1 when in d1 means the cell two columns to the left and 0 rows up or down. When we got to d2 in out fill, the system looked for the cell 2 columns to the left and 0 rows up or down and this was b2 which was used to replace b1 in the calculation. All the resulting cell formulas as we filled down acted the same way and that is what we are seeing with these formulas being shown.
This is also a good time to again discuss the formula bar. You can look at a cell as having two layers of values. The top layer is for show and is the result of the lower layer which is for calculation. I assume that I mentioned (and, if not, we do it now) this last week. Except for the initial entry, the formula bar is you gateway into the second level. You should make it a practice of looking at the formula toolbar when entering or changing the underlying coding in the cell. Excel, itself, will try to allow you to use the cell itself for both viewing and entering but it is easier for the user to train themselves to look at the cell itself for results and the formula bar when in the cell for the underlying coding and use this if changes are to be made.
Now, turn off show formulas and while we are talking about formulas, let me show one or two other "helps" in this regard. You can track by arrows the cells used in calculations. Move you cursor in to d1 and click in the formulas tab, trace precedents. An arrow shows you what cells you have used and referenced in d1 and obviously b1 is indicated. Below we see this.
Once you've analyzed this, you can click this off by clicking remove arrows. A final thing to llok at when trying to evaluate a new spreadsheet and familiarize yourself with an old spreadsheet, is evaluate formulas. This will give you a dialog box which will allow you to see the calulation as it calculates and what is the result. below we see the start of this. Underlined entries indicate that specific numbers will be applied and you can see as you click that 1% turns into .01. B1 is next underlined and as you click this changes to 240000. Eventually the calculation is done and you can start over if you like.
Now that we know what this spreadsheet contains, let's continue doing the problem. A salespersons salary is the combination of the fixed amount, in this case $1000 and the variable amount, in this case the commission. There are several ways to do this, but we will start with the most basic. In the first row, it should be obvious that this is the summation of c1+ d1. Notice that the system attempts to help by color coding these cells. So, in E1, (column E will hold the salaries for everybody) apply the formula =c1+d1. Now you know why = is used. What about c1 and d1. To the system c1 is 2 cells to the right. D1 is one cell to the right. Applying fill, this relationship is applied to e2 through e6. Below, your instrcutor attempts to show you this fill operation as you fill down one row.
I have primed this to show you several other things. If you click on sheet 2, you will see that I have done this calculation already. In addition, several other calculation have been preset in columns G and H. These have to do with range and function operations and absolute addressing.
So let's look at the colored columns, one reddish, the other blueish. The reddish uses a function to do our last math calculation, the function =Sum(). This is the first of several functions we will be looking at. It use is to take a set of cells, or a range, or a constant and any combination and sum the componebts. Below, we will talk about ranges and when done we will tie this to the function, =sum(). But keep in mind, you can make more work for yourself by duplicating what alrady have been accomplished. We already did =c1+d1 in E1 and it worked. If you used =sum(c1+d1) in e1, as students are apt to do once they learn about this function, you are doing the same thing but with more typing
Inside this formaula is an example of a range. Ranges have changed over the years thanks to changes in mouse operations. For this class, however, a range will be the intersection of a set of contiguous (together) row(s) and contiguous column(s). Take the row 1 and intersect it with columns C and D. The intersection is C1 and D1. We can designate this range as C1:D1 or D1:C1. This is a very powerful concept as you will find out although it looks somewhat trivial at the moment. We can use ranges with functions, one of which is Sum which sums up the components of a range (although this functionality can be extended). Therefore, you see the formula =sum(c1:d1) in row 1 and this has the same effect as =c1+d1. Which would be easier to deal with if we had 5 cells - let's say c1 through g1 - to sum up? Your instructor has set up an example for you on sheet3, so let's look at it now. A1 through A10 has been entered with values of 1 to 10. How can we sum these up. A11, A12 and A13 show you possibilities. What seems easier to you. Below, I have shown this using show formulas and as you look at this, what would you do if we had 600 rows like this where the A cell of that row was an increasing number. You would only beable to use ranges on this as the input would swamp both you and excel.
So, we return to sheet2. Now, let's look at the blueish cells. Notice they are all the same value. Why? Inside the first cell is the formula =$c1$1+$d$1. This is a example of absolute addressing where =c1+d1 is an example of relational addressing. This is another important issue for excel and you and again is a powerful concept. By putting in a relative address like c1, excel creates a "delta" or difference between where you are and the cell indicated. If in E1, c1 is -2 columns away (2 to the left) and 0 rows difference. In a fill, when your cursor move to E2, to resolve your reference to what was c1, it looks for a cell -2 columns away (2 to the left) and 0 rows in difference. This cell would be c2 and that's what is displayed.
Absolute addressing, where column and row designation is preceded by a $, really looks at that location. So $c$1 when copied stays as $c$1 (or referencing c1) throughout and this is what you are seeing in this second column.
You can see, just on our problem, that excel can become quite difficult to control as far a the mathematics are concerned. Below, if a little check list for you to consider as you do a problem.
Students should deal with Excel on a heads up basis continually polling the data as indicated on the screen to see if it makes sense. As an example, let's assume you are doing a social security problem. Someone has a salary of 50,000. Social security cannot be 350,000 or thereabouts. This is a tip off that your calculation is wrong and it is probably the percentage applied to social security. We would have had something similar in the use of /1000 or *.1 in the calculation that generated 1% of sales.
Remember that there are two factors when looking at any cell: what's behind it (in the formula bar) and what is shown. It is only an accomodation to you that excel at any time shows the formula underlying the cell within the cell. It is probably easier to train your mind and hands to deal with all formulae (formulas) in the formula bar.
When using excel, you should train your mind to look at relationships. This really means going past one cell and considering many. This concept of studying many cells leads to the use of relationships.
And speaking of relationships, always consider how excel will interpret your formula. If you put in a formula accessing b1 in d1, consider that excel interprets this as the cell two columns to the left from d1. Therefore, when you "copy" that formula into another cell, the interpretation remains as two cells to the left.
Here are the things we want to do with this file today
Set up column headers. This should take us into wrap text
Sorting columns
Set up totals. And we will show it two ways using =sum() and autosum
below this table, setting up another table involving average, max and min
grouping and hiding columns and widths
Dealing with formatting which includes decimal points, separators and currency
Creation of graphs to visually indicate information.
I'm pretty certain that I did not deal with column width last week and what happens when width is too wide or too short. Let's discuss this at this moment by giving examples. Too wide wastes space. Too little may hide your calculation. Excel is oriented to math (not text) and feels that it must present enough significant digits to you that you can make sense of your decision.
In addition, excel has several tools pertaining to width including autofit that we should discuss at this point which we will.
Before we get back to our problem, notice that using a second sheet has not compromised using the first. Sheets work independently unless you tie them together which we may do later this morning. But it has to be our decision for sheets to intermingle data.
Insert a new first row and use this to label columns. Insert is easiest done by clicking on the row where the insert should be. Click you right button and then click insert. A new row should appear but even better the old rows are still there except they have a new designation that is one more than it was. All calculations are guaranteed to still be viable. Pleease keep in mind that this is not true for deleting a row (or column for that matter).
Let's label the columns as Sales Person, Sales Amount, fixed, commission and total salary. As mentioned today pertaining to bottom, these get cropped when the next column header is put in. Now we could use autofit but we would have wasted space. Let's handle this by alignment. Highlight the row of the column headers and either click the row indicator (and request format cells) or format in the cells group and request format cells. You will now see a tabbed dialog box. Click alignment as shown below.
Let's invoke word wrap which will manipulate the size of the rows. Set horizonal alignment to center and vertical to fixed (which we will explain and do examples in class) and we should end up with our spread sheet looking like below.
What if we wanted to sort this information. Excel provides several different sorting capacitiies. At this moment we could use the easiest. Anything beyond this becomes somewhat more difficult which we do not have the time for given the time constraints of the class. Below we see the options. Let's set the sequence so that those with higher salaries appear first.
Now, we want to create column totals. We would like to sum all the numbers in a column and deposit that total in the cell at row 7 of that column. I hope this seems like a logical approach to this and something you would always want to do. What options do we have. We can do the vertical equivalent of what was done above. Put =sum() at the right place and manipulate the cursor to enter the correct cells. Below we see this.
This would work. You can if you like automate this procedure using the formulas ribbon. What we have done is autosum. You could have also done automult, autoaverage and autocount as I will show you, but Autosum is wahat is usually used. This is microsoft speak for column totals and the result is exactly what you did. Move your cursor into an appropriate location and click autosum and you will see something similar.
Now, once you have resolved "a" column total, what;s the easiest way to resolve the other column totals. Ask yourself: what is similar about setting totals in other columns. The relationship is the same. So, follow your instructor and fill in the columns by selecting the handle and dragging right. This is the horizontal equivalent of what we did vertically in columns C, D and E
I do want to add something here about another possibility for column totals that I see students do. In B7, sometimes students will put in =b1+b2+b3+b4+b5+b6. Is this the best way? What if we had 600 line items as opposed to 6. Would this be feasible? And, if feasible, would we want to provide this type of formula but for 600 cells as opposed to 6?
By now, you should have concluded that use of range would be easier, And how do we sum a range in excel. First we need to describe the range which is the "extreme" cells. In this case the farthest out cells are b1 and b6. Our range is therefore b1:b6. But we need a function to do this summing. The best candidate is sum(). Remeber, we have to include the = sign so excel understands that this is not text. Our result is =sum(b1:b6)
The picture to the right shows the entry of this formula in b7. Notice the auditing trail as the system outlines the cells n question - those in the range - in blue. Visually you can verify if this is what you want.
How about for c7, d7 and e7. It would not be incorrect to try the same procedure in those 3 cells. It would be wasteful of time. Those cells represent the same relationships with cells above them. The fastest procedure at this point would be to copy the relationship established in cell b7 (which is sum up all the cells above it) into c7,d7 and e7. You can see this below.
We've already dealt with sums. And, by the way, there is an automated way of getting a column sum which we will show in the future. But, we want to consider the question of average, max and min for any columns
Average displays a result that is not consistent as far as decimal points. What do we have that will deal with the formatting of a cell?
It would be nice to show this as a chart (Microsoft's nomenclature for graph). What columns are we looking to graph and what graphs are there?
Although we only have 5 columns and 10 or so rows, not everything should be shown to everybody. How can we hide information from someone. We will do this by grouping.
What about sorting this informatuion. Could we show this list alphabetically. How about by most sales first?
You can insert a row (or column) by clicking the row (or column) where the insertion should be, then clicking your right button of your mouse and clicking insert. In excel operations, you are guaranteed that an insert will not alter data. This does not apply to delte I might add and be aware that it is possible to affect a spreadsheet's data by delete. If this happens, you should immediately undo. Look to the right to see an example of the start of inserting a row.
Now, once you have the inserted row, what do you do. Let's create column headers and, by the way, whe we created totals these are normally called column totals. This will nvolve several things including column width and what you can do with this. But even before starting this, keep in mind that excel deals with extended width differently between numeric and text. A value that is numeric that cannot fit within a column width will be altered slightly to attemp to show it. If the system can change it into scientific notation, it will. If it can cut down decimal points, it will until it gets to the integer. Now, if it still doesn't fit, the sysem will show pound signs such as #########
Text is worked differently. It will bleed into the next cells on the right assuming these have not been entered. If they have been entered, the text will be truncated. Now, with his info, let's enter the columns headers. 1 to 5 should be name, sales amount, fixed, commission and total salary. Ignore the question of whether the column header is too big for the column.
Here's our option. Your instructor will show you how to increase column length by manipulating the column divider. Another way is to use column autofit which we wll also do. The final way is to invoke some of what we learned in Word. We will do this using word wrap as you will see. We may even add rotation into this mix.
When done with text, let's do average, max and min. Luckily, the software experts at Microsoft have included functions designated as =average(), =max() and =min() into excel. All we need to do is provide the correct ranges. Now, again, we are going to do this professionally. The range for B should be b2:b7, is that not correct. Similar ranges will be required for C,D and E. Let's skip a row (probably 9) and calculate the average for each column as well as the max and the min using relationships as much as possible.
We have several things we want to do to make this more presentable. With the average, something new has cropped into this spreadsheet: decimals. Let's talk format. It looks like we have different decimal points on different calculations. Should we go to 2 decimal or integer? Whatever we decide, how do we do this. The home tab has a section in the middle for manipulating number format. We will use this section to look at both 2 decimal places and integer. Your instructor will show you how to use the new type of formatting that is on the home tab of the ribbon and also show you how to deal with the older version of format.
Now, Let's consider hiding some columns. Hide and show columns have been in existance since the 80's. We however are going to use groupings for both columns and row. Your instructor should have the necessary expertise to pull this off, but we'll see. Group and ungroup is part of the data tab of the ribbon. These can only be done with entire columns or entire rows. Don't bother trying it with specific cells as the system will prompt you some more to determine if you mean entire rows or columns. Highlight columns C and D and in the data tab of the ribbon click group and we are at the position indicated below.
Click group and a section above the spreadsheet will open up. There are tow sets of controls and we will look at both. Notice that there is a set that "hides" the columns. What about printing? The columns will not print when grouped. And, the system will not print the control section above the spreadsheet. When do you use this. You turn off columns when dealing with people who do not like detail. You keep them on with people who love detail. Which would you do for your instructor if the need arose?
Let's do some other formatting. Note: We will show you a better technique next week per formatting but we can't apply it now. So, we will go back to simpler controls for this presentation. We want to end up as indicated below having used lines to differenciate the different sections (and color, too)
Now, I've used some comments. let's show you how to comment in Excel. Not surprisingly, it is through a cell. Click in a cell and enter the review tab of the ribbon and click new comment. A text box will appear with your Id (as far as your system is concerned) in the lead. You can delete this if you like. Put in your comment. As you move to another cell this comment will disappear. To show all comment, go back into the review tab and click "show all comments" which is a switch to turn this on and off which you can practice.
I doubt if we will have time to do graphing. Probably this is next lecture. Excel has made graphing (or as Microsoft calls it, charting, easier and we are after easy. Your instructor, before doing an example, will talk about the types of charts available. In this problem, we need to show salesman with salary. What would be better: a pie chart or a bar chart? any other chart? Your instructor will discuss these options and show you how to chart
p>All right, On to graphing. In essence, the vast majority of graphs are either bar or pie. Some others exist such as area and high low. We just consider pie and bar. Pie's can explode which means one of two things, the individual componebts are separated or a set of composite data can be shown in a secondary pie chart (this is called pie of pie).
To start our process, you should understand that Microsoft has made it easier to set up charts through just mouse selection. Each column that you highlight becomes a part of a series that is charted. In our example, let's chart name vs salary. Highlight A3 though A9 (assuming we have used the A3 as a header). Now, using your mouse in conjunction with your control key, add to this e3 through e9. Notice row 10 is not used as this is totals and shouldn't be part of the graph. Let's start with a pie chart. Move to the insert tab of the ribbon and click pie. Start with the most rudimentary pie chart and you will have something like what we see below
Notice the ribbon. Three new tabs have been allocated to you and these control facets of the pie chart. Look at design. The easiest to comprehend is chart style. There are many and let's manipulate a few. You can see that color and texture are changed. Look at chart layouts. We have in effect the last of these layouts but you can change these also. Notice that percentages, legends (what designates the color to the right) and title may or may not be included. A default title is the first columns header and by clicking on the title, you can make changes. Let's set this to "The Big V Salaries". Click select data and you can see that Excel is verifying what we had told it but you can use this to alter the data selected to chart. We will look at the first of these controls, switch chart types, shortly. Now, click on the layout tab of the ribbon. Because of this chart, some controls are grayed out, but of the controls that remain you can fine tune how you want your legend and title to appear. Data labels allow you to control whether percentages show or not. Now, let's look at the format tab of the ribbon. Here you can make format changes to the text portions of the chart and we can try a few of these to show you. below is what we have at this time although yours may look different
Now, go back to the design screen and click change chart type. Select pie of pie. Notice that 2 pie charts show up, the second on the right is the last 2 elements of the first. Move your cursor over the second pie chart and click do that the entire second pie chart is selected. Now, click format selection on layout or format. On the left you will see series options and when clicking you will have several possibilities. Let's use values and determine those less than 2501. You will see that the second graph changes to indicvate this and the first graph shows a block designated with a value of 6750 encompassing the parts of the second graph. By the way, to see value, your instructor will show you how to use a data label extension to show values. Anyway, here's what we have now.
We want to do one more thing pertaining to graphs. let's set up a bar graph for this. Again, move into design and at the left, under chart types, let's select a bar graph. Unfortunately, Microsoft designates column for what you think is a bar. Bar graphs to Microsoft are 90 degrees off kilter. Using column, select the first sub type and a bar graph will appear. There are more options pertaining to bar than pie based on its design and your instructor likes bar graphs better that pies except when making a certain type of point which he may bore you with if we have time. You can see large differences between the two graphs as you enter layout. Grid line. Choose vertical and then major and you can see that the individual bars are delineated. You can even add info as we did in the pie graph. Click data table and show data table. You get on the bottom the value you see at the top of the bars. Not a big deal here, but this may be valuable if we discuss stacked bar charts. Anyway, below is what we have and where we end today's lecture.
And that should do it for the Big V auto dealership. In the 103 class, we doi look at this problem in a little more advanced way, but this will have to do for oa106. What you should have gotten out of this is the power of Excel. It is so powerful that when you see it commercially, you are dealing with possibly thousands of line items and individual cell operations just won't work. So this leads us to the next problem which for sentimental reasons is my favorite problem of the entire course. It allows me to discuss my favorite author, his creation who is my favorite character and some of my favorite books. We are, of course, talking about a problem designated as "The books Of Ian Fleming".
Last Lecture for the semester, April 23rd, 2011
We are about to do one of my favorite problemsd, the books of Ian Fleming. FYI. Ian Fleming, born on May 28th, 1908, apparently the second of 4 brothers, was the grandson of richest man in England. Robert Fleming had made his money on speculating in the American Railroads in the 1800's (this was similar to the internet craze of some years ago). Robert's son Valentine was killed during World War I leaving his widow to raise these brothers. Fleming had a knack of tackling things with a flair and perhaps tangential approach. He hits his stride when becoming the assistant to the chief of British naval intelligence during world war II and this experience gives him the episodic knowledge that he applies to his books which is a sideline to his career in journalism after the war. Fleming wrote 16 books in all. 14 of these were the James Bond thrillers although to be fair apparently Kingsley AMis finished the 14 th book, The Man with the Golden Gun, half finished when Fleming died on August 12th, 1964.
This problem purports to be a forensic accounting problem dating back to 1965. The heirs to the Fleming estate would like to known the profitability of all the book, and each book, world wide. You are given the facts about the books in a Word table that kind of describes the problem. Open this word document by clicking here.
Notice that there are 112 of what are called line items. These pertain to a book and its sale at a distribution point. There are 7 line items for each book as you will find. Let's copy this nformation from the word table into excel. Your instructor will show you the + sign that selects the table and with this table selected, you can move this information into an excel spreadsheet. Below is a composite to do this.
Notice that there are 113 rows that have been copied. The first is a column header row and then 112 others deal with data. Accountants call these line items and so will we so your spreadsheet at the moment holds 1 header and 112 line items.
Our column headers look similar to how we started the Big V auto dealership. We've dealt with this before. Let's set a wrap text alignment and hopefully wind up close to what we show below.
Now, we get to the hard part. For every line item we need to calculate the net profit of the book sold at that distribution point. Our calculations will be on the level of 11th grade algebra but for some people this is difficult. Unfortunately, this is excel. Excel is a program applying high school algebra. Let's try it and see how we do.
First, how many books were sold for each line item. a certain amount were distributed but some were retuned back to the publisher. We assume that any books not returned that we distributed were sold. Looking at the first line item in row 2, d2-e2 is the amount of books sold. Let's apply this in a new column designated as books sold that will occupy column G. Below is the calculation.
Now, how much profit was in the sale of the books. This would be the value just calculated multipled by the value in F2. Create a new column in H indicating this. H2 should contain the value calculated in G2 multiplied by f2. The formula is f2*g2 (don't forget the equal sign to indicate to excel that this is mathematics)
The returns are a drain against the prfits of the book. Each return world wide costs 50 cents (.5). Create a column I calculating this cost. This is e2*.5
Finally, the net profit of this line item is the difference between what was calculated in G2 and I2. Use column J to calxulate this. Below is a composite of these calculations.
We are at a crossroads now between older concepts and newer concepts in Excel. Newer concepts like the new table constrauct would already have established these formulas through the 112 line items. Older concepts like subtotals would require copying this info down and prep work in the guise of a sort. For this last class we are going to straddle the two by doing this problem in pivot tables which is a 90's concept. Now, one of the things that has been added to this version is the abnility to copy down by double clicking the handle on a cell or range border. Highlight g2 through j2 as a range and double click the handle. Notice that the 4 cells are filled down through the table. I may have indicated last week that ranges can fill multiple columns (or rows) but look at the relationship of each cell as the fill is accomplished. Let's look here. Notice that each column has been filled with the calculation template of the that columns entry in row 2. Below we see the results of the fill. Notice I have highlighted the columns H,I and J
Notice the lack of uniformity in decimal places for H,I and J. Apply the numeric format to rectify this.
Pivot tables are an extension of a database technique designated as cross tabulation. This is one of three ways to resolve this problem and in the CIS103 class we do this problem using subtotals, then pivot tables and then using the new table construct with pivot tables. For our class, we will only do pivot tables. All ways of solutions have their own pluses and minuses. In the case of pivot tables, every column of the pivot table must have a header, preferable unique. This grinds to a halt is a column is not titled so notice we have done this in this problem by setting column headers for the new columns we have been calculating
This problem will create a one dimentional pivot table with the bias towards row as you will see. Now, click any cell in this table. Only one cell, not a range. Go into the insert tab and click pivot table. You will be given the dialog box as indicated to the right. This dialog box confirms the extent of the data and defaults to creating the pivot table on a new spreadsheet. For this class, pivot tables should be set on new spreadsheets.
Now, we want to see a title and a profit. Click the title check box and notice that the title designation is moved to rows. This is the default for text columns. We need to see profit next to each title. Click profit. Because it is numeric, it is defaulted into the data section. You should be seeing what is below.
Probably there is a need to sort these books by the most profitable first, least profitable last. The sort section has a to z for ascending and z to a for descending. Move you cursor anywhere on the profits in column B and click z to A. Notice the sort. If done right, You Only Live Twice appears first. How about a graph of this, the pivot chart control is your answer. Similar to the insert tab chart section, you have a chice of chart types. let's deal with bar or column. Below is our result.
Not bad, and pretty quick don't you think. Let's do another pivot table aiming at 2 dimentions. Click here for data to create a 2 dimentional pivot table.


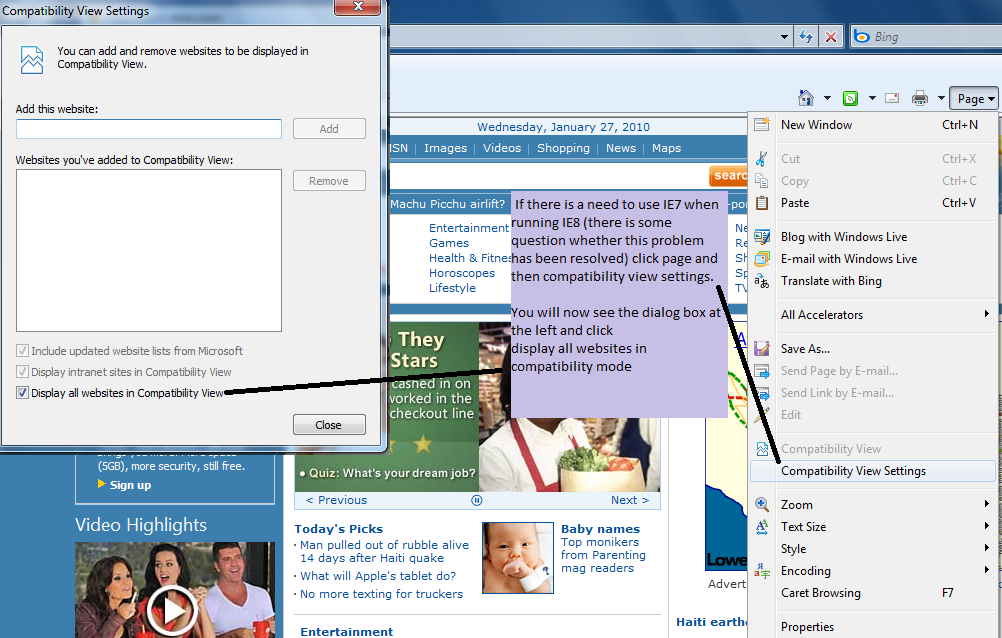

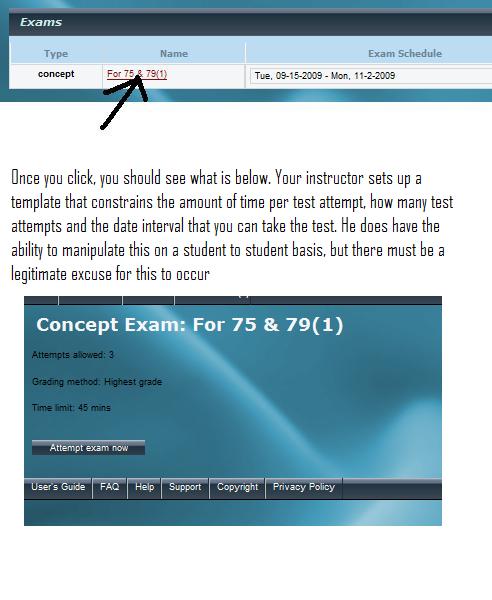


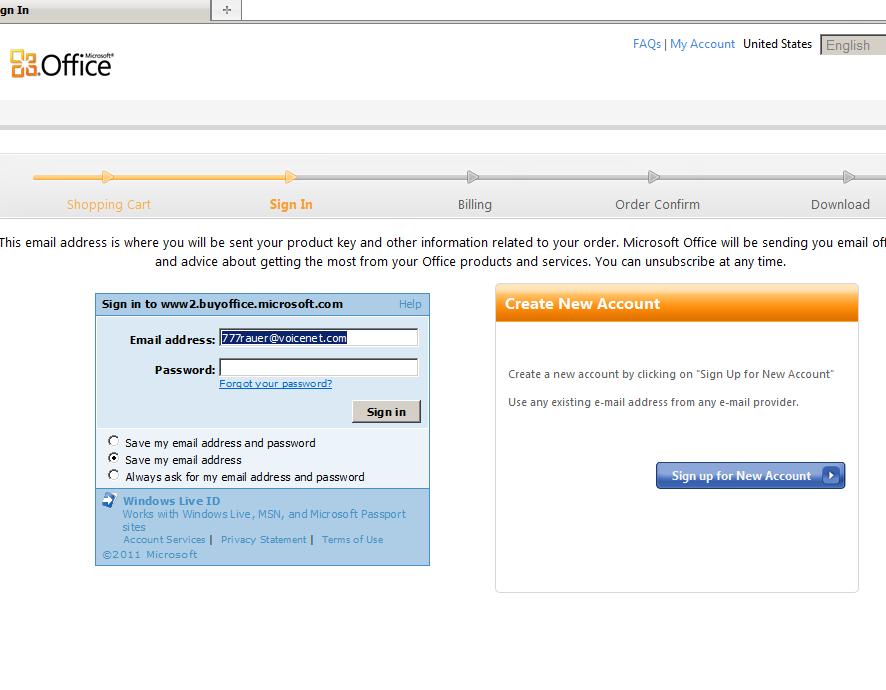
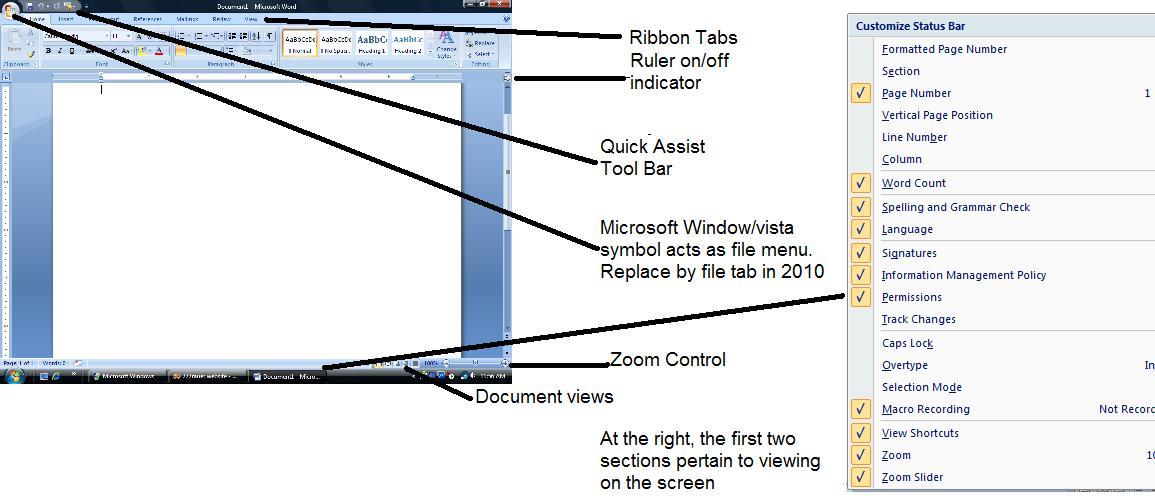
 Now, let's try a few more of these so that you can becomec familiar with what we have here. Click track changes. Notice that an indicator shows up on the status bar. That indicator should still show off. Keep in mind that there is a difference beteen activating an option and seeing the status of the option. The check marks pertain to use on the status bar. Once displayed on the status bar, clicking the icon may change the status.

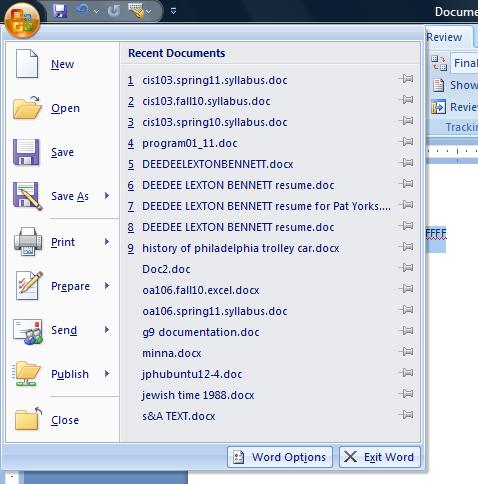


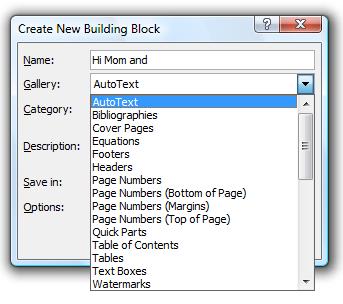

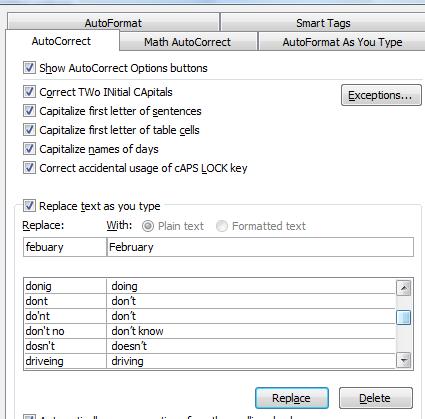
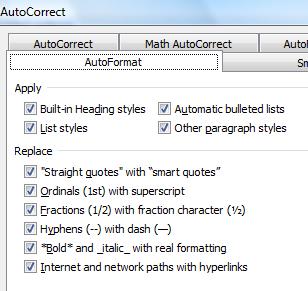
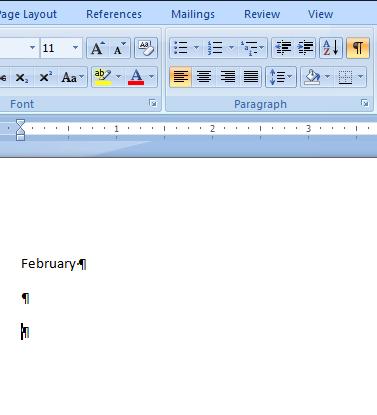 So, in our document right here. hit the enter key after the space in January and then hit the enter key again. To see what you've done internally, on the home ribbon move your attention into the paragraph group and right top hit what looks like the backward p. You should see something that looks like what is to the right.
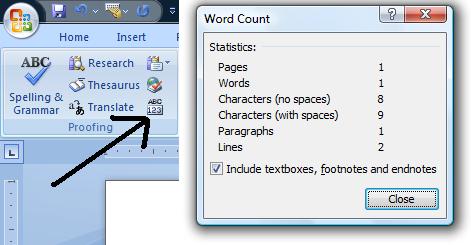 Click the review tab and the 123abc button and you should see something similar to that is on the right
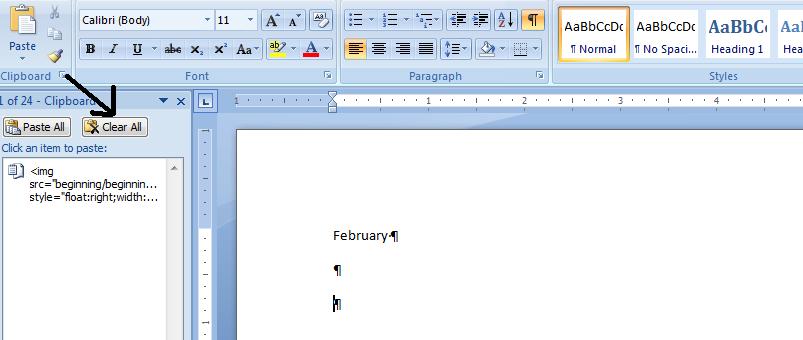
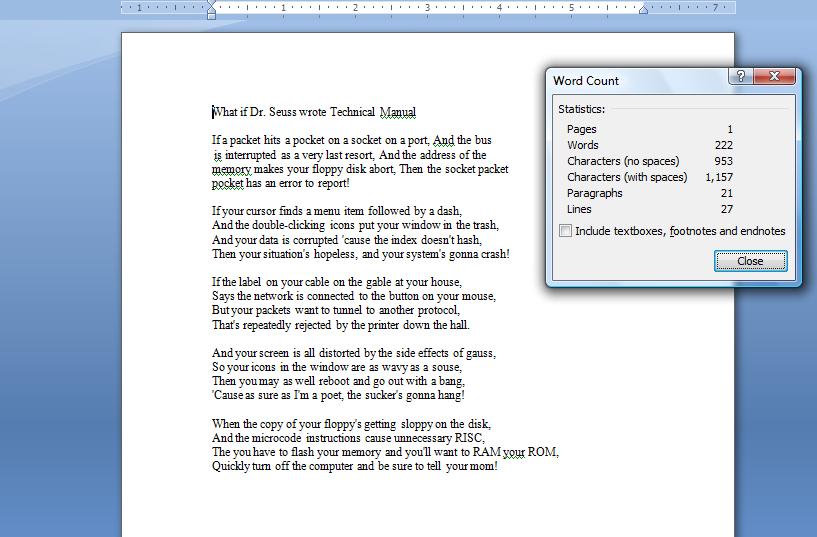 To the right is the document and I have included the statistics for this. Does this seem normal to you. It shouldn't based on the definition of paragraph indicated by me as I was working in autocorrect. We have to determine what is going on here. Now even before that, what would you call the line that reads: What is Dr Seuss wrote technical manuals. Is this a header.
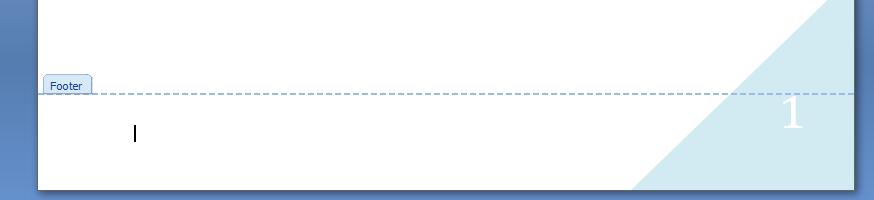
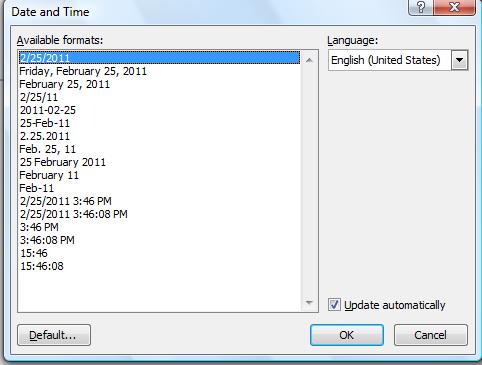 You should see something like at the right. Can you explain these formats? Where are they being generated? Further, how does societal differences influence date and time?
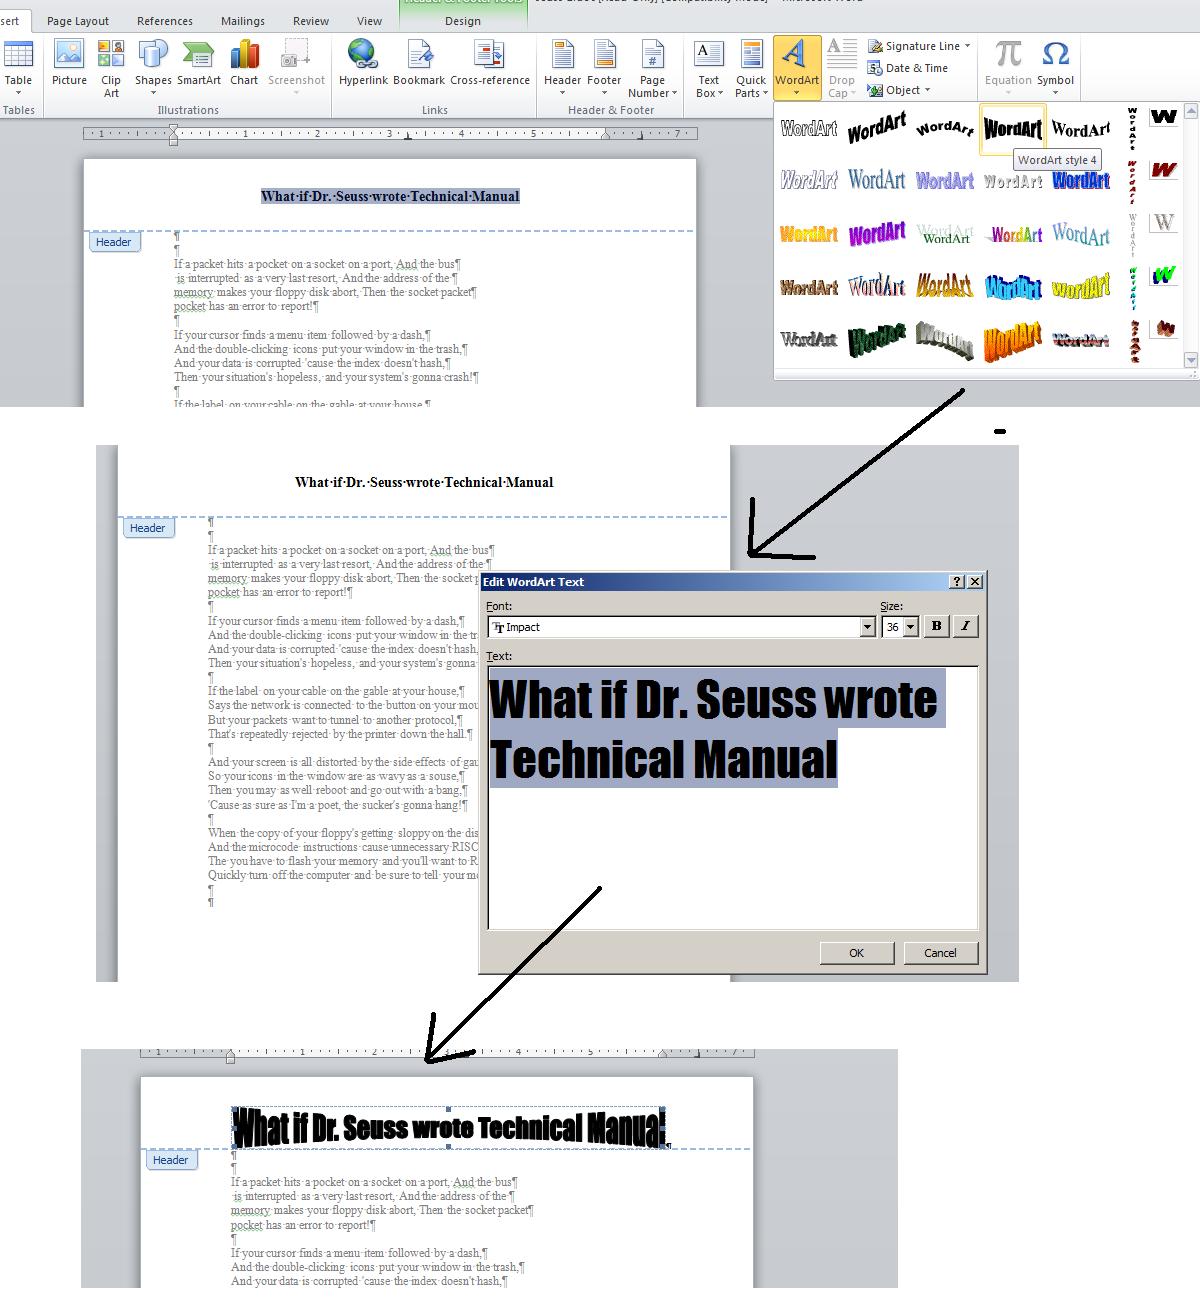
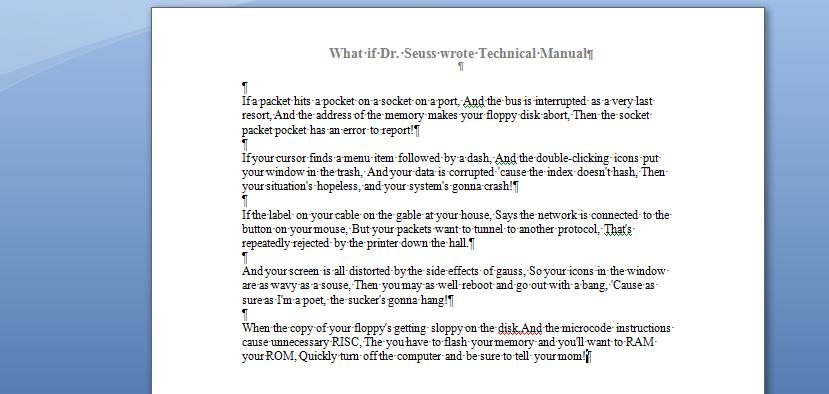

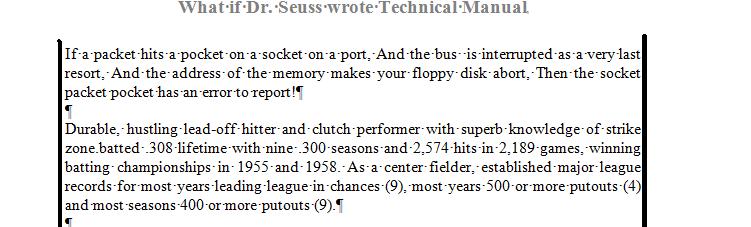
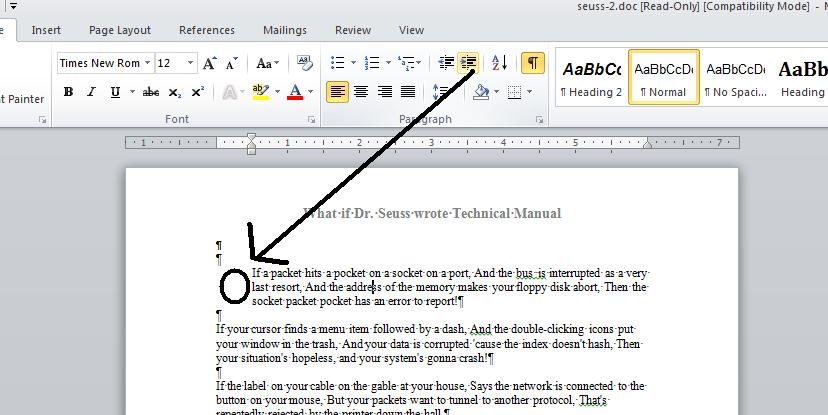

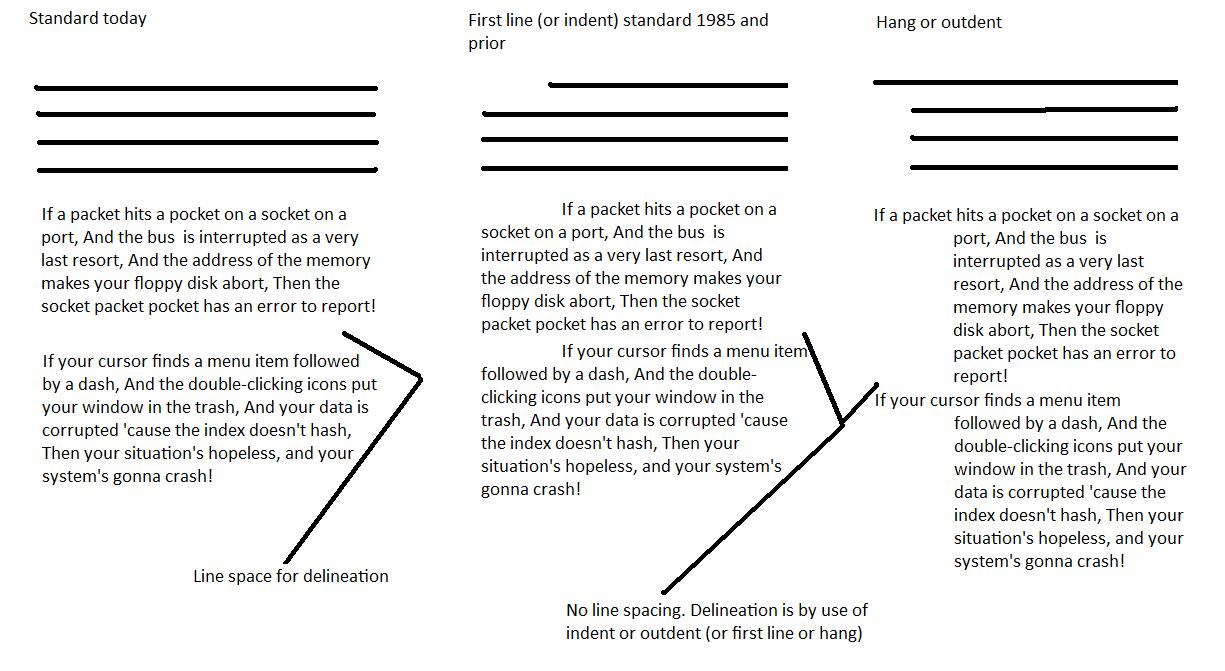


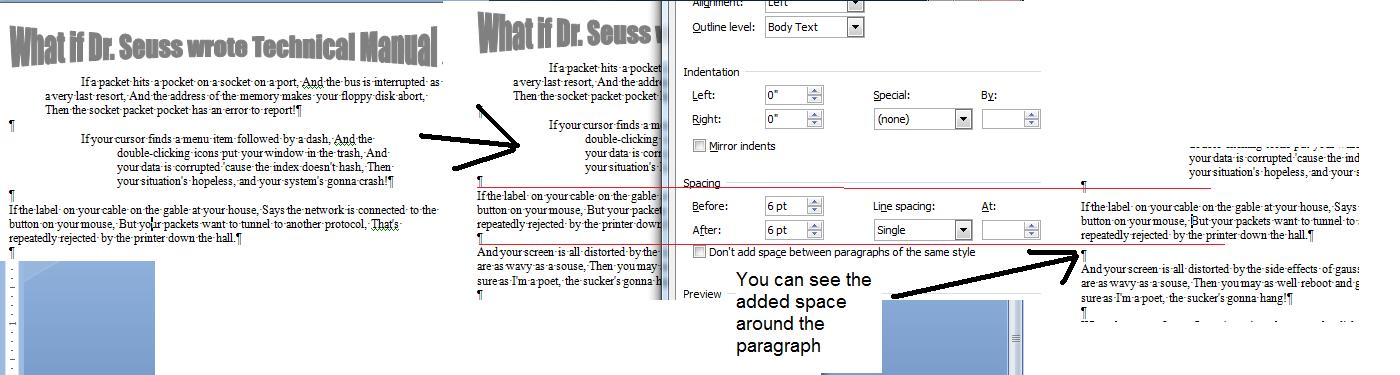


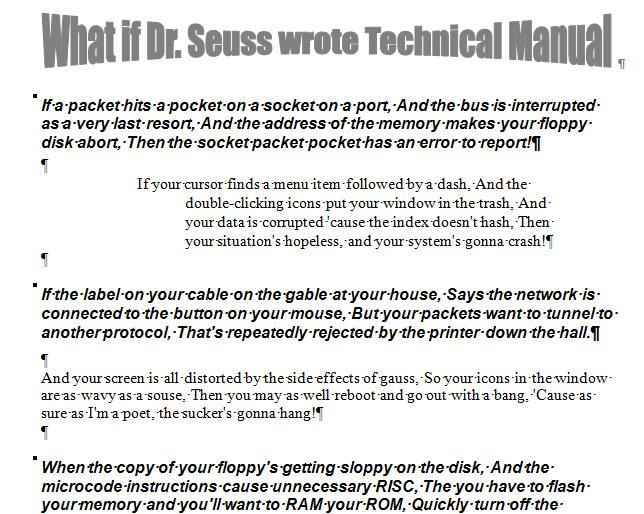
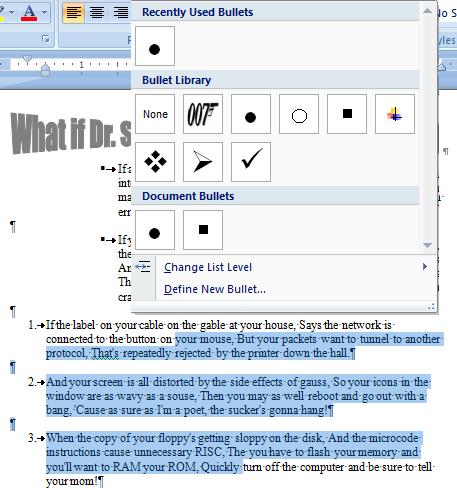 Now, let's do a generic bullet on the first 2 paragraphs. Highlight the two in some way and click the bullet icon (leftmost control on the first line of the paragraph group). Having done that, let's genericaly number the last 3 paragraphs. Highlight the paragraphs in question and click the control to the right of the bullet control. At the right, you should see the paragraphs so bulleted and numbered.
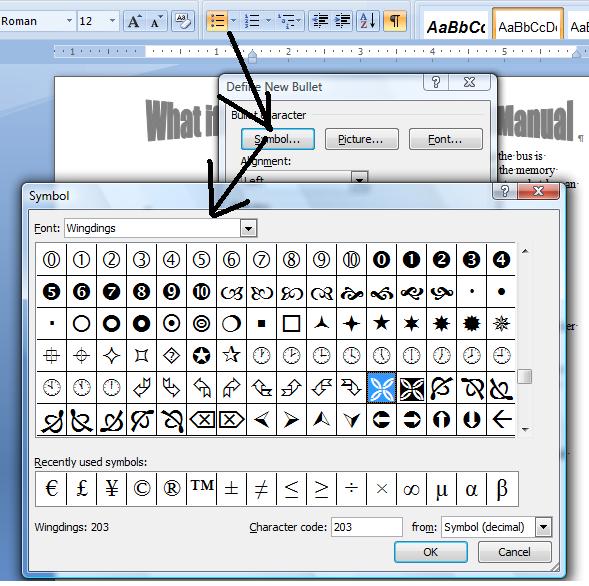


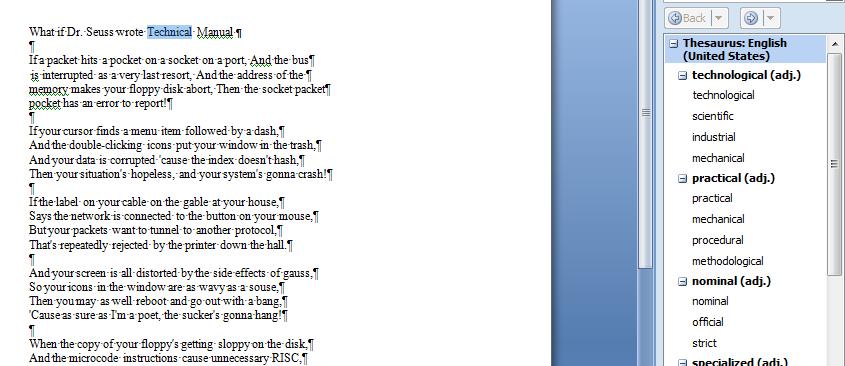

 A corollary to goto is a bookmark which sets a position in your document and allows you to return to that position. The position is fixed as far as subject is concerned - it is not fixed as far as page or line given that you could be changing your document before and after setting a bookmark. Move down the document until you see the paragraph heading, first year episodes. Book marks will not accept blanks (space bar entries). At this point we are going to set up a book mark designated as first_year. There are several ways to do this, but use the insert ribbon/bookmark entry. As you put this in, the add button will become enabled. Entries of bookmarks are not printed - they are for the writers use. This bookmark is now available for you to access from any point in the document. Let's use the goto dialog box for this. Goto goto and click on bookmark and first_year will be a part of this. Click on this and you will be sent to that location. You can also go to a bookmark location through this bookmark control on the insert tab. It also contains a goto ability. At the right, I have shown you the inclusion of the book mark.
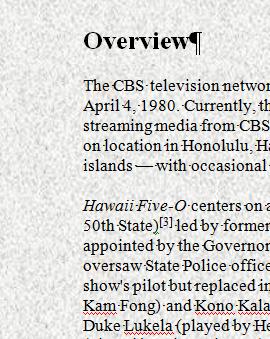 Additionally, 2 other features which were hidden in preveious versions of word are readily available here, Page color and page border. preview exist on page color and let's try some. Generally, added color to background is bad on two aspects, unprofessional and expensive. However, look at fill effects. Some of these work out well and look somewhat professional. Click texture and then newsprint. What does this backgroud look like (which you can see to the right). Like old paper and this is a technique to make documents look older.
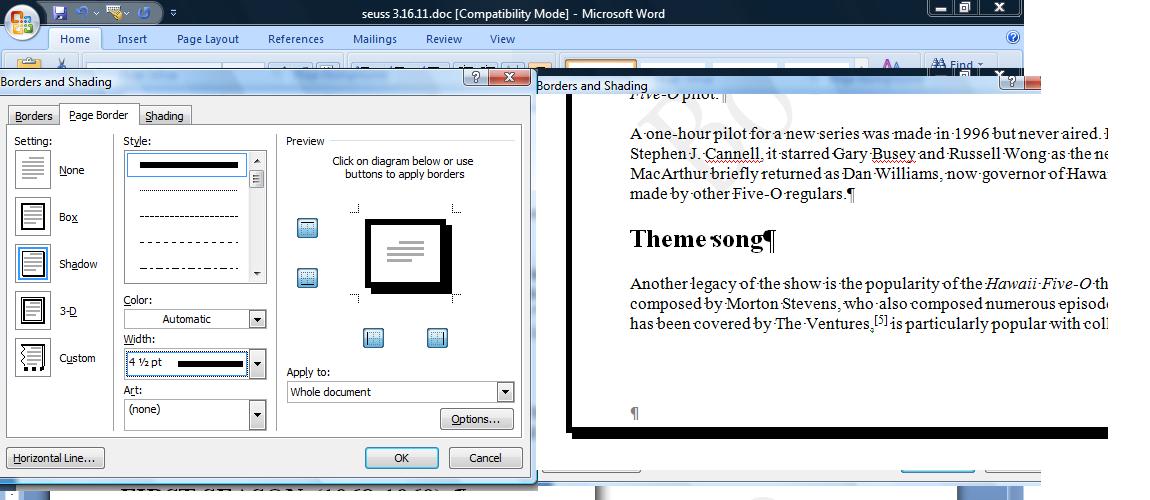
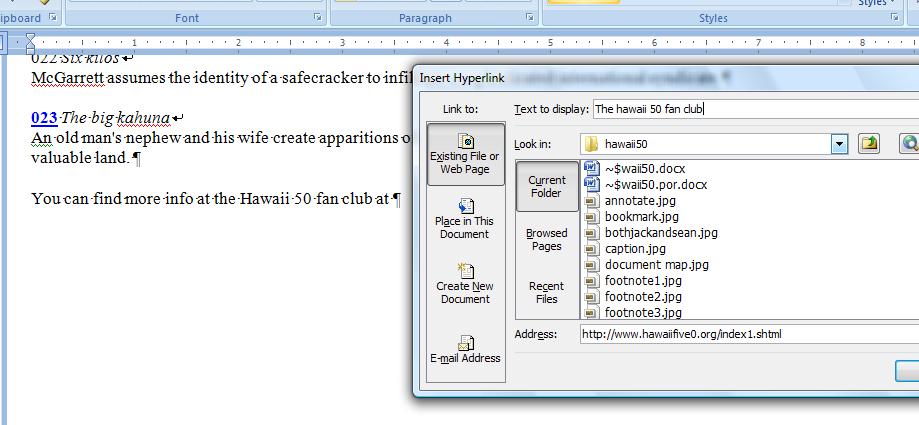
 I mentioned Document map and this is another way to navigate through the document. In this, Microsoft has provided a completely different structure than in previous versions. Each paragraph today has a level abd that level can be body text and level 1 through 9. In previous versions of Word, level1 equated to the style heading 1, level 2 equated to the style heading 2 etc. We are about to use this but we might as well be smart about thuis. Look at the document. Overview, Jack Lord bio, etc look like chapter headings if this was a book. Notice all of these are in Times New Roman 18. Move your cursor on overview and click select all text with similar formatting in select on the home ribbon. Notice all of these titles types are highlighted. Now, go into the paragraph dialog box and change body text to level 1. You won't see any effect at this point, but click document map and this will have changed to something similar to the right.
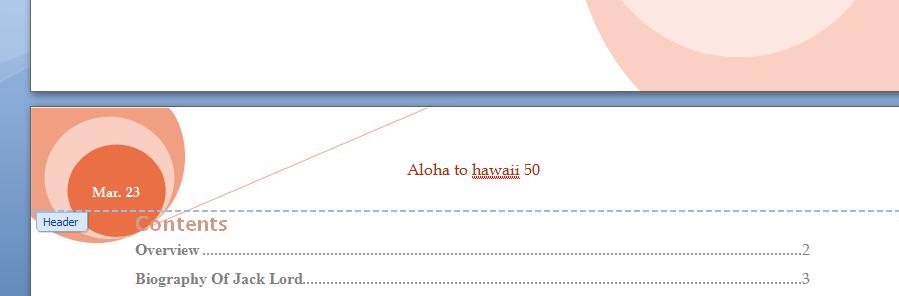

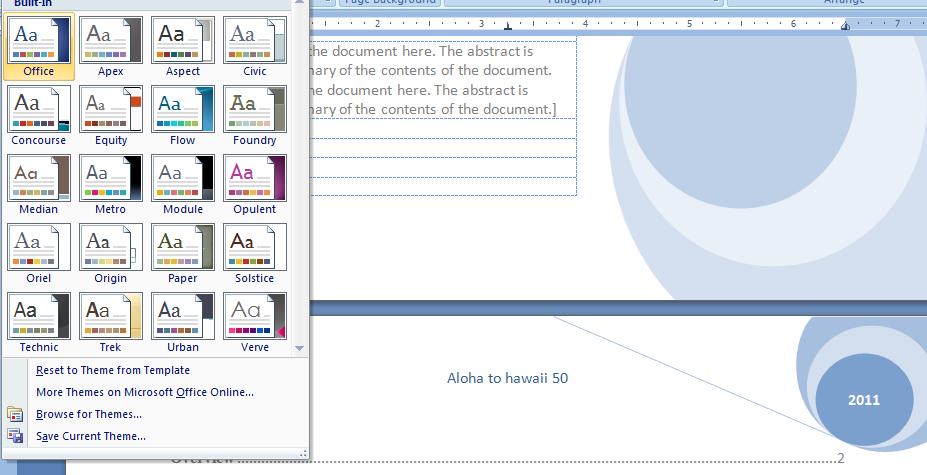
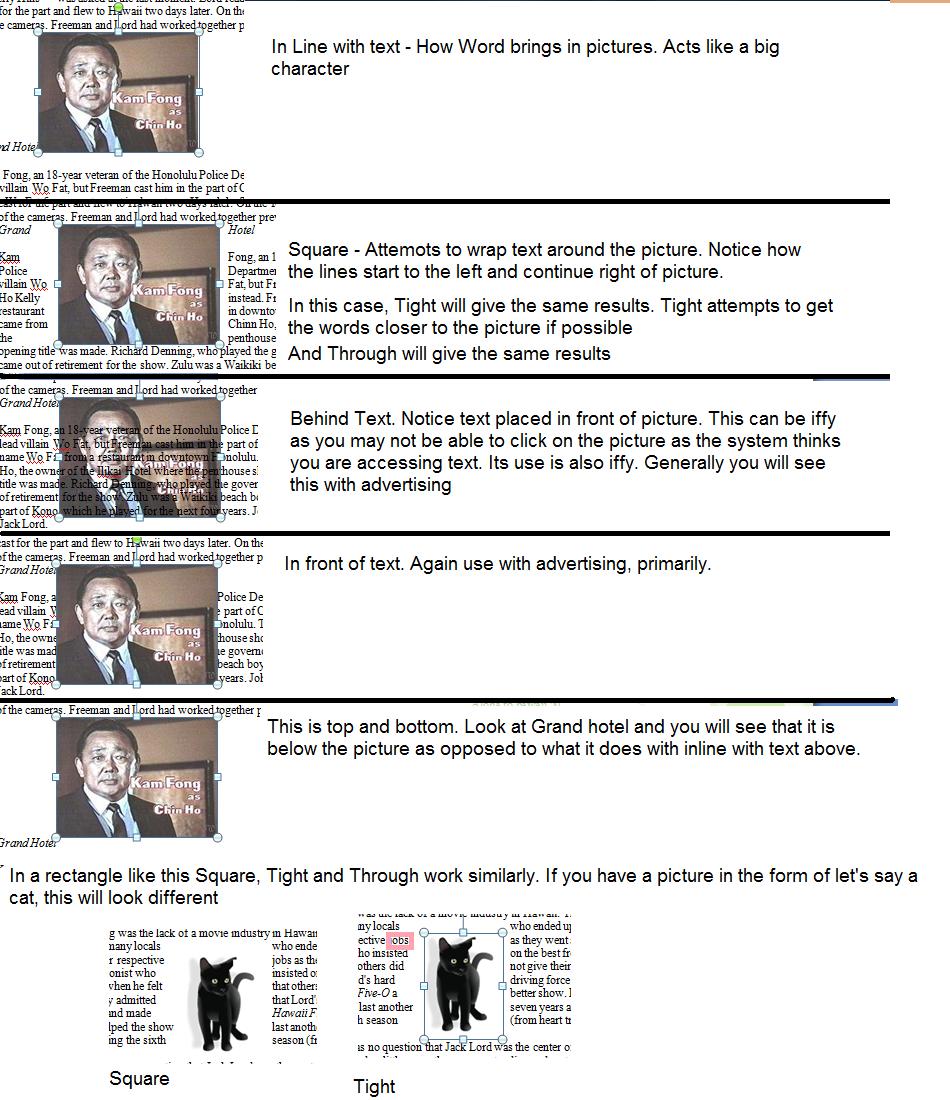
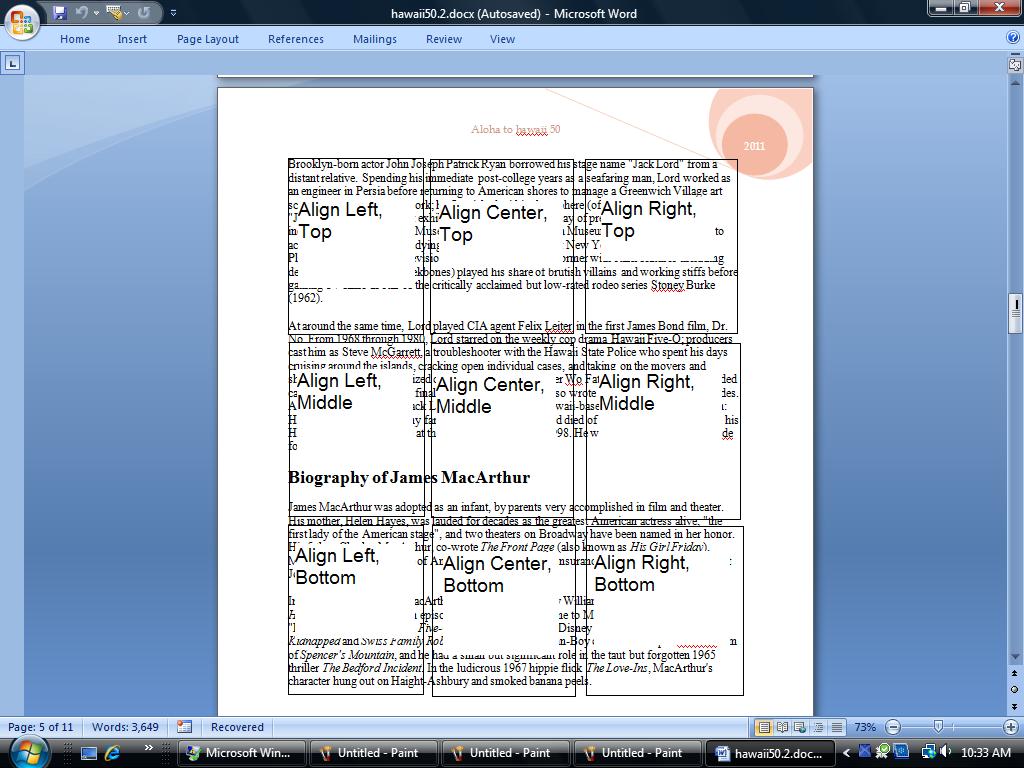

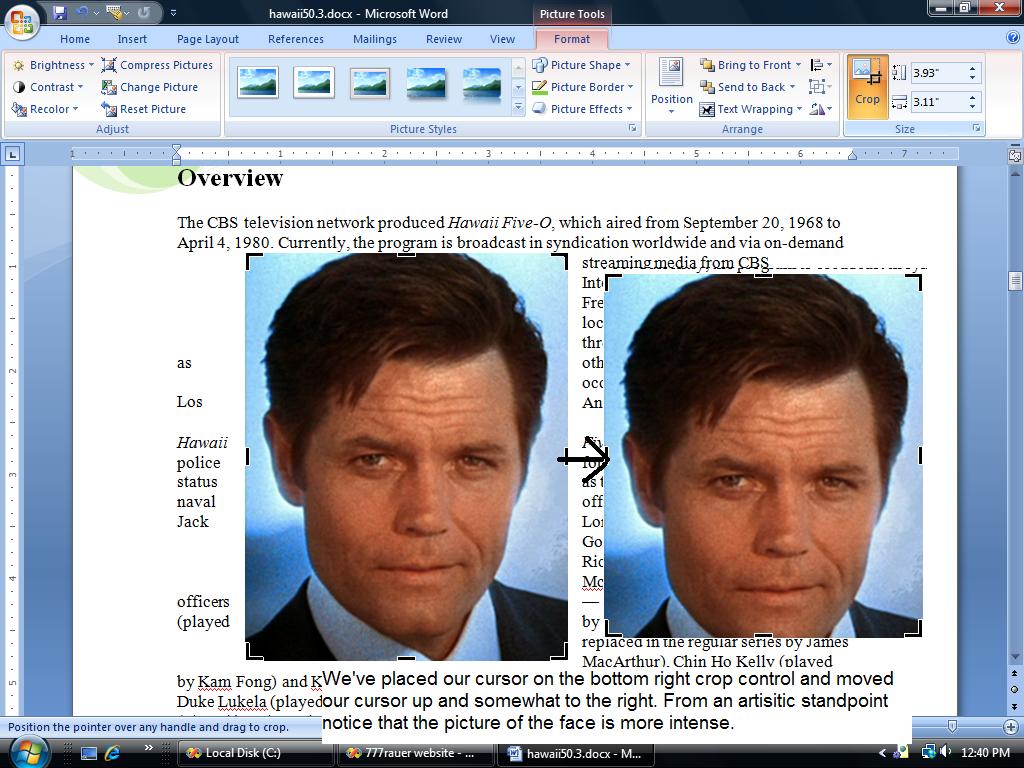

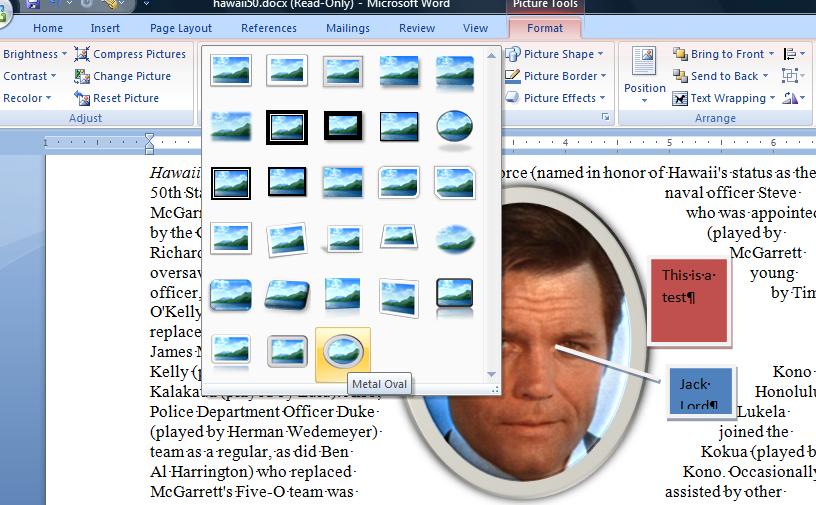

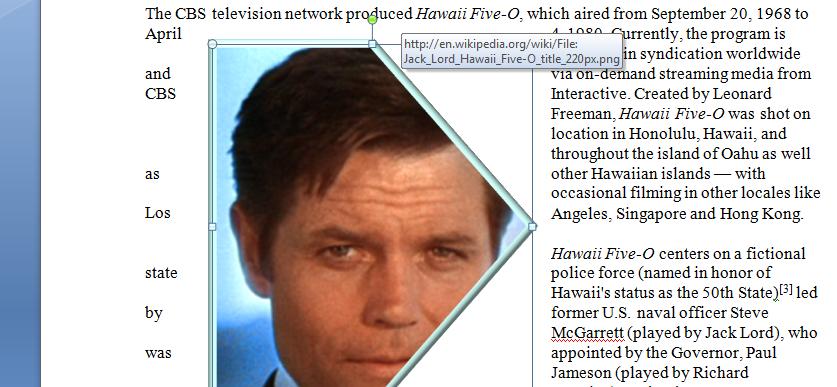
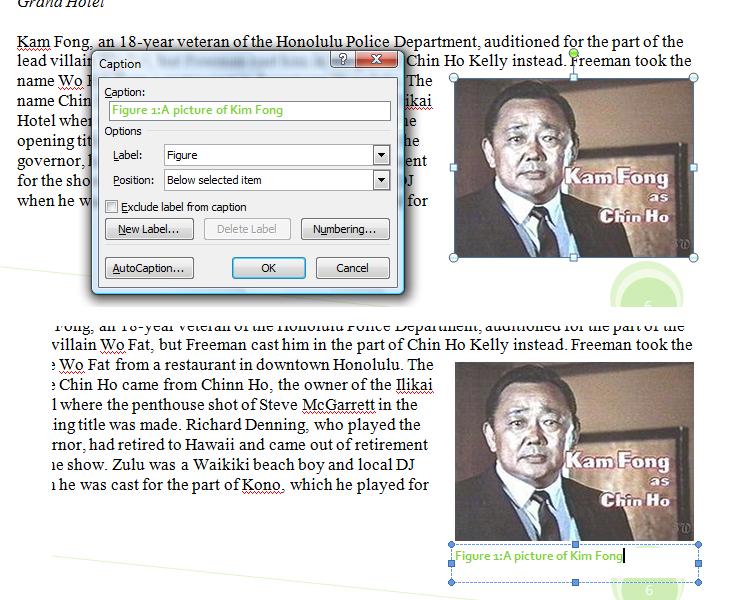
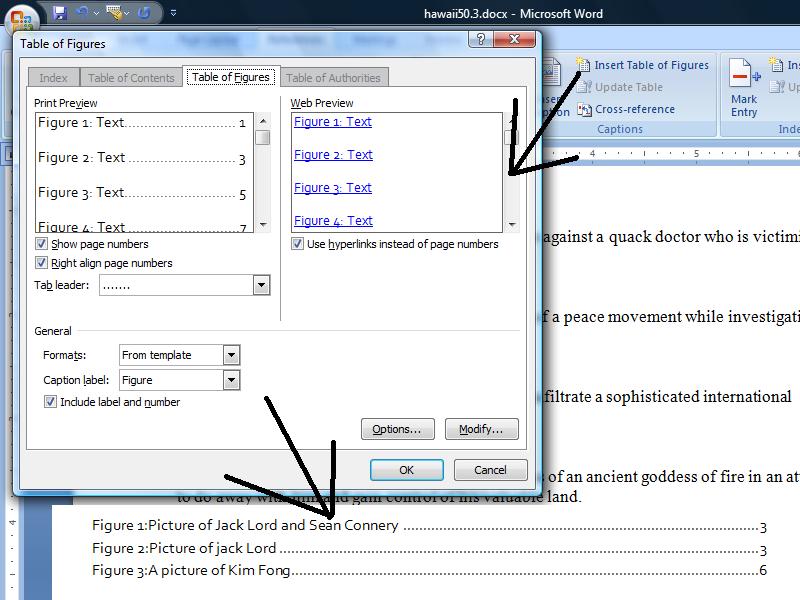
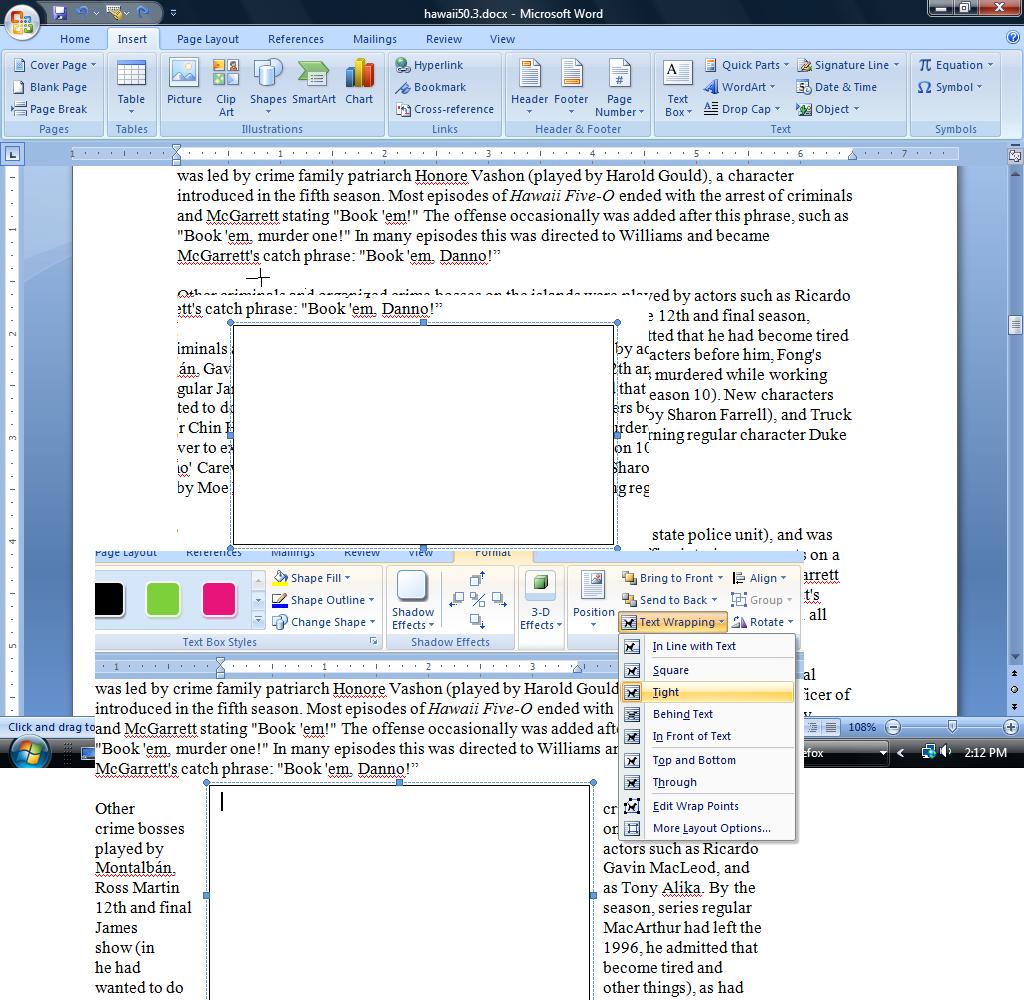
 Insert your text. Instead of rotate, which also exists here, at the left is text direction. Click that and the text is rotated 90% which we show to the right. Now, make the text box smaller horizontally (and don't forget text wrap is not set correctly). Set the text to some other font and maybe 16 points or so. And you get something similar to the right.
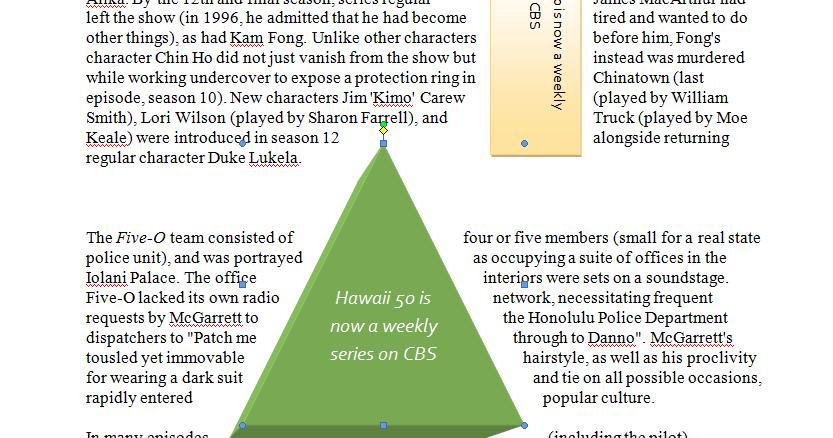
 Let's start with drop cap. This is a printing technique applied to word processing. Gothic era novels would always start with the first word of a chapter enlarged and placed in the center of the page. We have the option of an enlarged letter in or out of the margin for any paragraph. Let's use the initial Hawaii 50 document to show this whixh you can get by
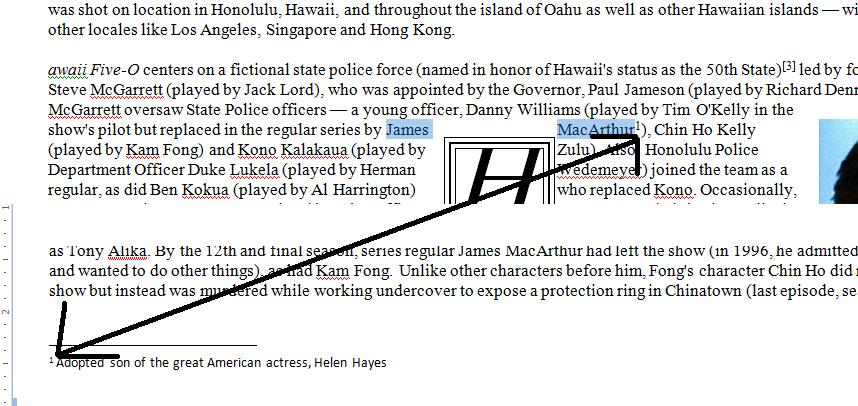
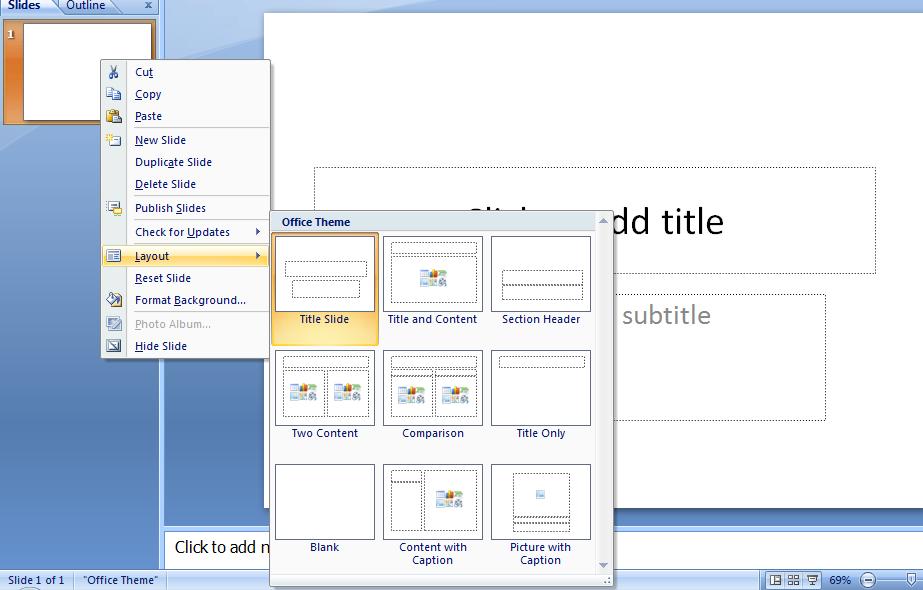
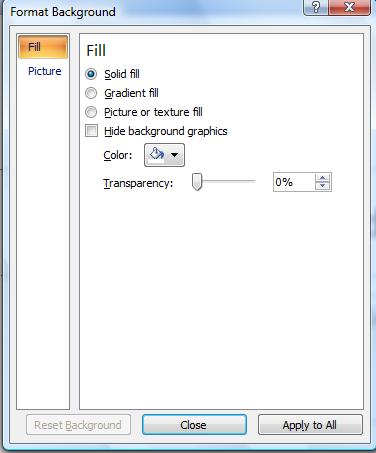 Notice these templates are made up of text boxes and what Microsoft calls smart boxes. We will return to these shortly. But first, how about the background. For this, click design. If we had the time, we could have done this in Word as the coding and principals are applied. You will see 20 themes (including the default white) and click on one, Even with the default layout, you should be able to see a difference. Now, each of these themes can be modified and the preview tools used in word can be used here. Click on font and see how the whole slide is affected. Similarly with colors where a set of colors are indicated. You can if you want affect the underlying style by using options of background styles in essence to make your own type of theme. If you really get good at this, find a piece of the background and click your right button and you'll get more options for this as to the left.
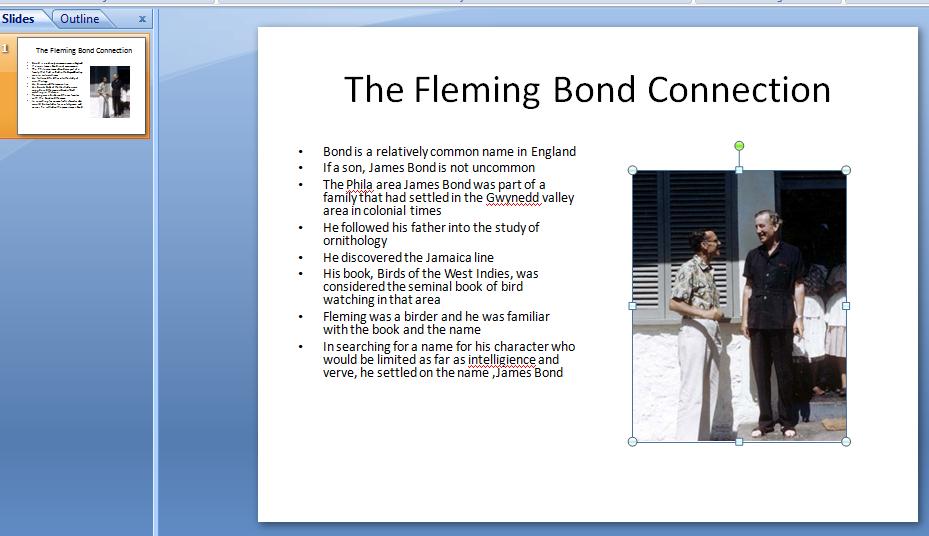
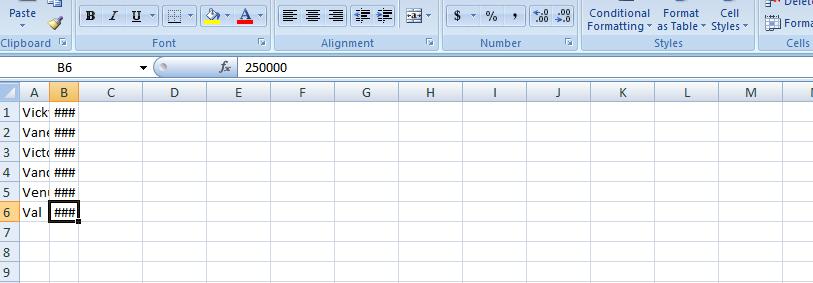
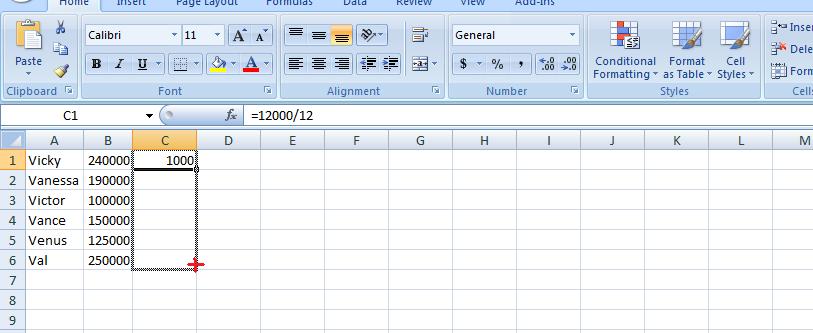
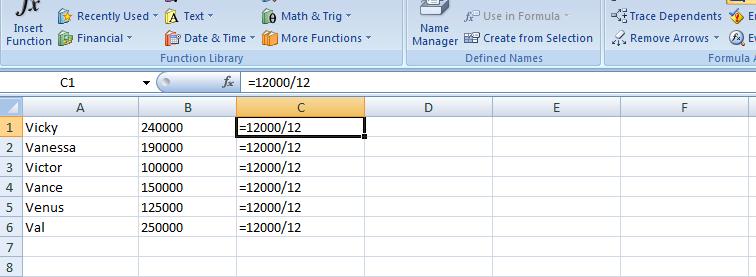
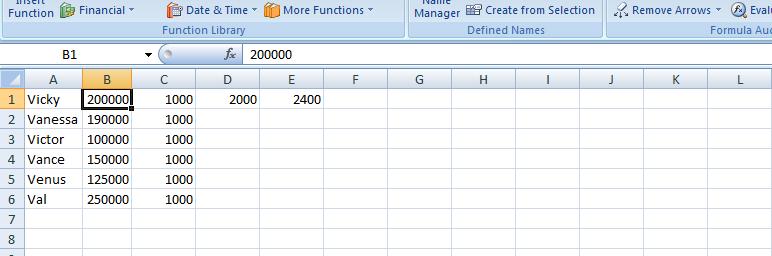
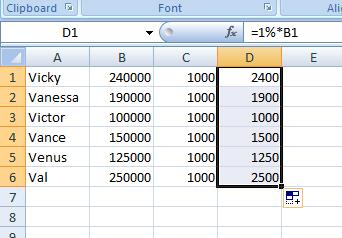
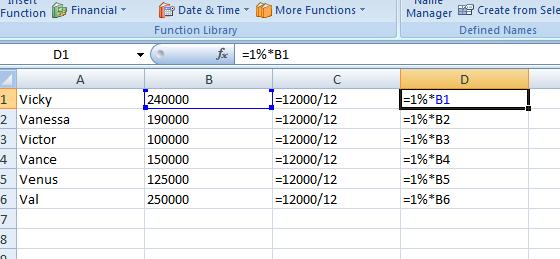 Previously, we have clicked within cells to see the formulas in the formula bar. Is there some way of doing this on a more geenral basis. Yes! In the formulas tab, on the right click show formulas and you will see what we have to the right. This is a good tool to use to see formulas in general as it lays it out on the spreadsheet. Ypu can even operate your spreadsheet this way in terms of entering formulas but you would not see the results. Your instrcutor would recoment that every now and then you click on this, especially if you have a big and complicated spreadsheet, to see if the patterns of the formulas make sense.
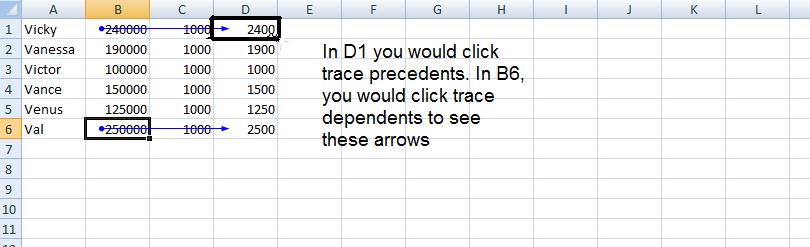
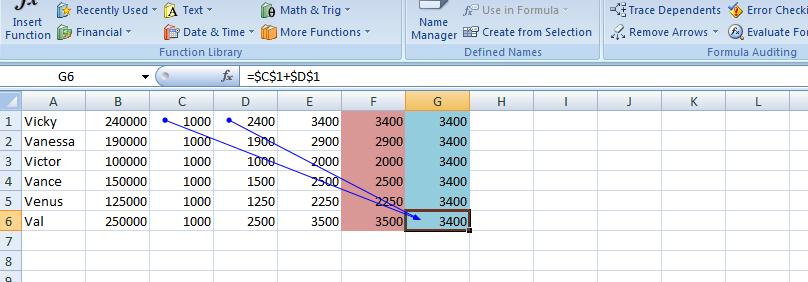

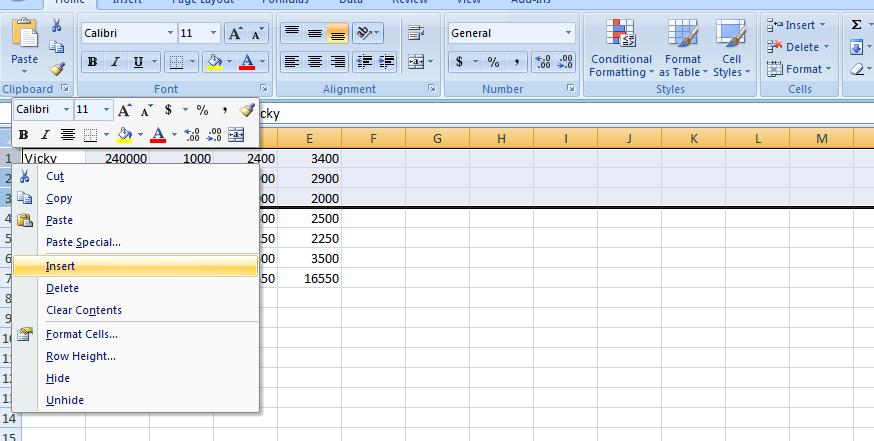
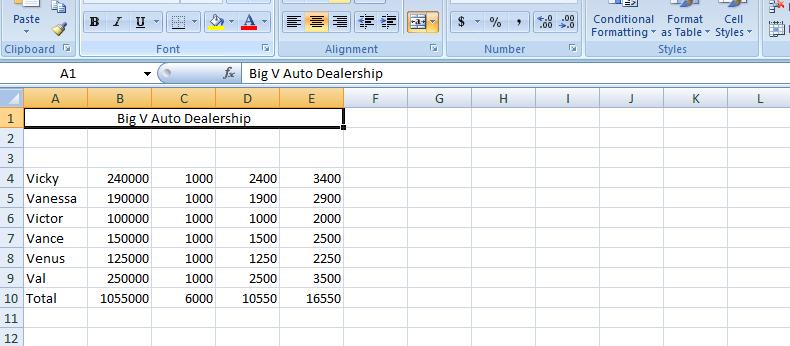
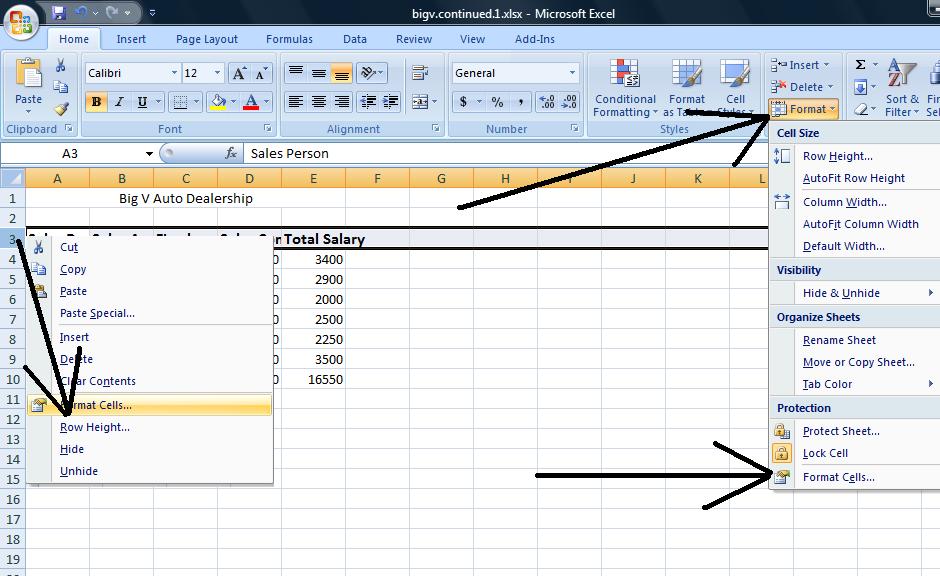
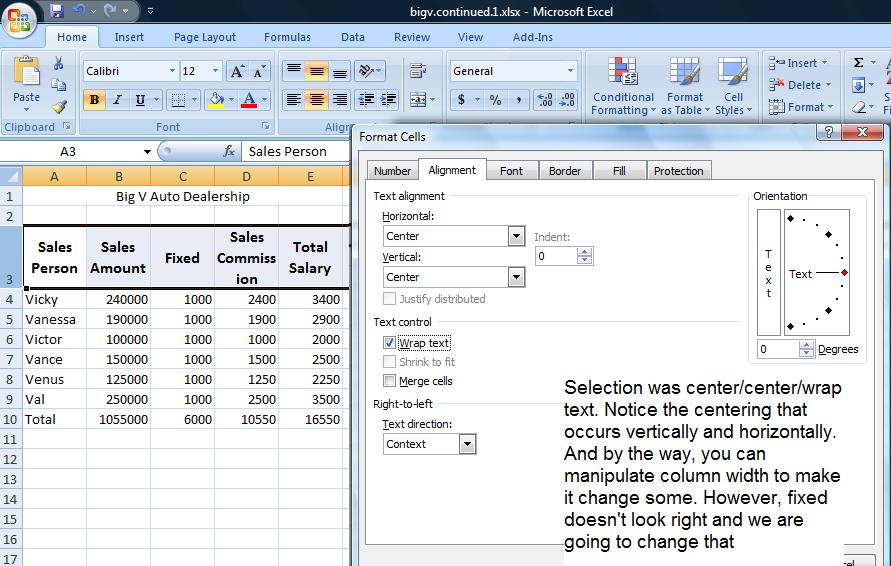
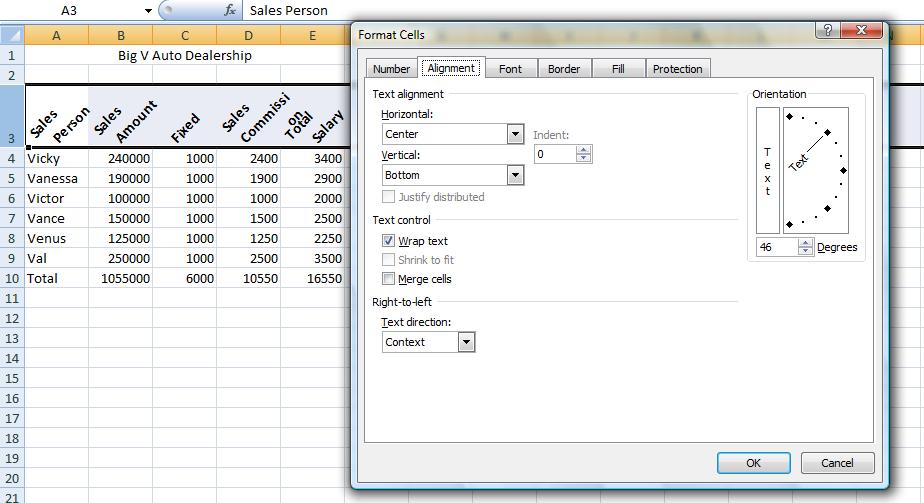
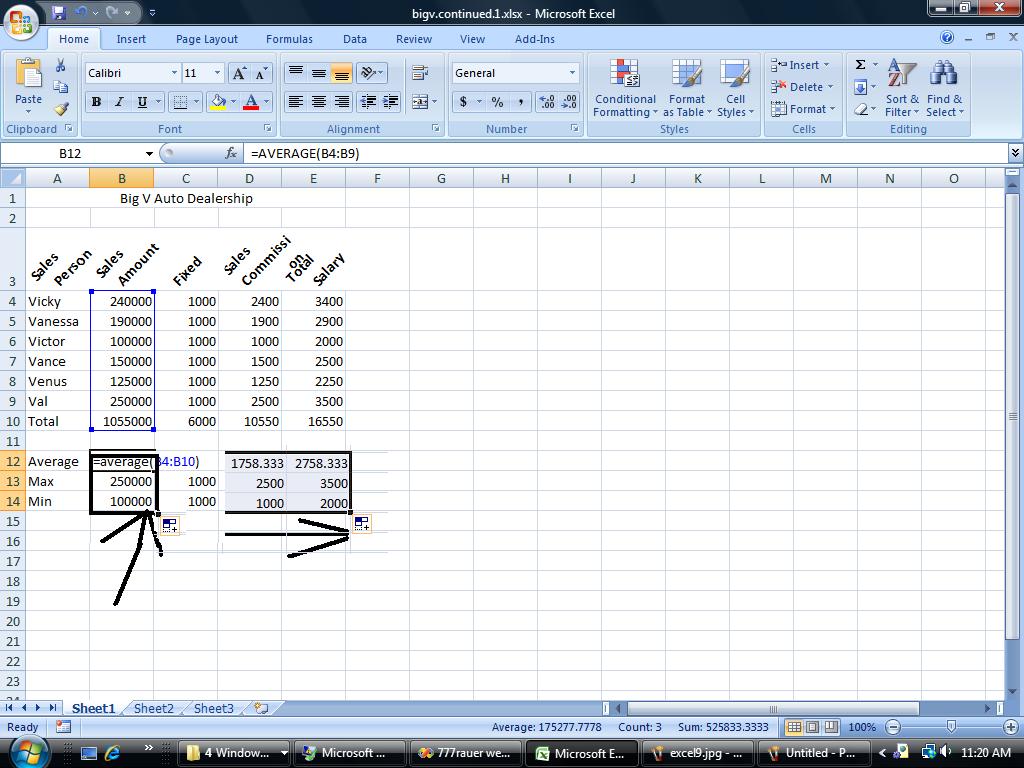
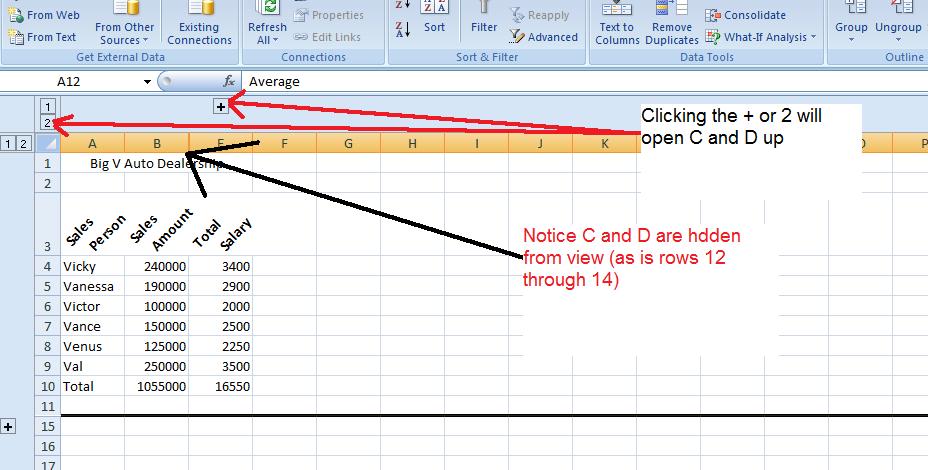
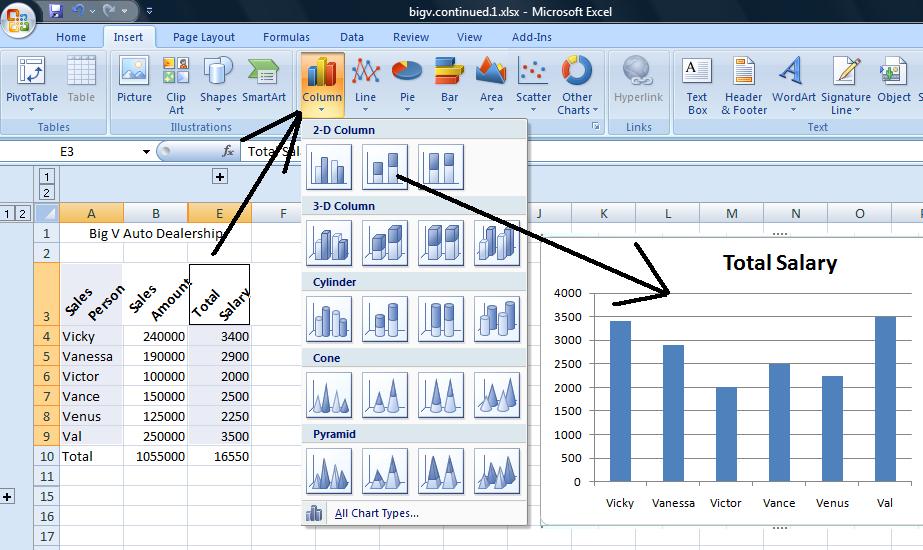
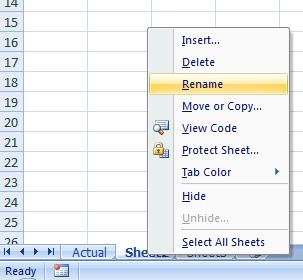 We want to make some modifications of sheet2. Sheet1 is the actural calcs and sheet2 will be the proposed. Move to the tab indicating sheet1, right click and rename to actual. Do a similar situation for sheet2 designating this as proposed. Part of thes process is indicated to the right. Now let's copy our spreadsheet A1 through E10 onto sheet2 by way of copy and paste. THis is similar to what we did with copy and paste in Word. Use either the context sensitive pop-ups of your right click mouse operation or the clipboard controls to accomplish this.
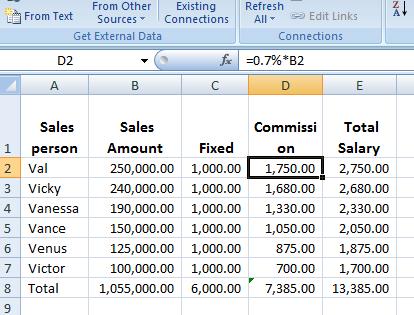 As far as our problem is concerned, we want to cut the percentage commission to .7% (.007) and provide a bonus of $800 for those having $150000 sales or more for the month. In class, we will use the IF statement to set this in the proposed sheet and compare the results with Sheet1, the actual model now in use.
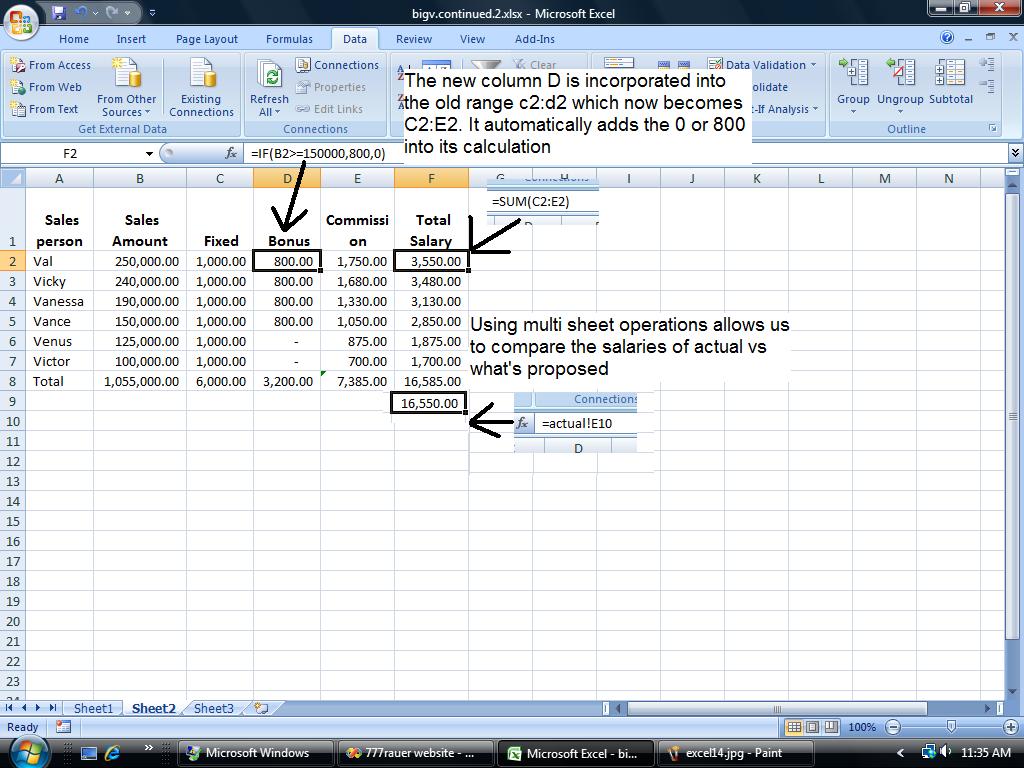
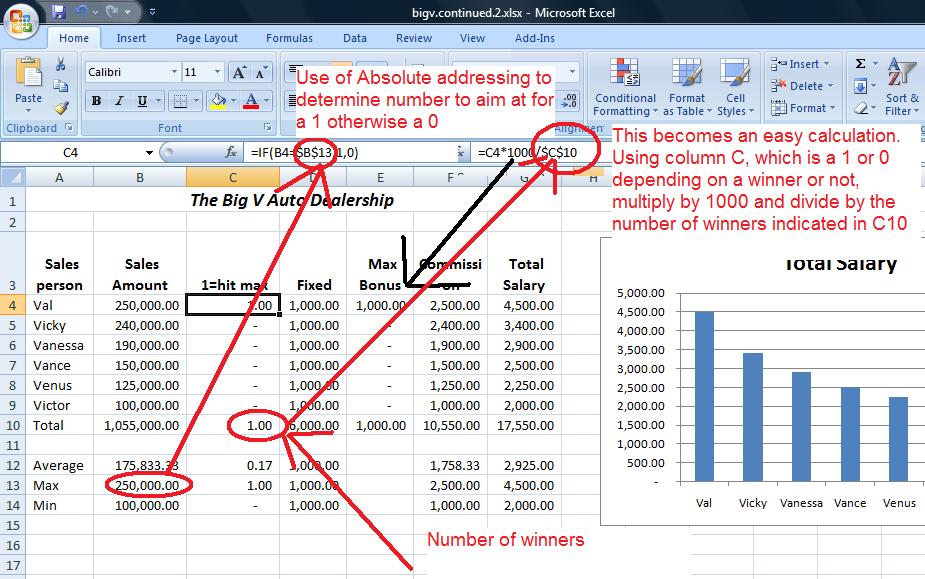


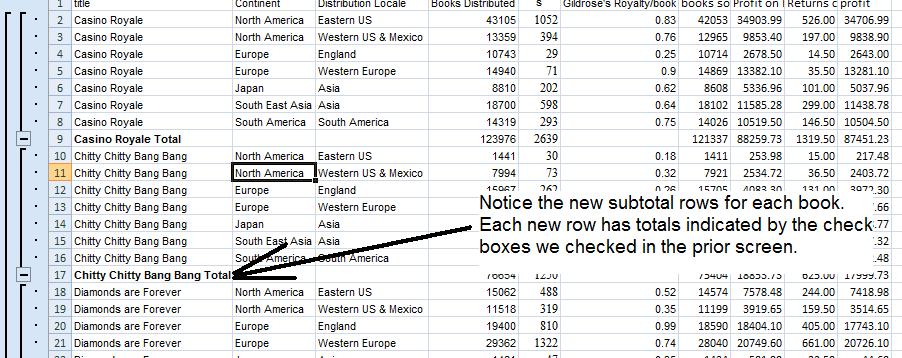


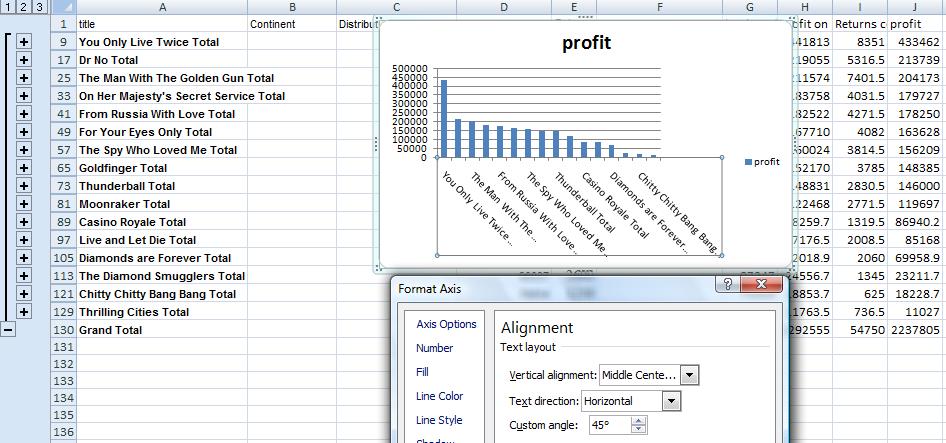
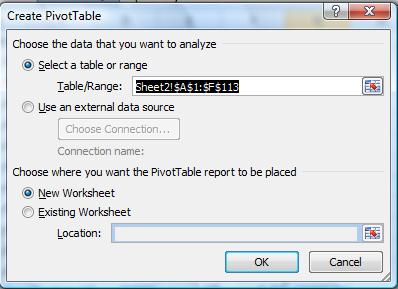 You have just completed the prep work necessary to get the pivot table to work. Prep work is a necessity in subtotals at least at the minimum of doing the right sort. Prep work is even less in subtotals. Click the insert tab of the ribbon and click pivot table, verify the range and set as new spreadsheet as indicated to the right. Click ok and a new sheet, sheet4, will be created and you will be on it.
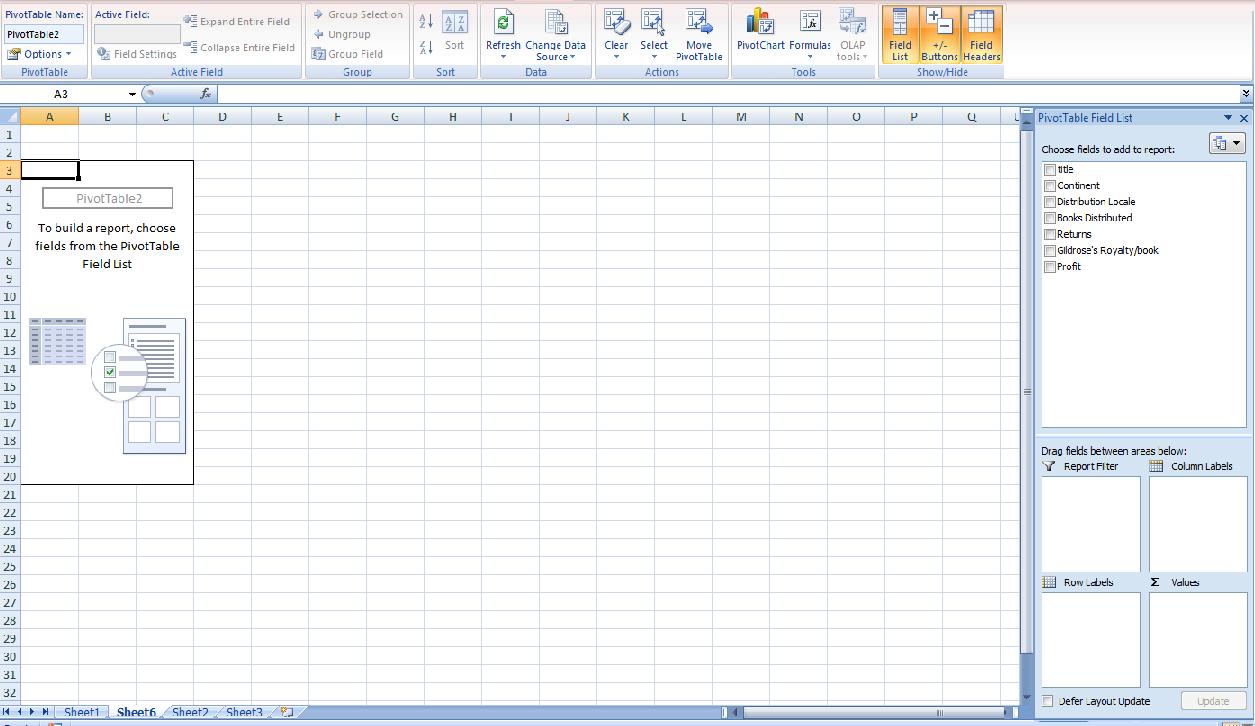
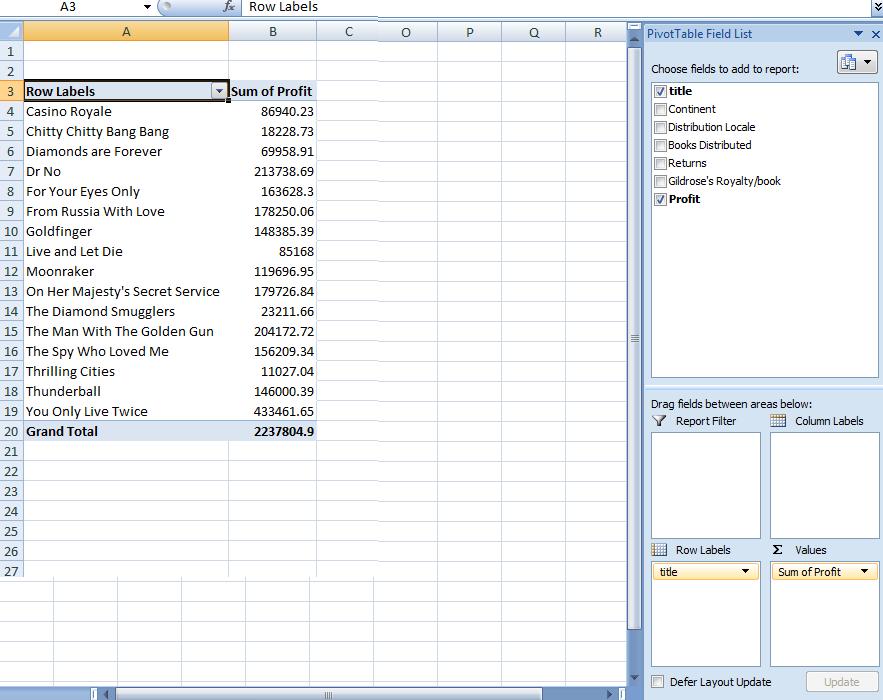

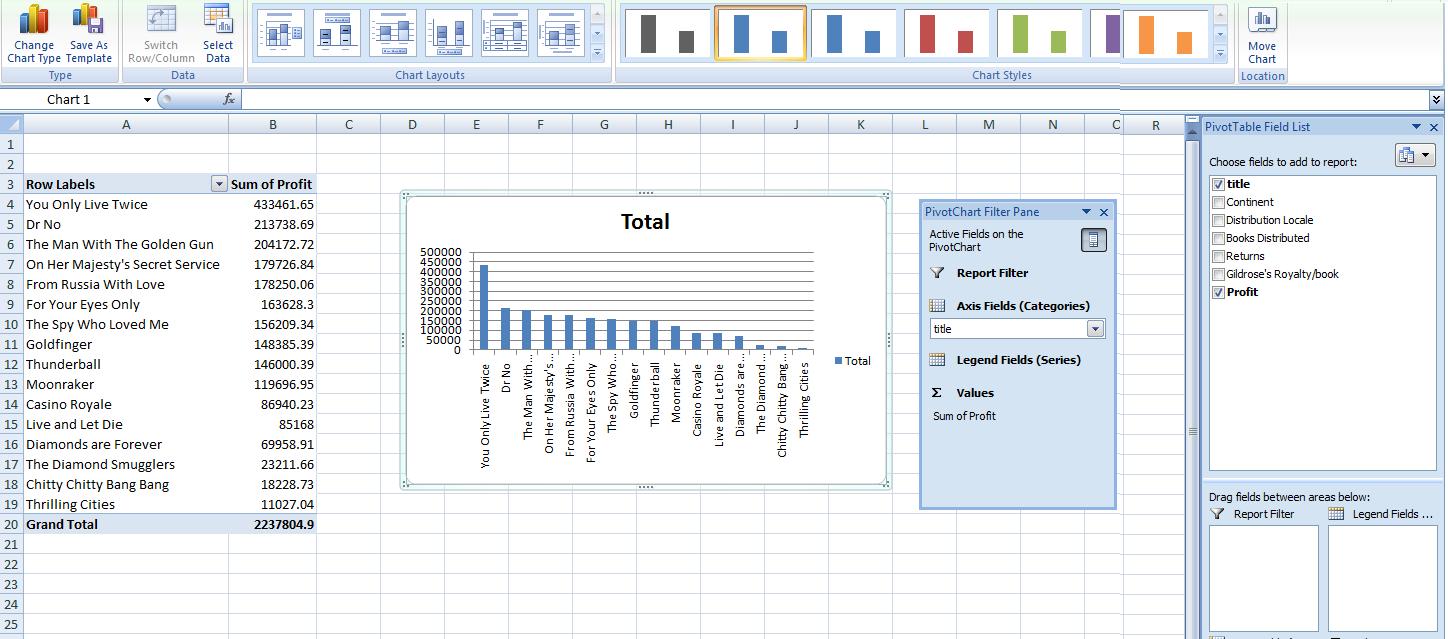
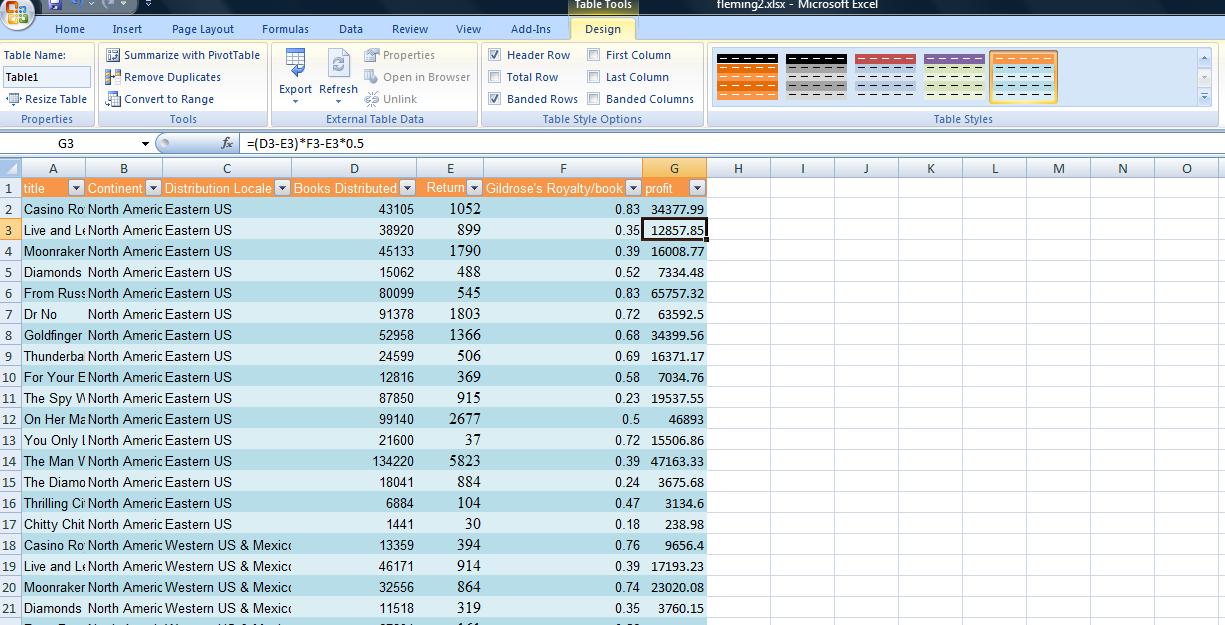
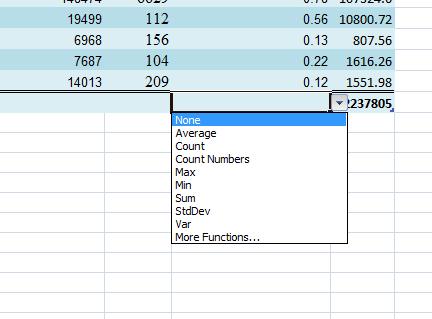 Look at this design tab. Header is clicked as is band. Total is not. Click the total row check box, A total row on 114 is created with the last column set as sum. Move your cursor into E114 and you will notice a right hand control. Click that and you will have the option to create a column total using a multitude of functions. This is an extended column totals row with the option of using multiple math function. we see this at the right.
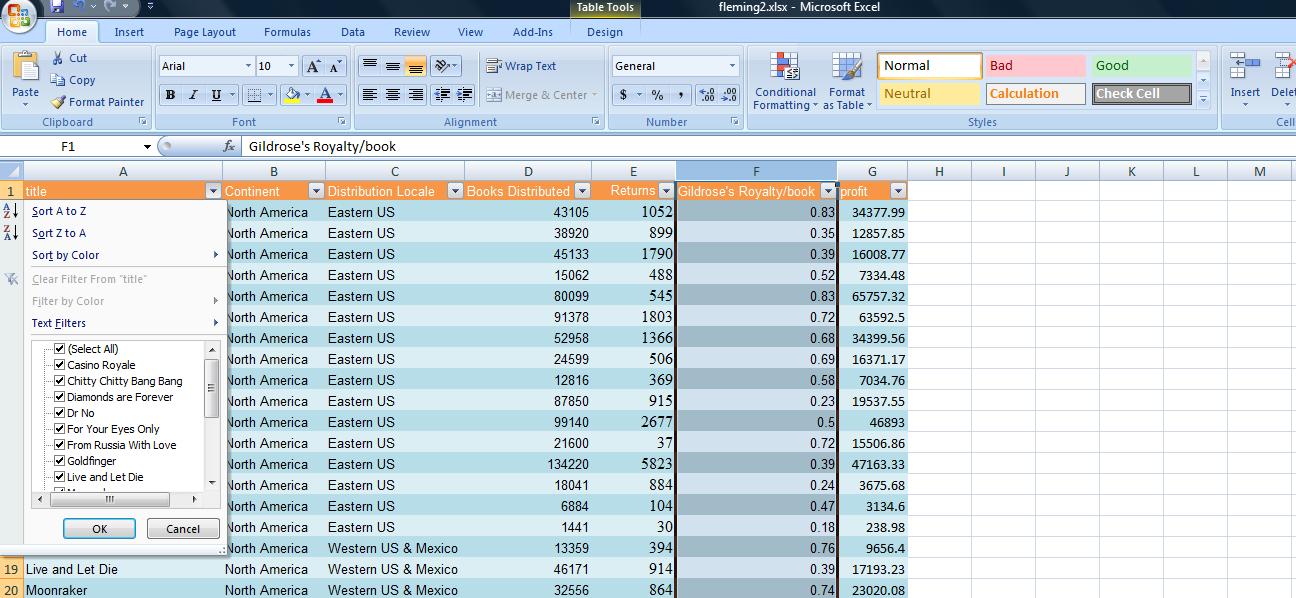
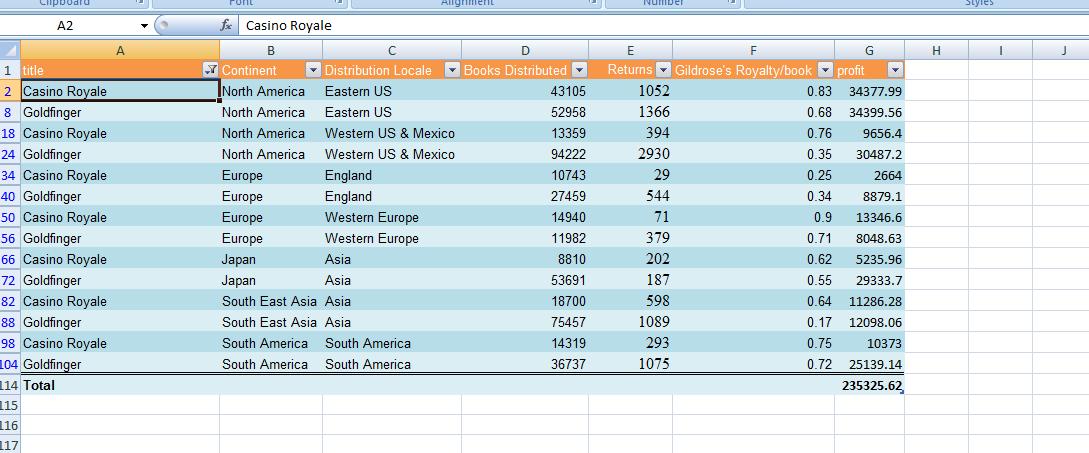
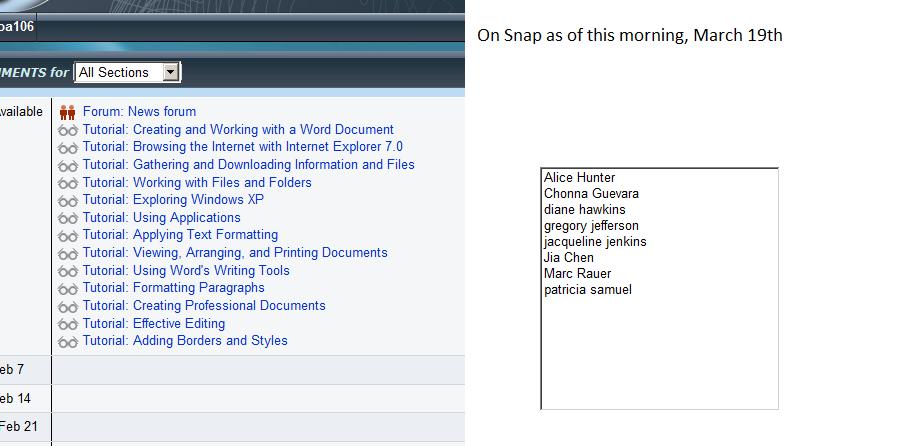
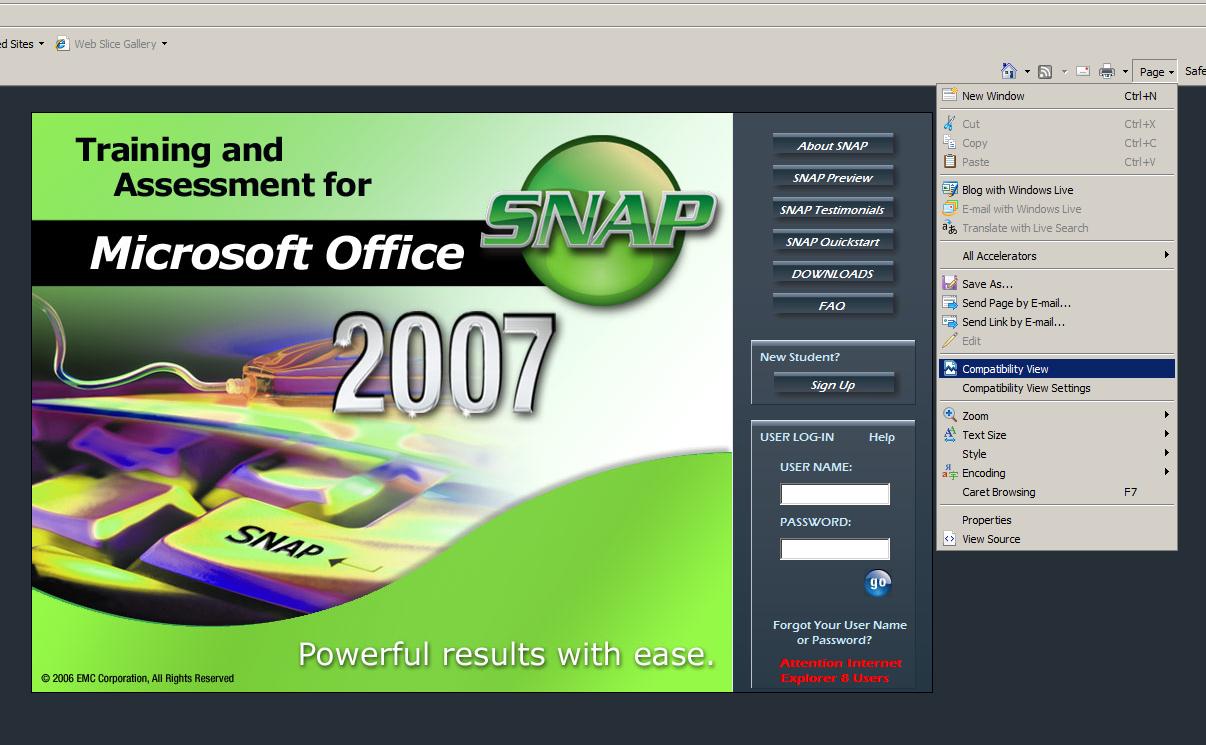
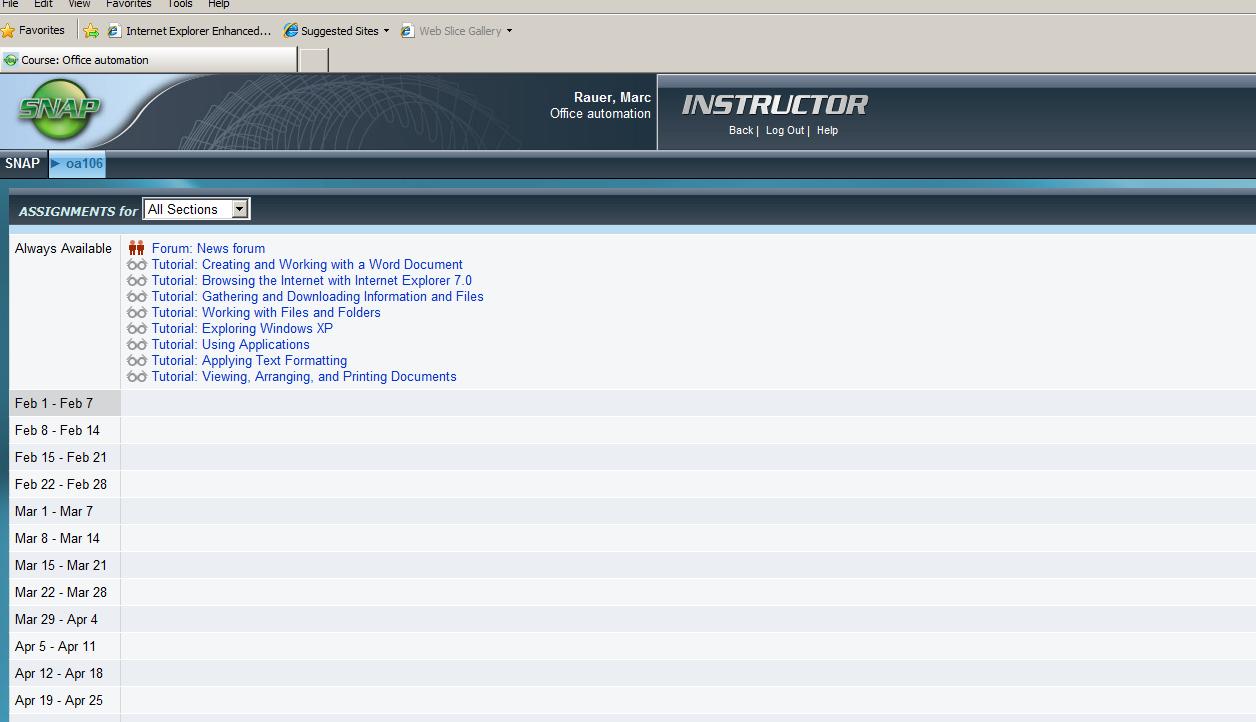
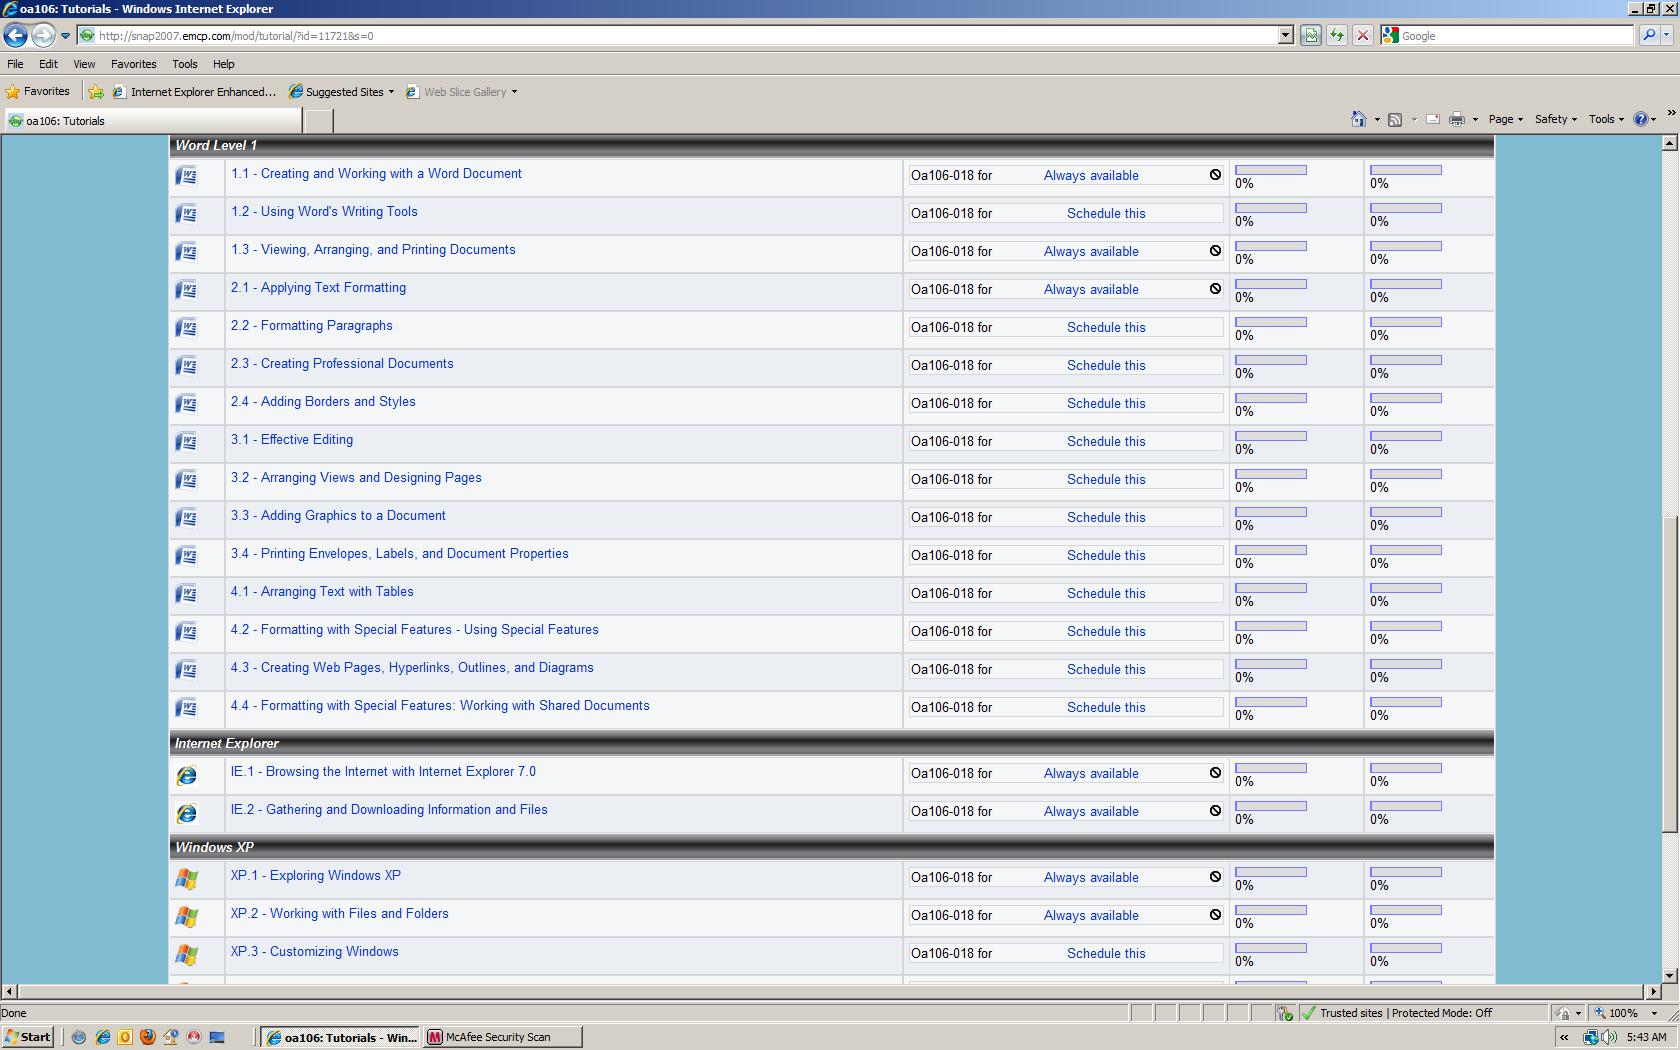
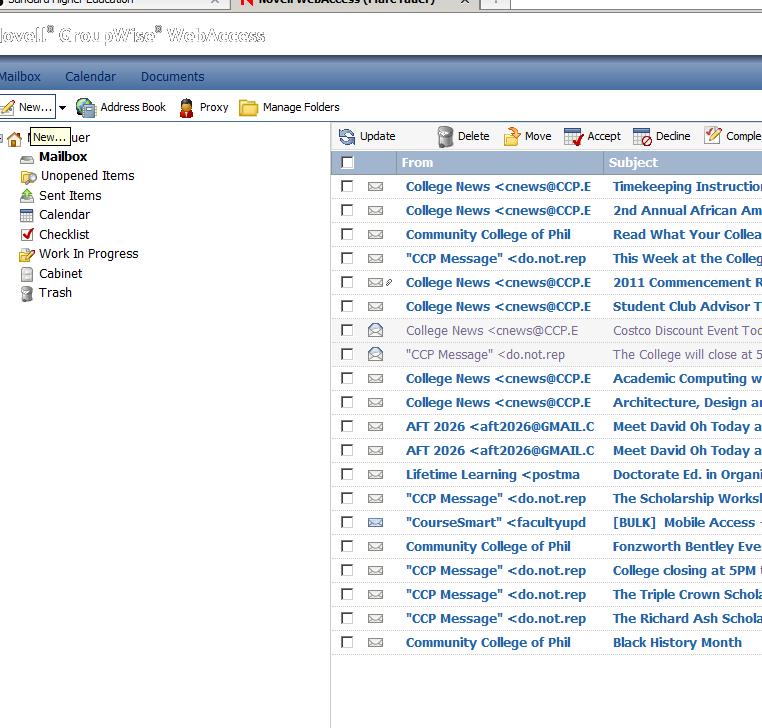
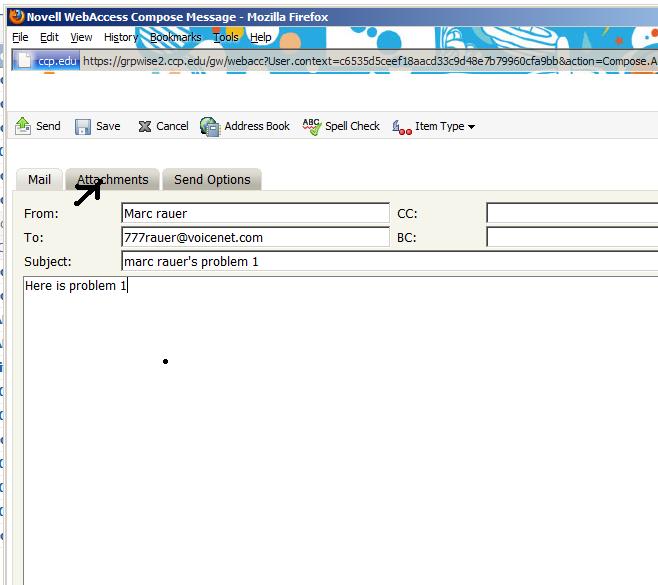
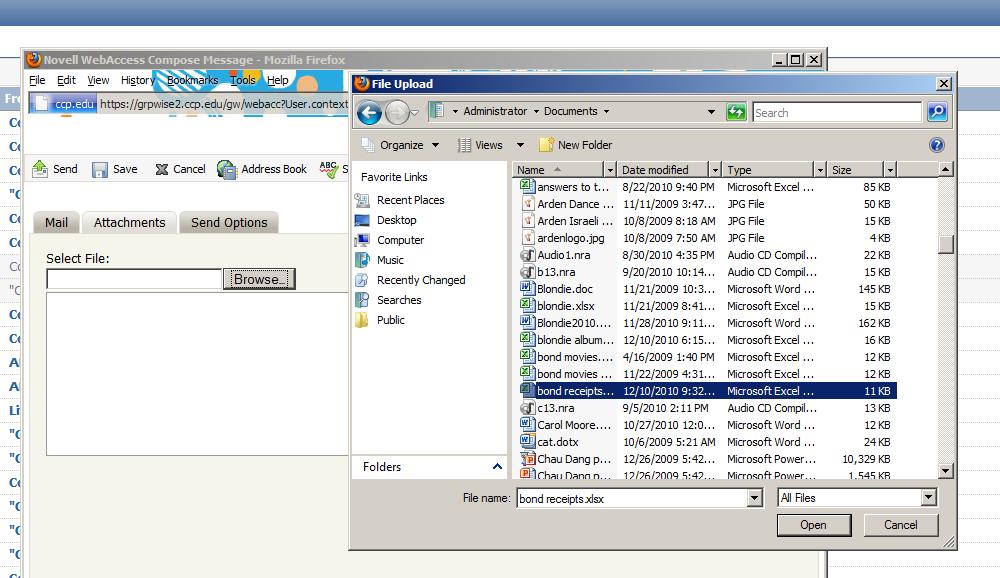
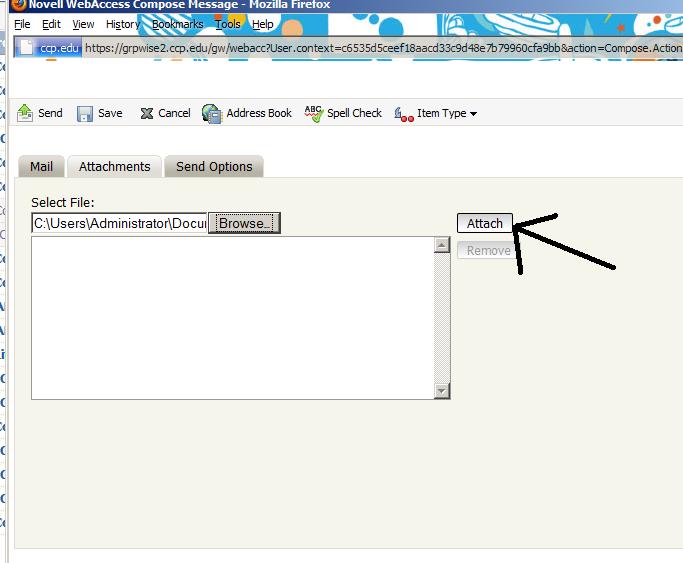
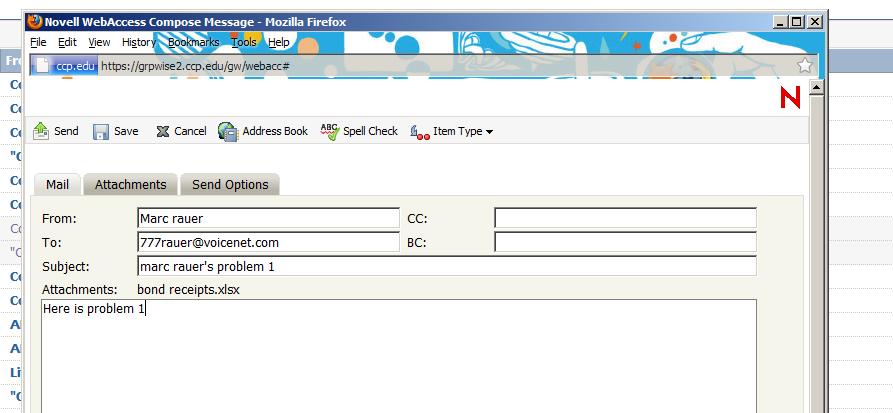
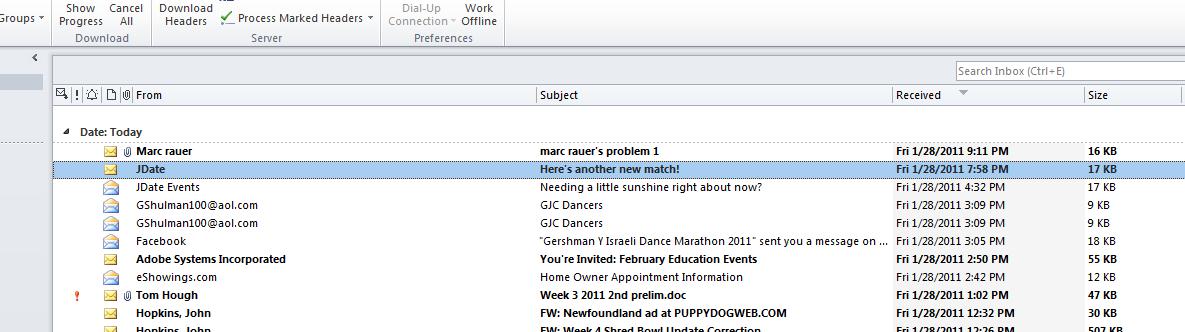


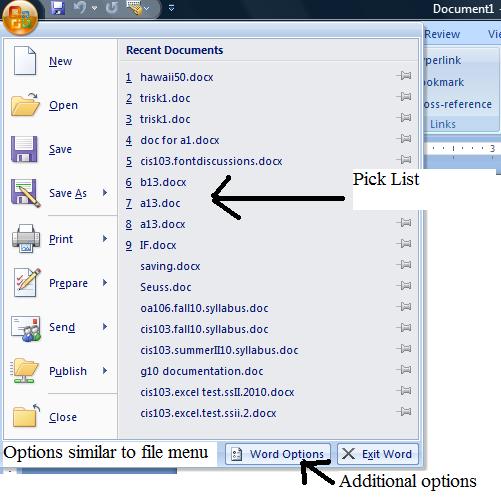 Now, click the microsoft office (Vista) button and a dialog box will be extended as shown to the right. Of interest here is the option on the left which are simuilar to the options available on the file menu in orevious versions. The pick list which is nothing more than the previous word files that have been accessed and, at the bottom, the buttom designed as word options.
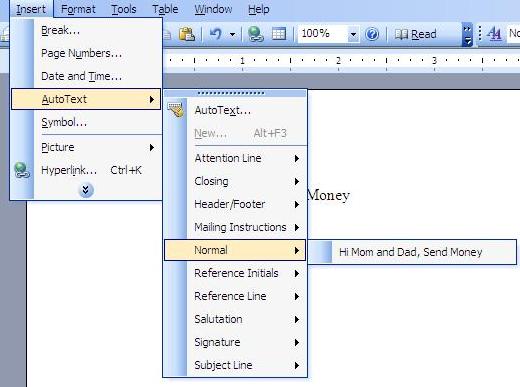 Finally, for those familiar with word from previous versions, it should be clear that some commands are missing. What to do about that. We will do a little exercise bring back an older command called auto text as indicated to the right in the 2003 version. What ribbon will this appear on? None, as what we are about to do pertains to the quick access tool bar. We are about to add autotext to this version of Word. But, in doing so, we will see another component of word which has been added for this version known as quick parts/building blocks.
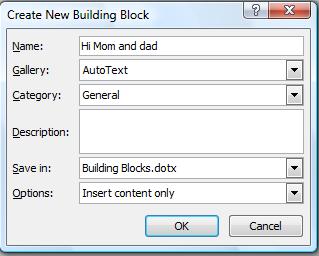 Now, things are changing from prior versions. An extra dialog box confronts you. This dialog box is part of something called building blocks which we will look at after finishing with autotext. It will be part of the catacombs tutorial you will do in a few weeks. To the right is what I have and you can see that I've added Dad to the title although there was no need. Now click okay. Now, we are back to controlling the word processing buffer.
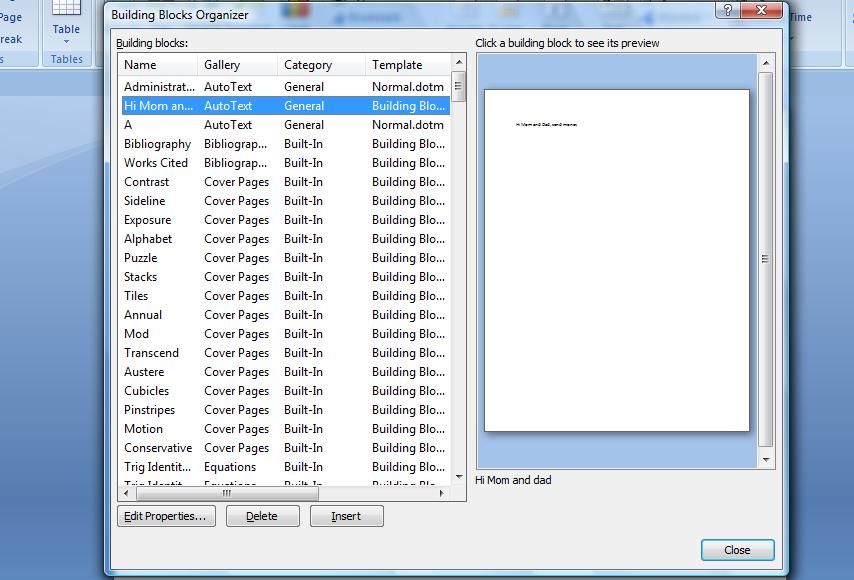

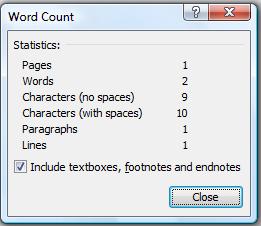 Your system keeps track of what you are doing on a real time basis. At the bottom, right click the Word status bar and you will see a lot of information including word count, line number, etc. Click at words and a table of such info will appear as indicated to the right. We should have 1 paragraph, 1 page, 2 words and a number of characters designated twice with the additional space indicated. While we have hide show on, notice that paragraphs are indicated a backward p's and typed spaces are designated as dots in the middle of the space. This is useful when trying to find out why things are not going to plan.
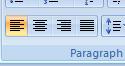 Let's show you some differences here. Move your cursor and click anywhere along your name. Do not highlight any text - we are just talking about a click. Look at the paragraph group. On the second line you will see 4 boxes dealing with justification. Click the third box. What happens. Click the second box, what happens? These are justifications for paragraphs and you have seen this movement. This would work, as it has, with a click on the paragraph or a full highlighting of the paragraph.
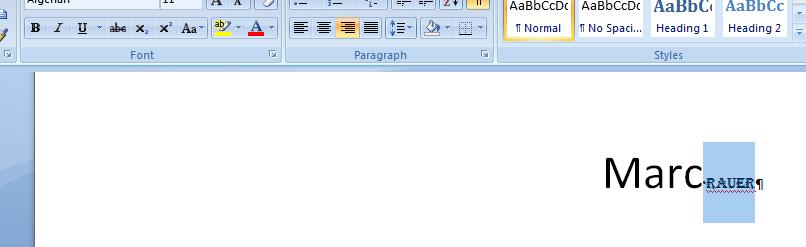


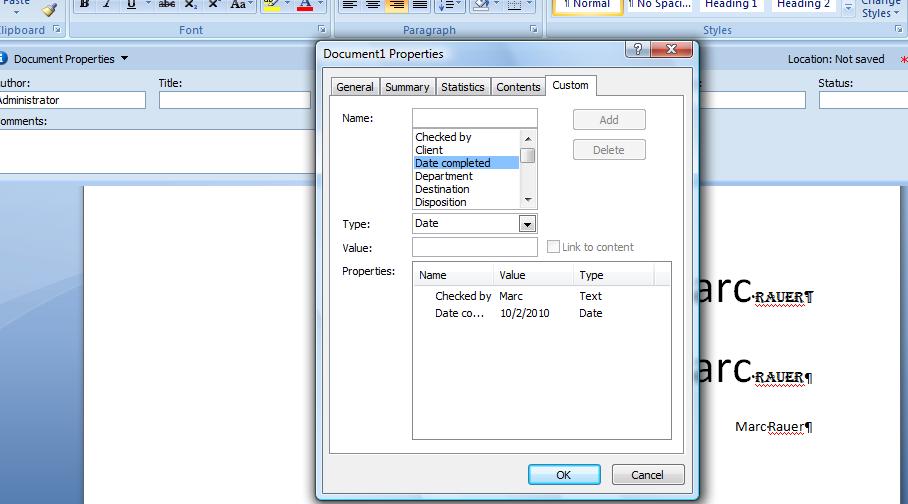


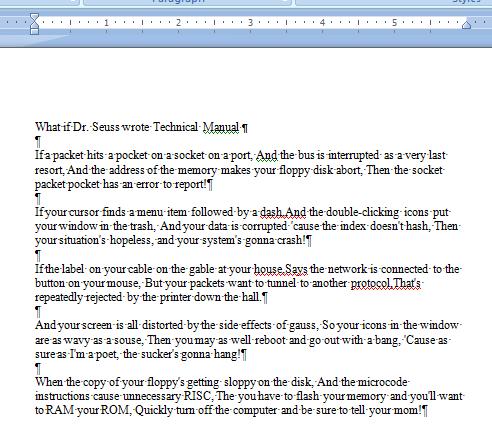 Okay, let's start working on this document. Let's handle the question of real paragraphs. If you include the title, there should be 6 paragraphs. To the right, you will the effects of this "trimming" (and that is the word processing term for this) where we have deleted the paragraph symbols of lines of a paragraph to the end. You can see the form of this for these new paragraphs: margin to margin for each line except the last line which tags on (Now, I'm using a term from parcing dance steps, but I think you understand what we're saying and showing here. Look at this as a whole and you will see that each line on the left starts flush left with the left margin. In addition, the first line (which we had designated as title) is flush top with the top margin. And, speaking of margins, it should be apparent that there are four margins on the page. Appropriately named as top, right, left and bottom. The top and bottom margin contain buffers (you've seen one already) which we will call headers and footers. You can, if you want, determine margins by looking at the page layout tab/margins, but you should be able to determine the margins of this document through the ruler. Its gray space at the beginning and end on the horizontal ruler indicates as such. On the vertical ruler, you would be looking at the top and the bottom. Now, speaking of margins, which Microsoft standard is applied here?
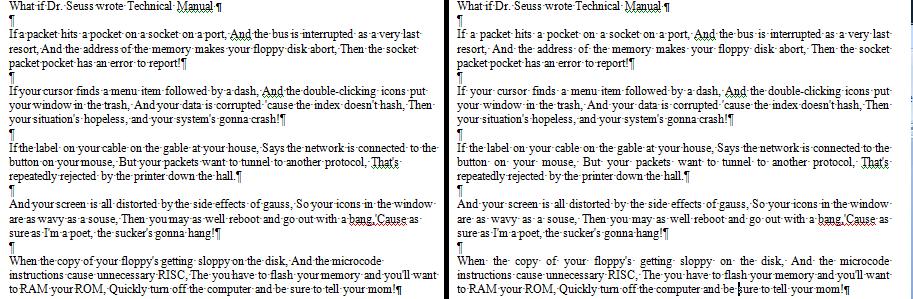

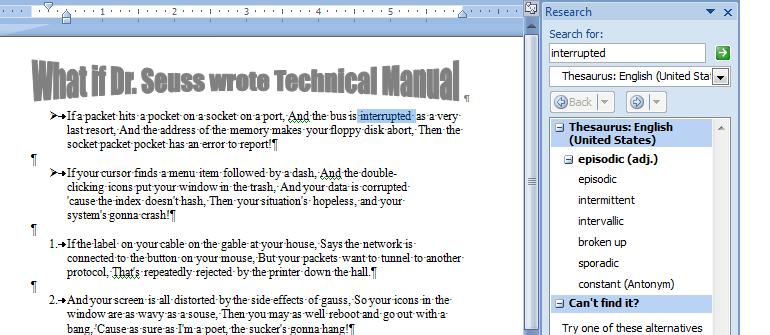
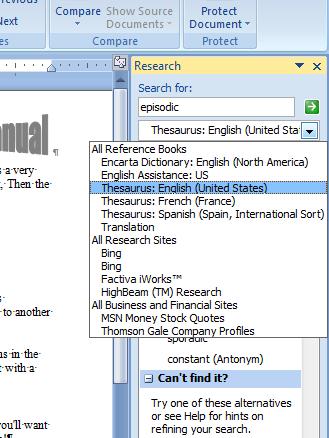 This is the basis of the research capability of Word. The only reason to use this capability is not to have to get out of word to accomplish what you want. To the right is the sources of info allowed on this word version. All of these are Microsoft supplied (or owned) web related sites and some may not even exist anymore.
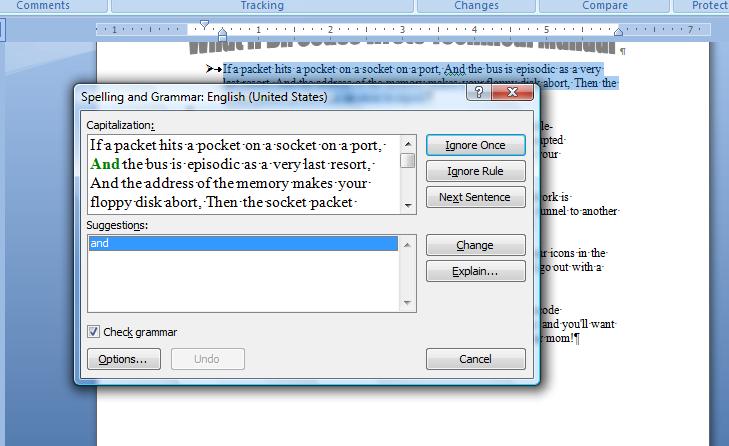
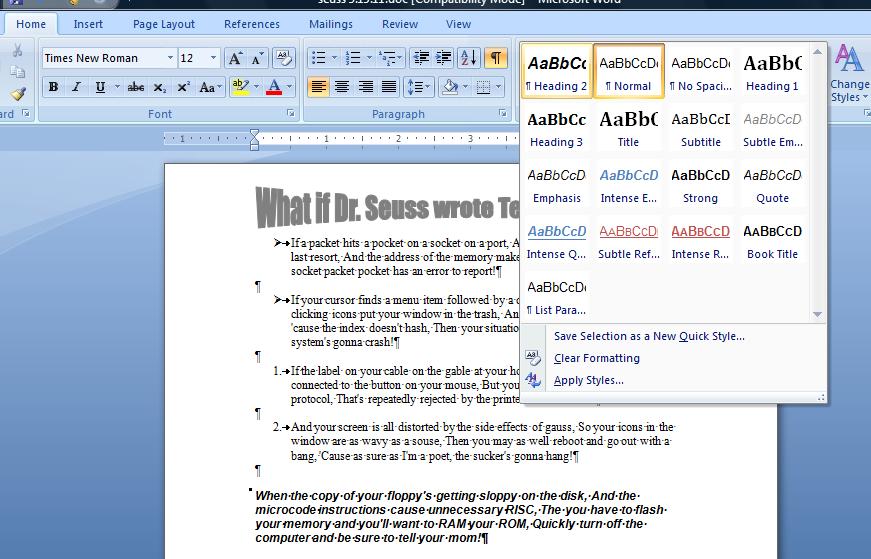
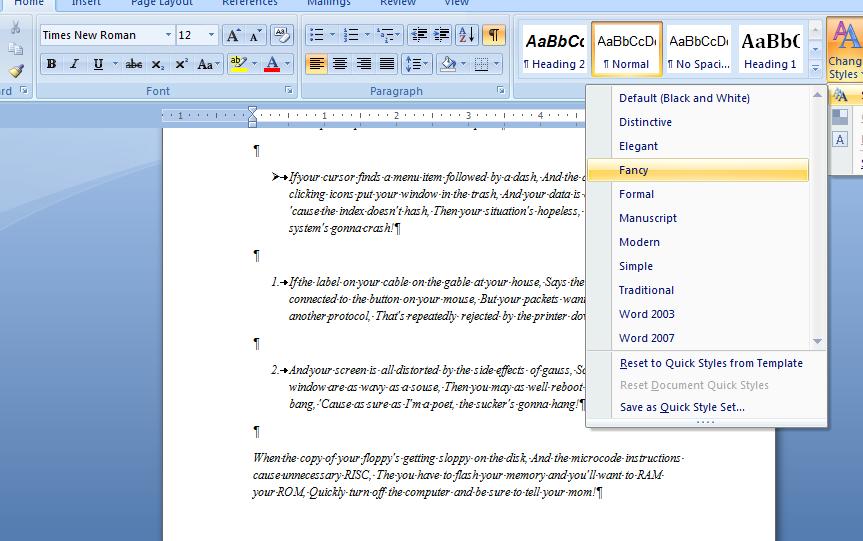

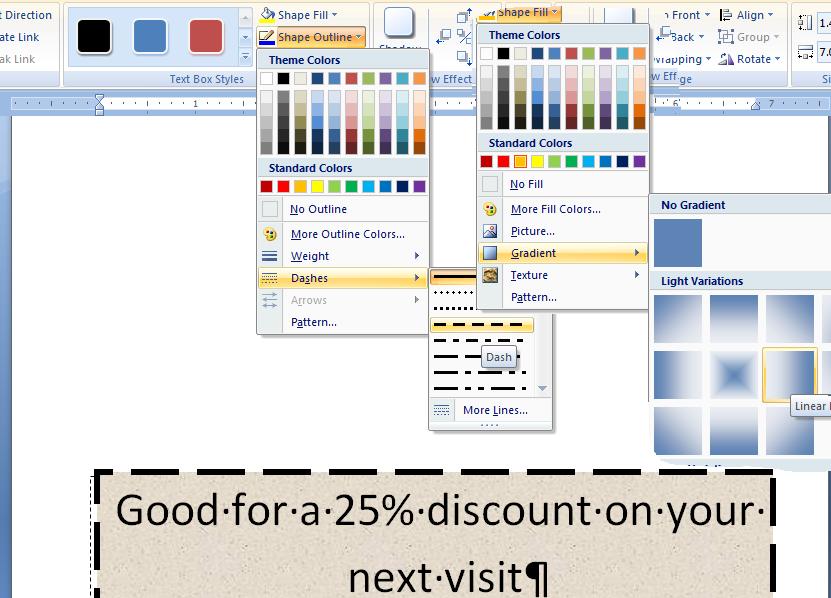
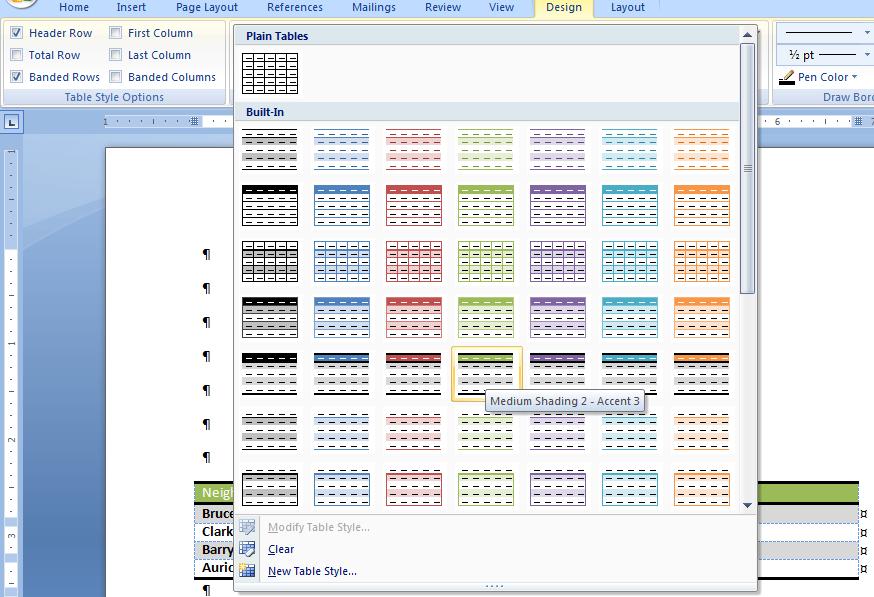

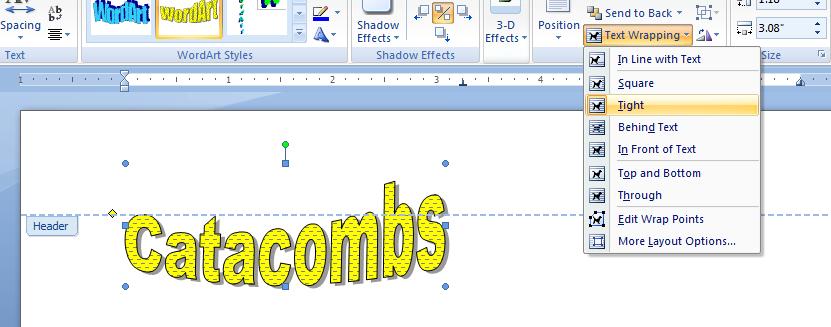
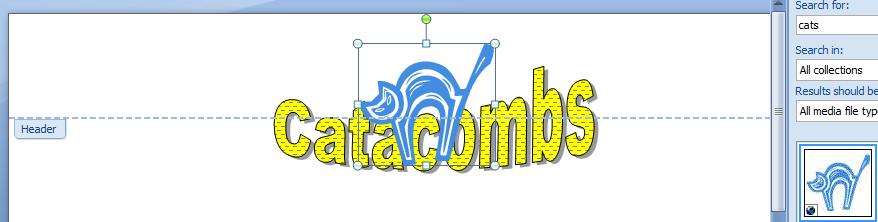
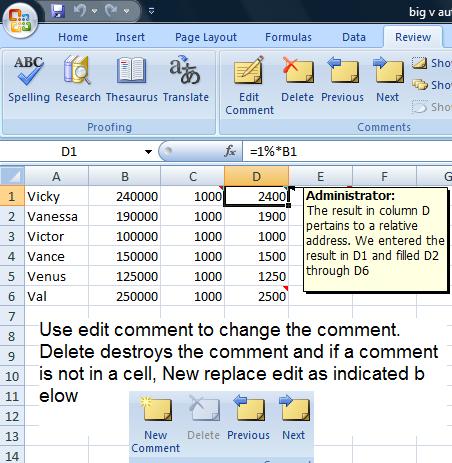 I've added some comments to the cells. Comments have been a feature fo Excel from the 2000 version but this version makes it very easy to use. Notice that a red triangle is placed top right in a cell when a comment is inserted for that cell. The comment is shown when your mouse is over the cell in question. Using add comment, let's put a comment in at A1, where Vicky resides, indicating that we need a header. Also, at A7 below Val indicating a need for a comment to calculate column totals.
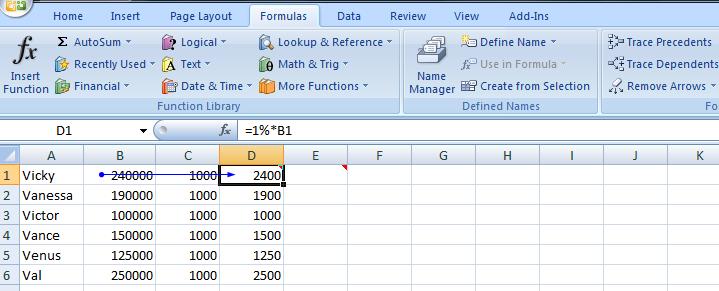


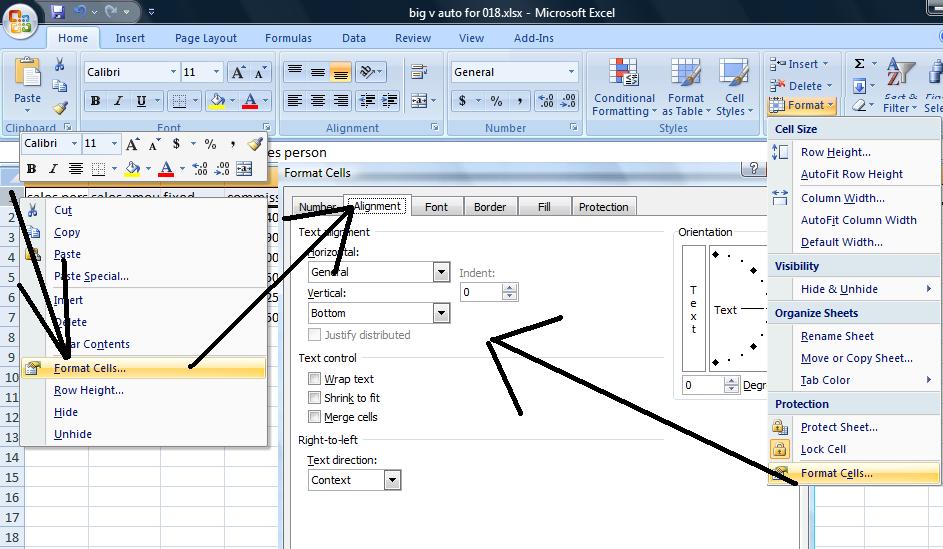
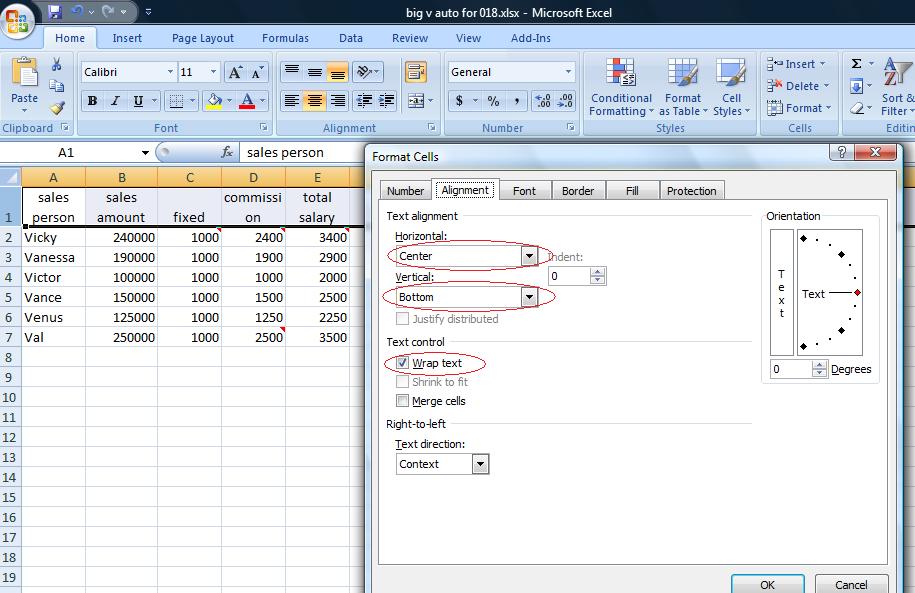
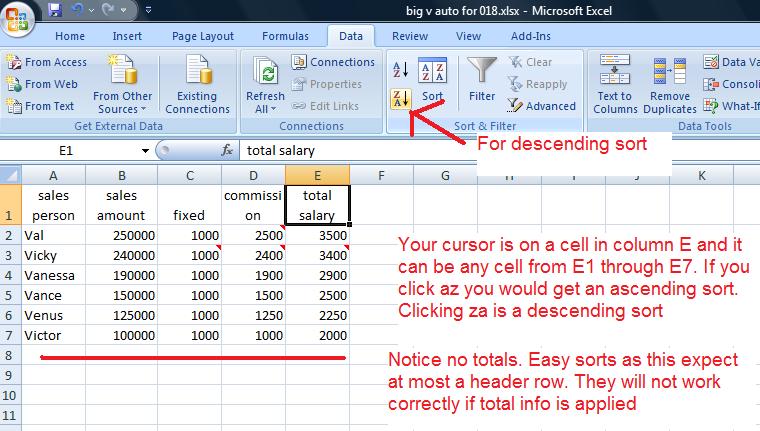
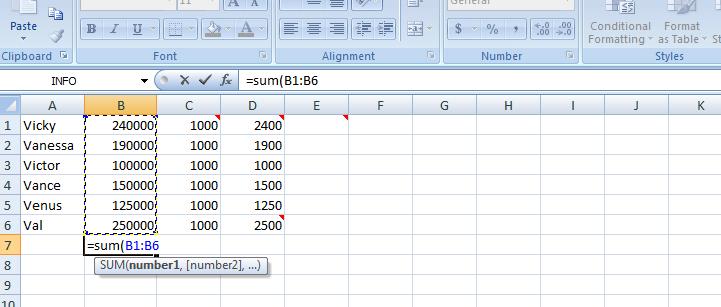
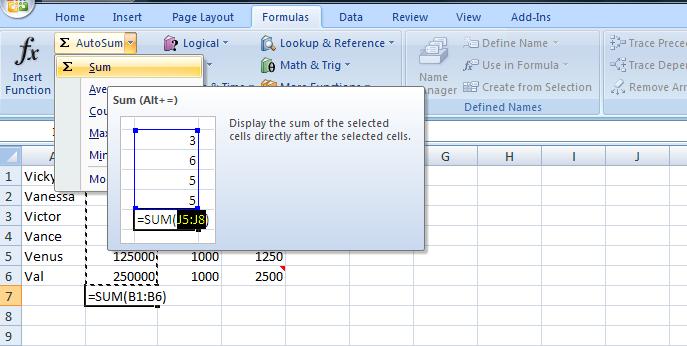
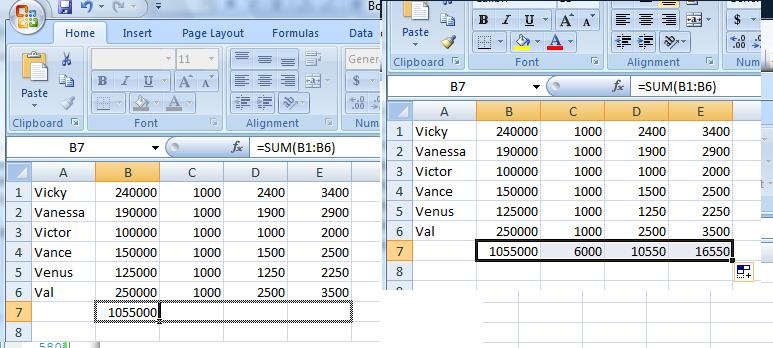
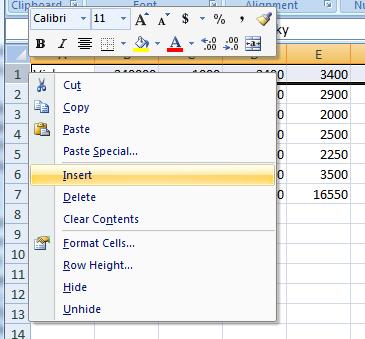 You can insert a row (or column) by clicking the row (or column) where the insertion should be, then clicking your right button of your mouse and clicking insert. In excel operations, you are guaranteed that an insert will not alter data. This does not apply to delte I might add and be aware that it is possible to affect a spreadsheet's data by delete. If this happens, you should immediately undo. Look to the right to see an example of the start of inserting a row.
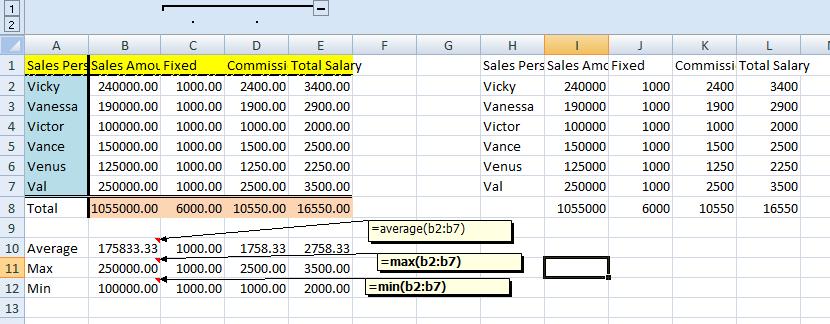
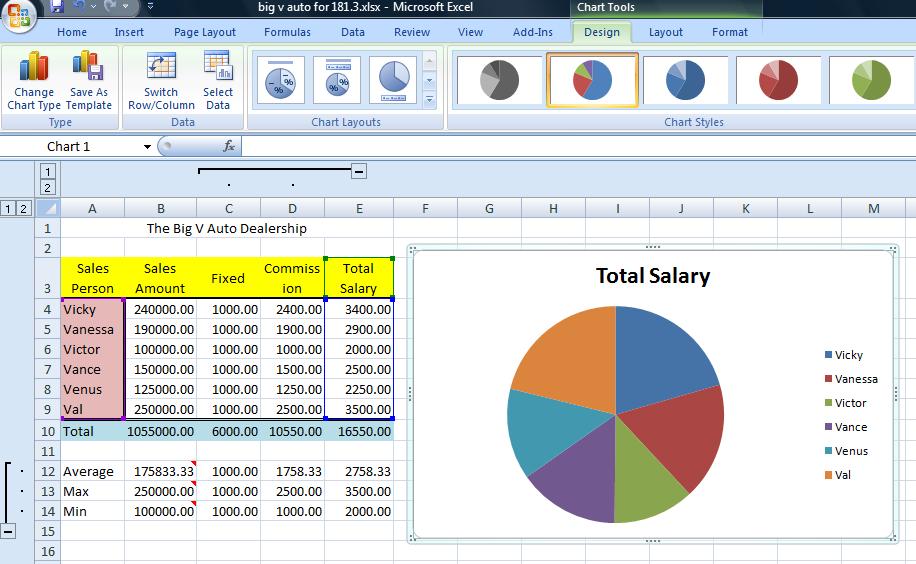

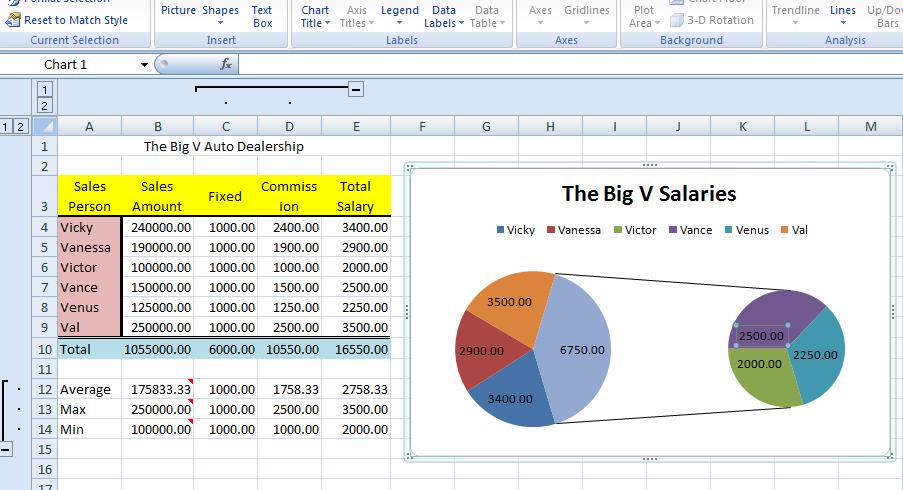

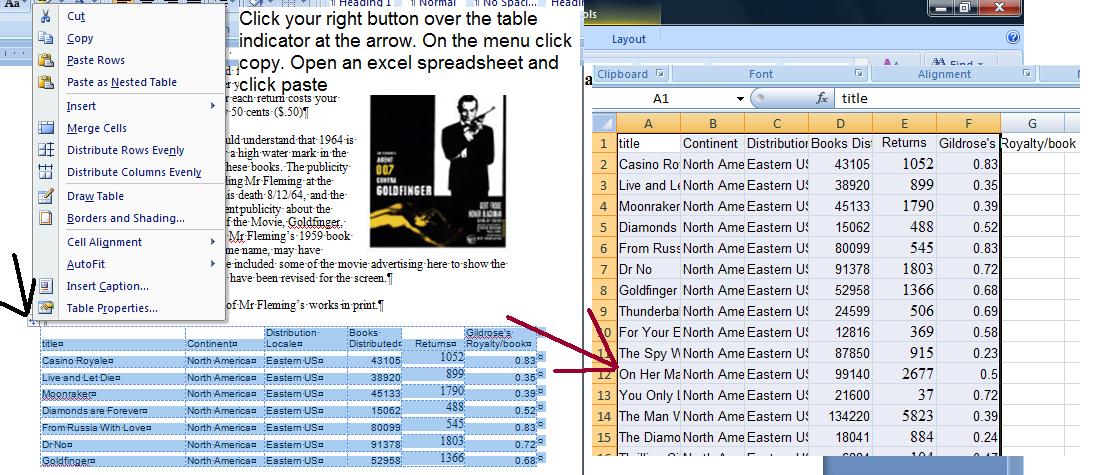
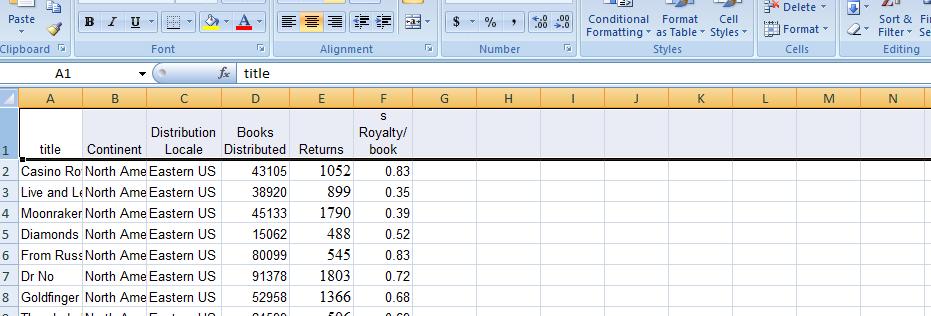
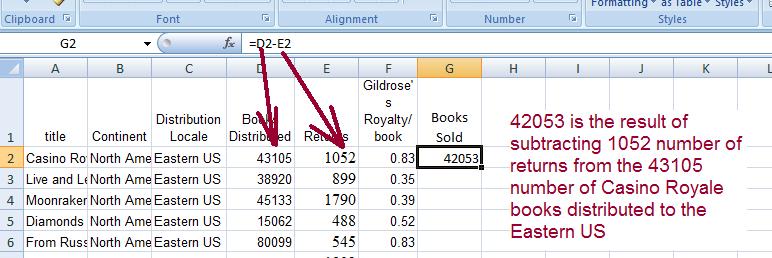
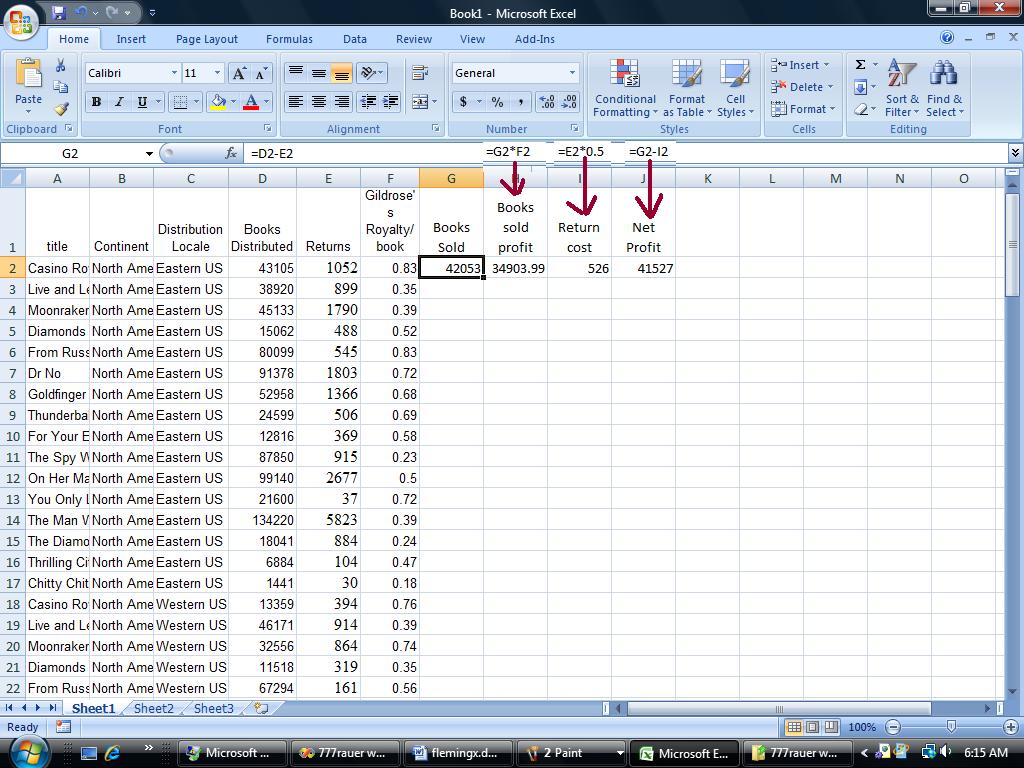
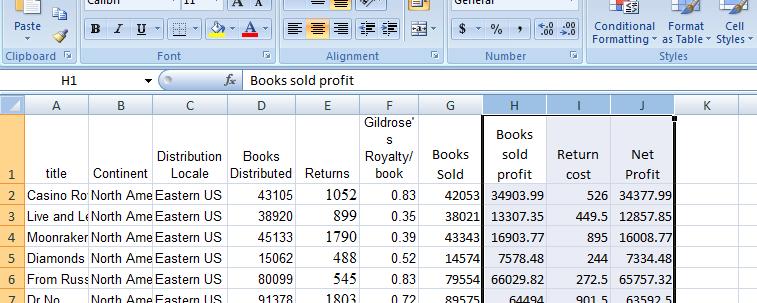
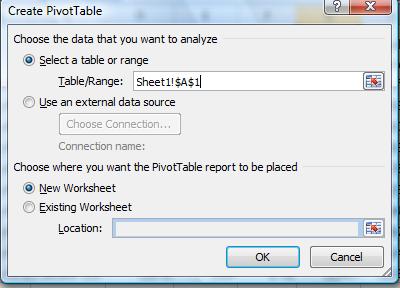 Pivot tables are an extension of a database technique designated as cross tabulation. This is one of three ways to resolve this problem and in the CIS103 class we do this problem using subtotals, then pivot tables and then using the new table construct with pivot tables. For our class, we will only do pivot tables. All ways of solutions have their own pluses and minuses. In the case of pivot tables, every column of the pivot table must have a header, preferable unique. This grinds to a halt is a column is not titled so notice we have done this in this problem by setting column headers for the new columns we have been calculating
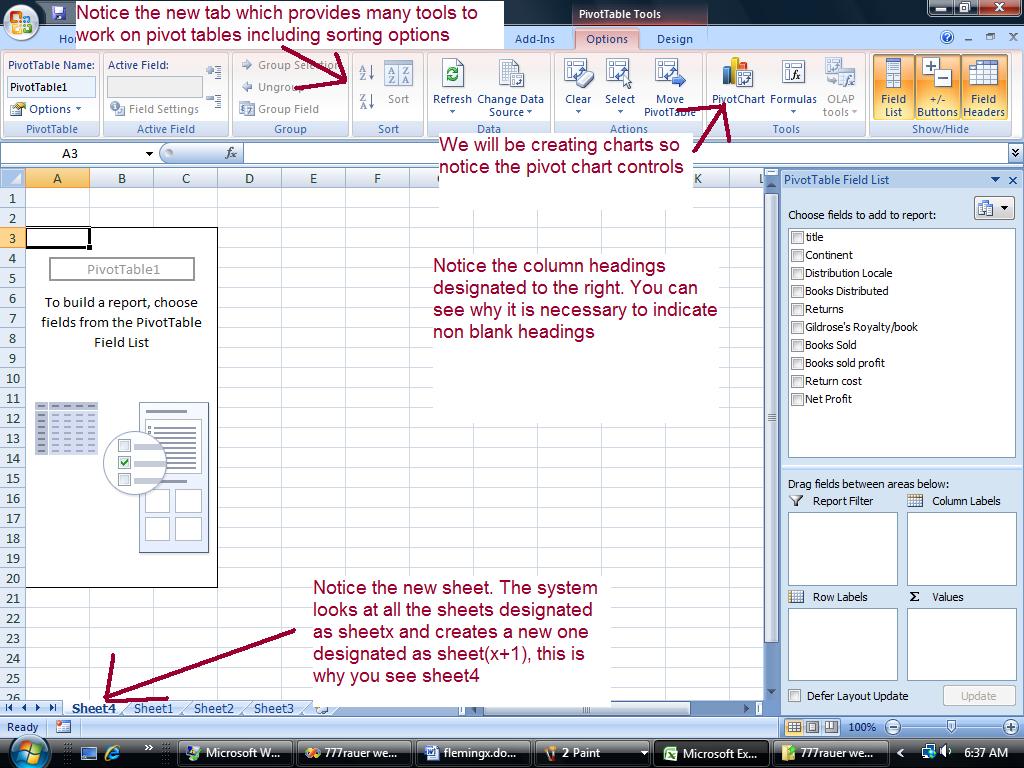
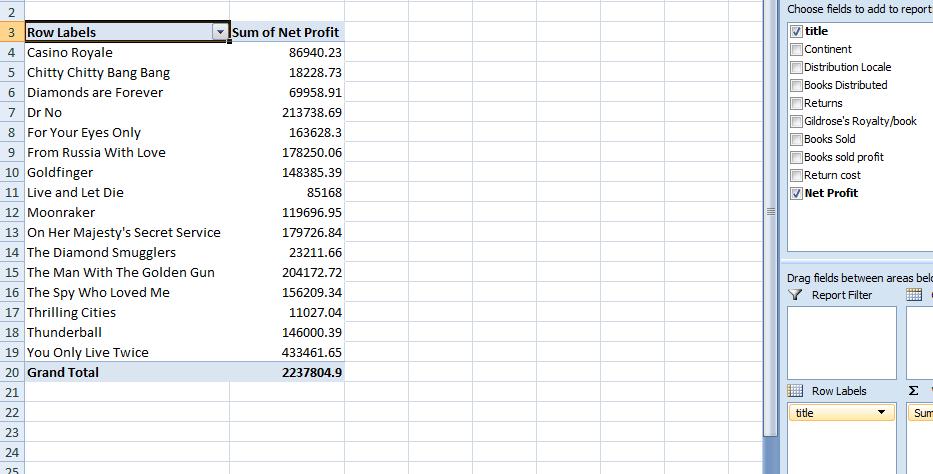
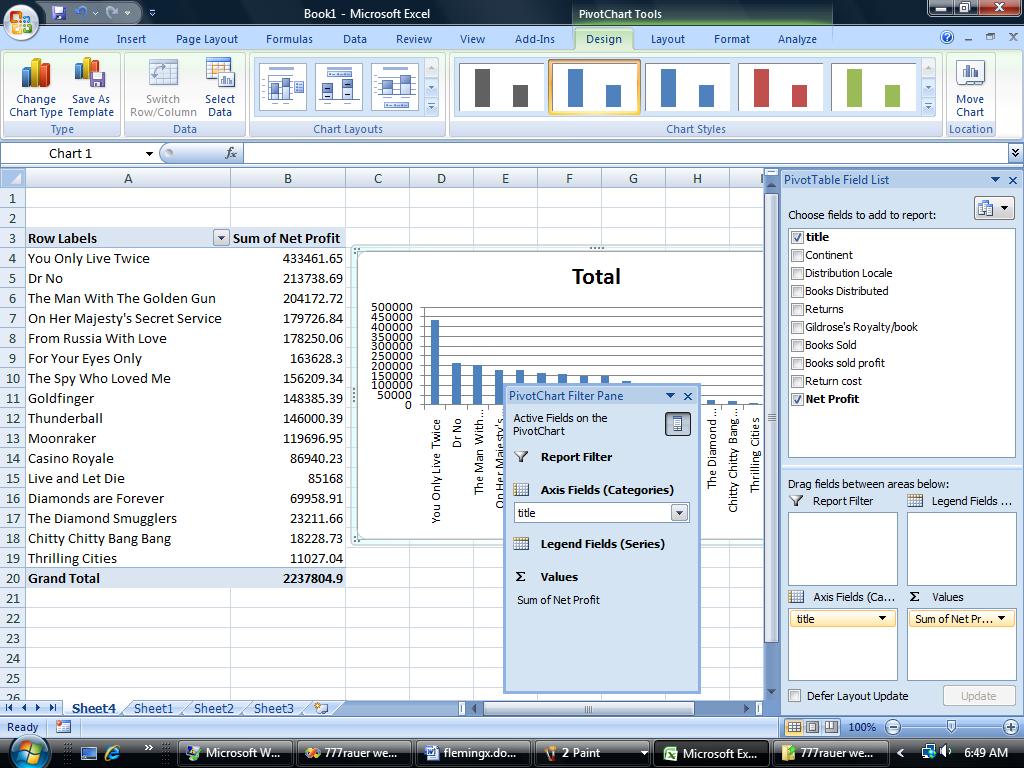
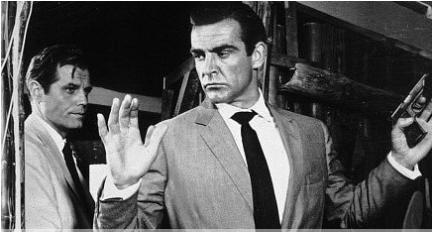